• Post Reply Bookmark Topic Watch Topic
  • New Topic
permaculture forums growies critters building homesteading energy monies kitchen purity ungarbage community wilderness fiber arts art permaculture artisans regional education skip experiences global resources cider press projects digital market permies.com pie forums private forums all forums
this forum made possible by our volunteer staff, including ...
master stewards:
  • Carla Burke
  • John F Dean
  • Timothy Norton
  • Nancy Reading
  • r ranson
  • Jay Angler
  • Pearl Sutton
stewards:
  • paul wheaton
  • Tereza Okava
  • Andrés Bernal
master gardeners:
  • Christopher Weeks
gardeners:
  • Jeremy VanGelder
  • M Ljin
  • Matt McSpadden

Traditional woodwork tutorials / plans online or in a book

 
pollinator
Posts: 1495
860
2
trees bike woodworking
  • Likes 2
  • Mark post as helpful
  • send pies
    Number of slices to send:
    Optional 'thank-you' note:
  • Quote
  • Report post to moderator
I’m planning and working on my Straw Dimensional Lumber PEP badge and beyond - I’ve finally found a local lumber yard. I’d really like to make a bookcase with sliding dovetail joints, where the shelves slot into the uprights. There’s no need for glue, nails or screws and the result is quite elegant


Here’s a project example https://www.popularwoodworking.com/projects/dovetailed-bookcase/

It uses a router to cut the slot and the tapered dovetails with the help of some jigs. I’d like to make it without using a router, but can’t find any examples of a sliding dovetail that doesn’t use power towels. Does anyone know of a source for traditional tutorials or examples that doesn’t involve youtube, (unless you know of an awesome no BS, living in the real world series). Most of my woodwork to date has been ‘construction’ standard outdoor projects with powertools where precision wasn’t a high requirement. I have made traditional joints before, but that was taking classes at school. Thanks
 
steward
Posts: 17469
Location: USDA Zone 8a
4464
dog hunting food preservation cooking bee greening the desert
  • Likes 1
  • Mark post as helpful
  • send pies
    Number of slices to send:
    Optional 'thank-you' note:
  • Quote
  • Report post to moderator
Maybe will help, uses a chisel and it is a box rather than a bookcase:

https://www.ashleygrenon.com/2017/03/building-dovetail-box-hand-cut-joinery/

 
Edward Norton
pollinator
Posts: 1495
860
2
trees bike woodworking
  • Likes 1
  • Mark post as helpful
  • send pies
    Number of slices to send:
    Optional 'thank-you' note:
  • Quote
  • Report post to moderator
Thanks Anne - great tutorial for regular dovetails - bookmarked for future. I see they still use a router for the lid!

I’ve done some more digging around. The sliding dovetail requires a long channel, somewhere around 12 inches for my plan. From what I can gather, this is cut at 8 degrees by hand and then chiselled out. The shelf end can also be cut with a fine tooth saw. There’s a type of plane for doing this but wouldn’t work across the grain.
 
gardener
Posts: 1876
Location: Japan, zone 9a/b, annual rainfall 2550mm, avg temp 1.5-32 C
956
2
kids home care trees cooking bike woodworking ungarbage
  • Likes 3
  • Mark post as helpful
  • send pies
    Number of slices to send:
    Optional 'thank-you' note:
  • Quote
  • Report post to moderator
You will probably want a router plane to do those sliding dovetails (or other long slots/trenches/mortises). Paul Sellers shows how to make a poor man router plane in one of his videos... There are some tutorials on making one from a hex wrench. I think you could probably find a used one cheap in the US or the UK.

It's possible to do without, but it will be MUCH easier if you have one. Maintaining the absolute depth without a router plane is really challenging because you don't have an outside point of reference other than the one lip if it's half-blind or (two lips) if it's fully open.

I do not have a router plane yet... and I suffer for it in almost every joinery project I do.
 
gardener
Posts: 586
Location: Pembrokeshire, UK
437
2
dog forest garden gear fungi foraging trees building medical herbs woodworking homestead
  • Mark post as helpful
  • send pies
    Number of slices to send:
    Optional 'thank-you' note:
  • Quote
  • Report post to moderator
There are a pair of tutorials here for making a very nice router plane. As L. Johnson mentions, there are also plenty of tutorials for making fast + cheap router planes using an Allen/hex key, just be sure that you key you use is made of hardened/hardenable steel.

 
Edward Norton
pollinator
Posts: 1495
860
2
trees bike woodworking
  • Mark post as helpful
  • send pies
    Number of slices to send:
    Optional 'thank-you' note:
  • Quote
  • Report post to moderator

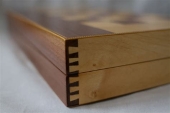
L. Johnson wrote:You will probably want a router plane to do those sliding dovetails (or other long slots/trenches/mortises). Paul Sellers shows how to make a poor man router plane in one of his videos... There are some tutorials on making one from a hex wrench. I think you could probably find a used one cheap in the US or the UK.

It's possible to do without, but it will be MUCH easier if you have one. Maintaining the absolute depth without a router plane is really challenging because you don't have an outside point of reference other than the one lip if it's half-blind or (two lips) if it's fully open.

I do not have a router plane yet... and I suffer for it in almost every joinery project I do.


Interesting. I’ve seen a couple of Paul Sellers videos and I like what I see. He reminds me of my school woodwork teacher. I’ll see if the salvage guy I know has one in his Alladin’s cave. I promised myself I wouldn’t visit until I’d restored all the tools I picked up last time, there are too many tempting items.
 
L. Johnson
gardener
Posts: 1876
Location: Japan, zone 9a/b, annual rainfall 2550mm, avg temp 1.5-32 C
956
2
kids home care trees cooking bike woodworking ungarbage
  • Likes 1
  • Mark post as helpful
  • send pies
    Number of slices to send:
    Optional 'thank-you' note:
  • Quote
  • Report post to moderator
For what it's worth i learned about 70% of my dimensional woodworking from Paul Sellars YouTube videos, 25% from doing it after watching, and 5% from various and sundry other sources including some lovely members from Permies.

 
Edward Norton
pollinator
Posts: 1495
860
2
trees bike woodworking
  • Mark post as helpful
  • send pies
    Number of slices to send:
    Optional 'thank-you' note:
  • Quote
  • Report post to moderator
That’s good to know - I was getting despondent looking through youtube where even the so called ‘traditionalists’ use powertools. I do have one exception -

Ishitani Furniture - Japanese furniture maker who uses some impressive power-tools in a zen like manner.

You might like this guy

Dylan Iwakuni - very traditional Japanese joinery
 
gardener
Posts: 3132
2095
  • Mark post as helpful
  • send pies
    Number of slices to send:
    Optional 'thank-you' note:
  • Quote
  • Report post to moderator
Now that you mention it, I don't recall seeing an antique plane for doing such dovetails, nor can I recall having seen any antique furniture with them, either. I'm guessing it probably just wasn't done much back then because there were easier ways to go about it. Or maybe it was just too fancy for my area! Even as late as the day of combination planes like the Stanley 45, 46, 55, etc., I don't recall seeing any cutters that would do the job. Maybe some creative use of standard cutters or custom cutters could work. The tennon part could easily be done, but the dado part is another story.

Without fancy tools, I would say if you want a challenge and have the time to spare, you could do it with a small backed saw of some sort and a chisel. You could cut the angle on the end of a board and clamp it to the workpiece to use as a guide for the saw. You could mark the desired depth on the sawblade with a marker to keep things even. Then carefully chisel out the center. Better than a chisel would be a plow plane or router plane, but a sharp chisel and patience should do.
 
pollinator
Posts: 353
Location: 2300' elev., southern oregon
114
forest garden fungi foraging trees food preservation cooking building solar woodworking wood heat homestead
  • Mark post as helpful
  • send pies
    Number of slices to send:
    Optional 'thank-you' note:
  • Quote
  • Report post to moderator
Howdy,

I am into using antique wood working tools, chisels, gouges, etc., and I have one of these combination planes with a full set of blades. And it does work for a variety different "set-ups". The real trick is SHARP, SHARP, SHARP!
IMG_3095.JPG
combination plane w/blades
IMG_3094.JPG
[Thumbnail for IMG_3094.JPG]
IMG_3093.JPG
[Thumbnail for IMG_3093.JPG]
 
L. Johnson
gardener
Posts: 1876
Location: Japan, zone 9a/b, annual rainfall 2550mm, avg temp 1.5-32 C
956
2
kids home care trees cooking bike woodworking ungarbage
  • Mark post as helpful
  • send pies
    Number of slices to send:
    Optional 'thank-you' note:
  • Quote
  • Report post to moderator
I like to plan allowances for mistakes and misjudgements in my joinery. So I offer some thoughts regarding the joinery on this shelf (in absence of plans or tutorials)

Regarding the sliding dovetails. If you accidentally make them too loose, they can slide when you don't want them to. If you have no intentions of having this shelf (dis)assemble-able, then you could stop it (even if your sliding dovetail is a little loose) by putting in a few wooden nails/pins to hold it in a couple places on each side. These can be very small and almost disappear except against close inspection. The basic method is to drill a small round hole, and tap in a square profiled length of wood slightly wider than the hole diameter. The friction from the edges compressing against the round hole stops it from moving.

If I want it a joint to be (dis)assemble-able I usually use tusked tenons. They are tenons that go through to the outside and sit proud, and have a little room for a wedge shaped "tusk" that closes the joint mechanically and locks it in place. If you want to remove the joint you can knock the tusk out and take it apart easy as pie. The downside is you have the tusk and tenon sticking out proud from the outside of the shelf. It can look beautiful, but it can also get in the way.
 
Could you hold this kitten for a sec? I need to adjust this tiny ad:
Learn Permaculture through a little hard work
https://wheaton-labs.com/bootcamp
reply
    Bookmark Topic Watch Topic
  • New Topic