• Post Reply Bookmark Topic Watch Topic
  • New Topic
permaculture forums growies critters building homesteading energy monies kitchen purity ungarbage community wilderness fiber arts art permaculture artisans regional education skip experiences global resources cider press projects digital market permies.com pie forums private forums all forums
this forum made possible by our volunteer staff, including ...
master stewards:
  • Nancy Reading
  • Carla Burke
  • r ranson
  • John F Dean
  • paul wheaton
  • Pearl Sutton
stewards:
  • Jay Angler
  • Liv Smith
  • Leigh Tate
master gardeners:
  • Christopher Weeks
  • Timothy Norton
gardeners:
  • thomas rubino
  • Jeremy VanGelder
  • Maieshe Ljin

Making a paper clay dollhouse/castle

 
steward
Posts: 21553
Location: Pacific Northwest
12040
11
hugelkultur kids cat duck forest garden foraging fiber arts sheep wood heat homestead
  • Likes 1
  • Mark post as helpful
  • send pies
    Number of slices to send:
    Optional 'thank-you' note:
  • Quote
  • Report post to moderator

Pearl Sutton wrote:
I build a LOT with cardboard, and when you are ready for an addition, tell me and I'll give you some hints for structure. You are wanting a turret, to make cardboard into a tube: cut a big rectangle with the ribs going up and down, as high as you want the tower, and as wide as the diameter of the tower times pi (3.14) cut through only the TOP SKIN of the cardboard, in the crack of the ribs, all the way from top to bottom, do this about every 2 inches all the way across. Roll it carefully, with the cut sides out, and it will bend on your cuts, but not break. If you want it to be REALLY sturdy, do a second one that is a bit bigger, and make it double thick by putting the small one inside the bigger one. Glue them together well, tape the joints tight, cut windows before you hook them together! This will be strong enough to hold your rock work looking mixture up. Tell me if you need pictures,  I can take you some. For what it's worth, to get cardboard to do what you want, you score it (cut it partway, but not all the way through with a knife, and it will fold along those lines neatly. The ribs run exact distances apart, and are straight and parallel, so it's easy to use them as a grid to keep it all square and neat.


Thank you! I was wondering how to do this. I think I understand what you're saying, but pictures would be really helpful!

Pearl wrote:
I'm a big fan of slot and tab work with cardboard, that's a whole post of it's own.  I have something I wrote elsewhere I'll put in a sec.  I have built a lot of castles out of cardboard and plywood, and been paid to build a plywood one that folded up for storage, had to be engineered against 50 MPH winds and 12 year old boys (after they are 12, there's no engineering against them, I didn't try.)  That's a post in itself too, and I don't want to derail yours, I'll start a new thread someplace and link here, so yours doesn't get derailed. Edit: New thread: Pearl's Castles and other old projects

AWESOME WORK NICOLE!!  


Thank you, Pearl! Somehow I'd figured you'd made castles before -- You're the best! I'm going to go visit your castle thread right now!
 
steward & bricolagier
Posts: 14667
Location: SW Missouri
10103
2
goat cat fungi books chicken earthworks food preservation cooking building homestead ungarbage
  • Likes 8
  • Mark post as helpful
  • send pies
    Number of slices to send:
    Optional 'thank-you' note:
  • Quote
  • Report post to moderator
Pictures of how to abuse cardboard::
About to get cut along this hard to see line, in between the ribs. Cut only the top layer of paper.


Getting cut along the line. I don't mark them often, the ridges are generally clear enough to see. Run the end of the cutter along it and it will make the ridges show up well if they aren't.


After cutting a bunch of 2 inch apart lines, all in the cracks of the ridge, fold each one slightly till it makes a POP noise, then roll the whole thing gently.


I't ll look like this from the end. This is pretty stable as is. Add a second layer done just the same (a hair bigger) to it and that is VERY solid., and you will have no trouble with it not holding up the weight of your paste stuff.  


You can score and snap any cuts, makes them straight and clean (use a ruler if you have to, doesn't work well with curves) and only through the top, and you can fold any cardboard cleanly. This is a random victim box, I'm about to cut a diagonal on it to fold it.


And snap it neatly.


You can make any straight solid out of cardboard easily this way. A full ball is hard, most other things are easy if you cut them well. Don't cut through the cardboard! Practice on a victim before you cut your project. It's a light, firm touch, takes a bit to get good at it.

:D
 
Nicole Alderman
steward
Posts: 21553
Location: Pacific Northwest
12040
11
hugelkultur kids cat duck forest garden foraging fiber arts sheep wood heat homestead
  • Mark post as helpful
  • send pies
    Number of slices to send:
    Optional 'thank-you' note:
  • Quote
  • Report post to moderator
Very nice! That sure beats what I did, which was to sort of form a tube out of packaging paper and then tape it to half circles to get my shape. My turret is rather lopsided fanciful because of it.

Any tips on how to make the pointy roof for the turret?
 
Pearl Sutton
steward & bricolagier
Posts: 14667
Location: SW Missouri
10103
2
goat cat fungi books chicken earthworks food preservation cooking building homestead ungarbage
  • Likes 1
  • Mark post as helpful
  • send pies
    Number of slices to send:
    Optional 'thank-you' note:
  • Quote
  • Report post to moderator

Nicole Alderman wrote:Very nice! That sure beats what I did, which was to sort of form a tube out of packaging paper and then tape it to half circles to get my shape. My turret is rather lopsided fanciful because of it.

Any tips on how to make the pointy roof for the turret?


Yup. let me draw it in a bit. I need to make dinner.
 
pollinator
Posts: 969
Location: Greybull WY north central WY zone 4 bordering on 3
284
hugelkultur trees solar woodworking composting homestead
  • Likes 5
  • Mark post as helpful
  • send pies
    Number of slices to send:
    Optional 'thank-you' note:
  • Quote
  • Report post to moderator
Good start.  There are a huge number of tricks to learn.  I grew up doing models in cardboard, paper sacks and elmers glue.  I did model airplanes with complex 3 dimensional curves by simply layering multiple layers of little pieces of cardboard.  If doing a lot standard flour glue and newspaper mache.

Will start with a whole list of other things.

1.  Source of cardboard in big pieces.  Appliance boxes are already listed but there are many others.  Best for big building is radiator boxes.  Cardboard is often 2 or 3 layers thick.  Local radiator shop or truck, construction or ag equipment repair places.  Another source is windshield boxes.  Your local body shop is a good source here.  Another is anyplace that does bagged materials on pallets.(concrete, bentonite, bagged animal feeds and salts etc(be sure to avoid cardboard from treated seed))  They often have pallet sized separator cardboards and in some cases 1/4 ply wood or masonite or waferwood separators.

2.  heavy cardboard tubes.  Flooring places often have heavy wall  tubes.  Another source is farmers doing netwrap round bales during haying season.

3.  When building walls etc you will find normal cardboard is only bend resistant one direction.  You can help solve this by making gluing two or more sheets together with the grain turned 90 degrees.  If you want it stronger still an old cotton bedsheet scrap laminated on or in with glue will make it stronger still.

4.  For building small, matchsticks and flat tooth picks are incredibly easy to use and not hugely expensive.

5.  To do clear windows scraps of clear plastic work.  Juice bottles, shirt collar plastics, pop bottles etc.

6.  If you are doing much of this you will want to cobble together a bending brake to get good clean bends in the cardboard.  A table with a square edge and 2 scrap boards and 2 c clamps is idea.  Clamp the cardboard between one of your boards and the table top.  Then push down in a bending motion with your other board.

7.  When cutting and scoring a good metal ruler or yardstick is advantageous to cut along.(this is way easier with 2 people one to hold the straight edge and the other to make the cut.)

8.  You want to protect it with good paint or some sort of waterproof clear coating like varnish, artists matt coat or decoupage glue.

9.  If you want to learn tricks for making details suggest watching model railroader videos on youtube.  They have a whole lot of neat tricks.
 
Pearl Sutton
steward & bricolagier
Posts: 14667
Location: SW Missouri
10103
2
goat cat fungi books chicken earthworks food preservation cooking building homestead ungarbage
  • Likes 5
  • Mark post as helpful
  • send pies
    Number of slices to send:
    Optional 'thank-you' note:
  • Quote
  • Report post to moderator
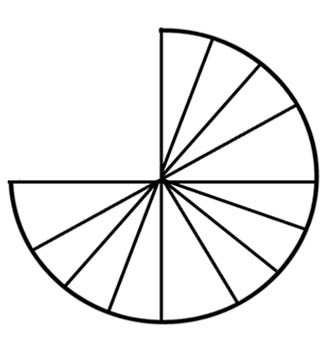
Nicole: I'd make tower roof caps like this: using heavy paper (poster board or cereal box) cut like this and hook the edges together.


Not very heavy duty though, to make it safer for dolls to bounce on the roof, make it out of cardboard.


Cut out the circle with a bite out shape. then score (not all the way through) all the radial cuts and snap them carefully. curl it up sort of like the cardboard tube I made in the last set of pictures, ends up an angled cone, hook the edges together. I think it needs shingles! I love your brown paper floor, would make cool shingles too!
 
Nicole Alderman
steward
Posts: 21553
Location: Pacific Northwest
12040
11
hugelkultur kids cat duck forest garden foraging fiber arts sheep wood heat homestead
  • Likes 9
  • Mark post as helpful
  • send pies
    Number of slices to send:
    Optional 'thank-you' note:
  • Quote
  • Report post to moderator
I got the blue up today! (The kids wanted a blue room because they still sing the songs my husband made up, mentioned in this thread). I ended up using the white printer paper that my kids had scribbled on for the blue. This actually worked out pretty well. Unlike the TP, I have to rip it up before mixing with water to get it to break down. But, It actually breaks down--unlike paper towel! I then added a bit of blue food coloring to the paper clay and kneaded it a bunch.

I had to get creative with sources for the paper clay, as I'd already used at least 6 rolls of toilet paper on this house. One roll of TP does pretty much two walls--so you need a lot if you're making it just out of TP!
blue-and-pink-rooms.jpg
The blue room is done, and I got the ceiling part way done. Yay!
blue-and-pink-rooms-decorated.jpg
castle decorated with waldorf pipecleaner dolls
Even though the paper clay isn't done, I had to have fun decorating them! :D
waldorf-family-dolls-in-castle.jpg
I don't think I ever showed that I paper mached the middle wall when I did the floor.
 
steward
Posts: 12433
Location: Pacific Wet Coast
6996
duck books chicken cooking food preservation ungarbage
  • Likes 3
  • Mark post as helpful
  • send pies
    Number of slices to send:
    Optional 'thank-you' note:
  • Quote
  • Report post to moderator
It occurs to me that your son should be returning to school soon. So the teacher asks him, "What did you do on the Holidays?" and your son replies, "I helped my mom build a new house." It's so great knowing I wasn't the only mom doing "interesting" things with my children!

I like the "blue" room, and the book shelf covers the secret door nicely!
 
Posts: 672
Location: cache county idaho
102
4
duck forest garden fish fungi trees food preservation bee woodworking
  • Mark post as helpful
  • send pies
    Number of slices to send:
    Optional 'thank-you' note:
  • Quote
  • Report post to moderator
GingerBread!  She could even put a witch inside it for her kid dolls to outfox!
 
Nicole Alderman
steward
Posts: 21553
Location: Pacific Northwest
12040
11
hugelkultur kids cat duck forest garden foraging fiber arts sheep wood heat homestead
  • Likes 14
  • Mark post as helpful
  • send pies
    Number of slices to send:
    Optional 'thank-you' note:
  • Quote
  • Report post to moderator
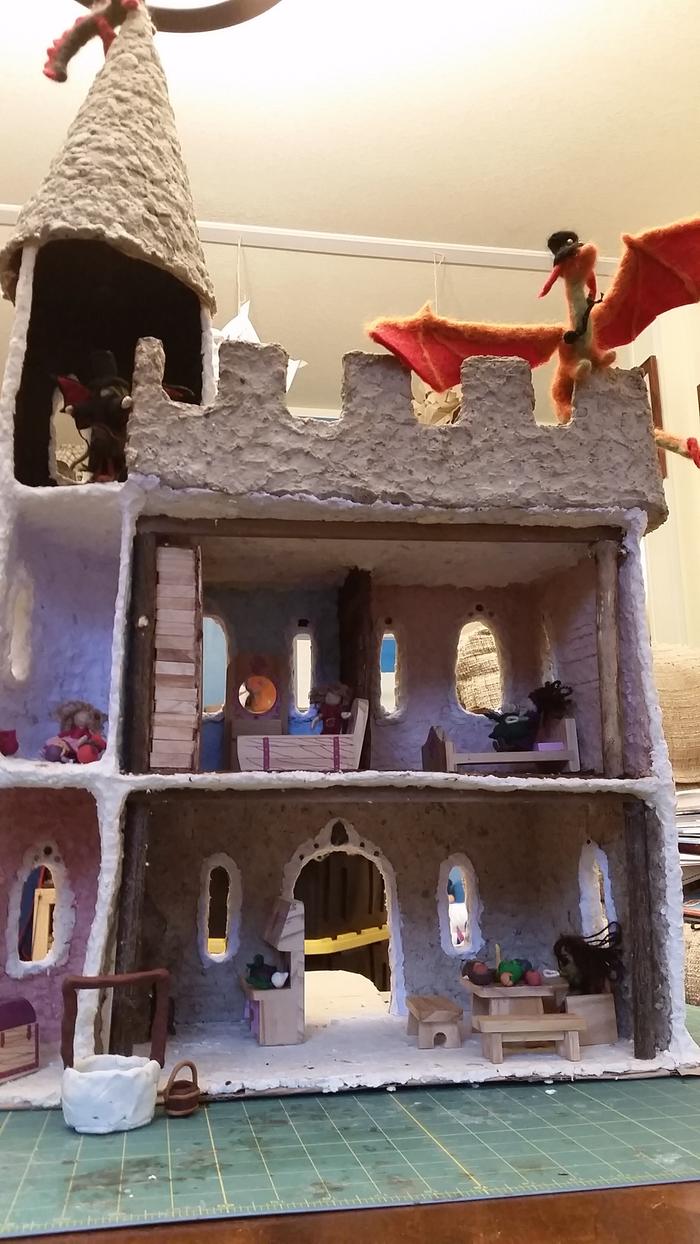
It's almost entirely done! I just need to find big enough cardboard to make the turret! I got the ceilings done, and added more white trim and did little touch-ups with white everywhere it needed it.
Inside-of-finished-castle-.jpg
paper clay castle with blue, grey, pink and white walls
Here's the inside! I added white trim to the lower floor, and I think it really helped.
outside-of-finished-castle.jpg
cardboard castle with white trim, grey walls, and gemstones
More white trim on the front really made the jewels pop!
angled-view-of-castle-turret.jpg
doll house castle with white turret
The white on the front also seems to have helped it match the turret better.
other-side-of-castle.jpg
cardboard and paper clay castle
Last side of the castle--complete with some white trim to pull it all together.
 
steward
Posts: 3425
Location: Maine, zone 5
1962
7
hugelkultur dog forest garden trees foraging food preservation cooking solar seed wood heat homestead
  • Likes 3
  • Mark post as helpful
  • send pies
    Number of slices to send:
    Optional 'thank-you' note:
  • Quote
  • Report post to moderator
It looks amazing Nicole!!!  Thank you so much for sharing the build, this has been a great thread.
 
gardener
Posts: 5436
Location: Southern Illinois
1491
transportation cat dog fungi trees building writing rocket stoves woodworking
  • Likes 2
  • Mark post as helpful
  • send pies
    Number of slices to send:
    Optional 'thank-you' note:
  • Quote
  • Report post to moderator
Nice castle Nicole!  

Personally I was thinking of using thing wood, but you have turned cardboard into something amazing!  Good job!

Eric
 
Rusticator
Posts: 8576
Location: Missouri Ozarks
4545
6
personal care gear foraging hunting rabbit chicken cooking food preservation fiber arts medical herbs homestead
  • Likes 2
  • Mark post as helpful
  • send pies
    Number of slices to send:
    Optional 'thank-you' note:
  • Quote
  • Report post to moderator
It's BEAUTIFUL!!!
 
Posts: 8901
Location: Ozarks zone 7 alluvial, clay/loam with few rocks 50" yearly rain
2389
4
  • Likes 5
  • Mark post as helpful
  • send pies
    Number of slices to send:
    Optional 'thank-you' note:
  • Quote
  • Report post to moderator
awwwww...I wanna come play!  

I remember the most joyous messy fun projects with the kids as they were growing up...there's something about having a child's mind involved that frees up a lot of creativity...

Wonderful castle!!! tell the young ones they've guided you well  
 
Nicole Alderman
steward
Posts: 21553
Location: Pacific Northwest
12040
11
hugelkultur kids cat duck forest garden foraging fiber arts sheep wood heat homestead
  • Likes 9
  • Mark post as helpful
  • send pies
    Number of slices to send:
    Optional 'thank-you' note:
  • Quote
  • Report post to moderator
I did some experimenting today! Yesterday I worked on the turret and made it the way Pearl suggested. I didn't have cardboard, so I used heavy postal paper. I used pipecleaner attached to a pencil to be my compass to draw the circle (just like they did in the castle documentaries when making stairs! This got my son excited and he made a bunch of circles). Then I covered it all in paper packaging tape to firm it up. Then I made more of the egg carton paper clay for the roofing tiles--I figured that would match better than wood shingles.  I left the turret detachable for more fun...and so I didn't have to figure out how to attach it :-D.

Today, I worked on the drawbridge door. First I used a ruler to draw lines on brown paper and shaded it a bit with colored pencils to make it wood like. I glued this on the gate, and was going to make two more strips for the cross beams when my husband asked if I used popsicle sticks. That seemed a lot nicer looking than more paper, so I oiled it with linseed oil with coco powder, and then glued them on.


Then I tried to think of how to cover the messy cardboard the thing is built on. I've been enjoying not using acrylic paint, and so tried making a thick paint. There's a bunch of different recipes for homemade paint (some here: https://m.wikihow.com/Make-Your-Own-Paint). Since i didn't have wheat flour, I tried making on like this gluten-free finger paint. I added a bunch of salt to prevent mold. It was WAY too thin and barely colored the brown cardboard. So, I added coconut flour and glue and more food coloring. Hopefully it'll dry fine! I also added linseed oil to the green "paint"--we'll see if that helps it at all.
fake-wood-paper-drawbridge.jpg
painting blue water with homemade paint
Cardstock with fake wood drawn on it
drawbridge-gate-from-paper.jpg
Getting ready to wrap the faux wood veneer on the drawbridge. I sliced down the planks to fold them over
20200106_153643.jpg
Kids painting the too-weak and thin paint
homemade-thick-paint-cornstarch-glue.jpg
Thicker paint applied! I think I need to do more texturing to it to make it look more natural, but it's definitely an improvement over the cardboard!
diy-dollhouse-castle.jpg
handmade castle with waldorf dolls and mellissa doug furniture
I just had to get a picture of it with the turret on! (taken before I'd done the drawbridge and grass/water)
how-to-castle-exterior-finished.jpg
The exterior with the turret (taken before the grass/water and drawbridge)
 
Jay Angler
steward
Posts: 12433
Location: Pacific Wet Coast
6996
duck books chicken cooking food preservation ungarbage
  • Likes 8
  • Mark post as helpful
  • send pies
    Number of slices to send:
    Optional 'thank-you' note:
  • Quote
  • Report post to moderator
Those dragons look totally at home! Are they any good at cooking dinner? (I used to tell my children a story about a purple dragon who replaced the oven when it went on the fritz. He also turned the entire field of corn the neighbors across the way had planted, into pop-corn - a bit of a character, but generally tried to be helpful.)
 
Nicole Alderman
steward
Posts: 21553
Location: Pacific Northwest
12040
11
hugelkultur kids cat duck forest garden foraging fiber arts sheep wood heat homestead
  • Likes 6
  • Mark post as helpful
  • send pies
    Number of slices to send:
    Optional 'thank-you' note:
  • Quote
  • Report post to moderator
The dragons tend to make a mess of things when they try to go into the kitchen. BUT, they do an excellent job at barbecuing shish kabobs!
 
Nicole Alderman
steward
Posts: 21553
Location: Pacific Northwest
12040
11
hugelkultur kids cat duck forest garden foraging fiber arts sheep wood heat homestead
  • Likes 11
  • Mark post as helpful
  • send pies
    Number of slices to send:
    Optional 'thank-you' note:
  • Quote
  • Report post to moderator
I think it's finished! The "paint" didn't dry as well as I could have hoped--it cracks and is soft. I had to repaint over the blue with as paint made with 3/4ths glue and the rest corn starch and water. The more glue, the better it seems to hold up. I do like how the drying toned the color down some.

I had a hard time getting these pictures, because the kids really wanted to play!
paperclay-medieval-castle-dolls-furniture-accessories.jpg
paper clay dollhouse castle
Castle is finished!
castle-with-drawbridge-closed.jpg
drawbridge up on DIY cardboard castle
Drawbridge up!
cardboard-dollhouse-castle-with-turret.jpg
DIY cardboard and paper clay mache castle with popsicle stick drawbridge
Drawbridge up!
daughter-playing-dragon-castle-dollhouse.jpg
toddler child playing with homemade dollhouse castle
It's almost as tall as my daughter!
 
Carla Burke
Rusticator
Posts: 8576
Location: Missouri Ozarks
4545
6
personal care gear foraging hunting rabbit chicken cooking food preservation fiber arts medical herbs homestead
  • Likes 4
  • Mark post as helpful
  • send pies
    Number of slices to send:
    Optional 'thank-you' note:
  • Quote
  • Report post to moderator
Nicole, that castle is AH! MAZE! ING!!! Seriously.  Just. WOW!!!
 
gardener
Posts: 1744
Location: N. California
811
2
hugelkultur kids cat dog fungi trees books chicken cooking medical herbs ungarbage
  • Likes 5
  • Mark post as helpful
  • send pies
    Number of slices to send:
    Optional 'thank-you' note:
  • Quote
  • Report post to moderator
I love it!  Looks amazing, and you made the best kind of lasting memories with you little ones.
 
Nicole Alderman
steward
Posts: 21553
Location: Pacific Northwest
12040
11
hugelkultur kids cat duck forest garden foraging fiber arts sheep wood heat homestead
  • Likes 15
  • Mark post as helpful
  • send pies
    Number of slices to send:
    Optional 'thank-you' note:
  • Quote
  • Report post to moderator
My living room floor is gone. It looks like a mess. I can't walk through it. But my son proudly tells me, "You know what I build? I'm a castle builder. I built this castle with my hard work." It's a castle he made for his sister and her baby doll (the blanket on the floor is her "bed"). The long box is the drawbridge.

This is his 6th or 7th castle that he's built since I finished the cardboard castle. I rather miss my living room, but I'm really proud of my son learning to use his creativity and hard work to build things.

His school sent around a survey for class ideas for next year. He wants to take one on building houses. He's wanted to build a house since he first saw Evan's ant village wofati be built.

20200111_151740-1-.jpg
How do I walk through my house? I don't!
20200104_194357-1-.jpg
blanket castle
Their first castle
 
pollinator
Posts: 417
124
2
dog trees books bee medical herbs
  • Likes 3
  • Mark post as helpful
  • send pies
    Number of slices to send:
    Optional 'thank-you' note:
  • Quote
  • Report post to moderator

Nicole Alderman wrote:I think it's finished!
I had a hard time getting these pictures, because the kids really wanted to play!


Oh wow!! The castle came out AMAZING! This is the kind of thing that would have kept my imagination going for ages as a child! And I love the felted dragons that add to it! Seriously beautiful build!!
 
Nicole Alderman
steward
Posts: 21553
Location: Pacific Northwest
12040
11
hugelkultur kids cat duck forest garden foraging fiber arts sheep wood heat homestead
  • Likes 6
  • Mark post as helpful
  • send pies
    Number of slices to send:
    Optional 'thank-you' note:
  • Quote
  • Report post to moderator
I just realized there's a bit of hilarity in this castle now. As I mentioned earlier, I used a good 12 rolls of toilet paper to make this, as well as a bunch of scribbled printer paper and egg cartons (because I didn't want to use too much TP). When I made this two months ago, TP was an affordable and easily accessible building material. Not so now!
Toilet-Paper-Castle.jpg
What's more precious than limestone or gold? Toilet Paper!
 
Posts: 9
Location: Alberta, Canada
8
cat urban
  • Likes 2
  • Mark post as helpful
  • send pies
    Number of slices to send:
    Optional 'thank-you' note:
  • Quote
  • Report post to moderator

Dale Hodgins wrote:
......
I'm not sure what the reinforcement is in the picture below, but just imagine that thin, light wood runs along the same spots. It would really stiffen things up, without adding a lot of expense or weight


If anyone's wondering, the stuff in the picture Dale was talking about appears to be foam core. It kind of has a similar heft to corrugated plastic or those 3 panel presentation boards used for school science fairs.

This is a neat thread Nicole and I am always amazed by your talent. Anyway here's some things I hope help bounce ideas around: (haven't read the whole thread so sorry if I repeat anything )

1. If you don't want to use wood you could make  cardboard logs by layering strips of the same size on top of eachother (4-8 layers perhaps?) and either gluing them or wrapping them, riveting... however you want to fasten them. Then you could use these logs to make a 'timber' frame and attatch cardboard 'drywall' to this or even wrap the frame in fabric.

2. Is it possible to stitch cardboard together using say left over bale twine? I think if you used a strong stitch like  on a leatherworking project it would be flexible but strong-ish. This would be tedious but if the kids are old enough to stitch it would be good practice on those motor skills and they could build protoypes of armor or any other inventions they can imagine. If they have the attention span it would be a neverending project to build structures this way and can be done with free materials.

3. Cardboard scratchers for cats and bunny rabbits might be a fun way to add a curved element to the playset. If you google it you could make one yourself or get one from the dollar store. Maybe for a hill or a bridge?

4. Paper towel and toilet paper rolls are good sized tunnels for lego-men. you could also cut them up and make awnings or other curved details. Or for a medim sized doll you could cut a tp roll lengthwise and add a handle to the inside of the curve thus making a shield which can be colored on/ customized by kids.

5. Pet Bunnys enjoy renovating card board castles designed specifically for them. These are made without the use of tape/glue because if the rabbit eats it it can kill it. Some of these have two levels and are modular so I think they may be a good thing to look at for structural inspiration and to save on the amount of materials needed.

6. 'Slat together' construction.  If you cut small slits into the edge of the cardboard you can insert the edge of another piece (picture those foam play mats) You can use this method to join flat pieces to get sort of a log cabin effect on your corners or you could cross hatch a bunch of skinny pieces and cover them in large flat pieces to make a panel for a floor that is light and strong. (Picture like a wine bottle shelf in a perfectly sized box)

7. Other materials that might be fun to incorporate: wire clothes hangers and old t-shirts?? You can make a DIY cat tent (easily find on google)  using them but maybe you could make a super cool removable dome or roof for your castle with the same method. (Pick a light colored shirt and it can be drawn on with markers or can let light inside the castle)

8. Multiple Shoe boxes inserted into a larger box is a quick way to make a multi-story with lots of rooms (go to a shoestore and ask them to save you a large shipment box plus empties and you should get stuff that fits together nice with minimal rigging) close up the lid and toss anywhere when kids are not using it if you don't put fragile stuff in the design.

Hope this helps someone out there get the brain juices flowing.
 
Posts: 2
1
  • Likes 3
  • Mark post as helpful
  • send pies
    Number of slices to send:
    Optional 'thank-you' note:
  • Quote
  • Report post to moderator
Layering cardboard makes it stronger. Any school type glue will work. Also a layer of cloth glued on (think poor man's fiberglass) increases the strength amazingly when dried. Just tossing it out there.
 
Nicole Alderman
steward
Posts: 21553
Location: Pacific Northwest
12040
11
hugelkultur kids cat duck forest garden foraging fiber arts sheep wood heat homestead
  • Mark post as helpful
  • send pies
    Number of slices to send:
    Optional 'thank-you' note:
  • Quote
  • Report post to moderator
That's a really good point, John! I think it might have been a really nice effect to cover the inside walls with fabric instead of the paper clay, as it would have made the wall thinner. But, I didn't have any medieval fabric on hand, and didn't want to buy more stuff. But, I think it would have been a really good touch!
 
Posts: 1
Location: San Francisco, CA
  • Likes 3
  • Mark post as helpful
  • send pies
    Number of slices to send:
    Optional 'thank-you' note:
  • Quote
  • Report post to moderator
I had a chuckle. I am 63 and still play with dolls! AKA making them and so on. I pretty much gave up on selling them, so I am learning to felt instead.
But, I still enjoy playingNancy. Now if I just had some grandkids...


Nicole Alderman
steward
Posts: 21553
Location: Pacific Northwest
12040
11
hugelkultur kids cat duck forest garden foraging fiber arts sheep wood heat homestead
  • Likes 2
  • Mark post as helpful
  • send pies
    Number of slices to send:
    Optional 'thank-you' note:
  • Quote
  • Report post to moderator
Felt is so much fun! Wool is such a forgiving and amazing medium to work with. I hope you have a blast with it, Nancy!
 
Let nothing stop you! Not even this tiny ad:
permaculture and gardener gifts (stocking stuffers?)
https://permies.com/wiki/permaculture-gifts-stocking-stuffers
reply
    Bookmark Topic Watch Topic
  • New Topic