• Post Reply Bookmark Topic Watch Topic
  • New Topic
permaculture forums growies critters building homesteading energy monies kitchen purity ungarbage community wilderness fiber arts art permaculture artisans regional education skip experiences global resources cider press projects digital market permies.com pie forums private forums all forums
this forum made possible by our volunteer staff, including ...
master stewards:
  • Carla Burke
  • Nancy Reading
  • r ranson
  • Jay Angler
  • John F Dean
  • Pearl Sutton
stewards:
  • Nicole Alderman
  • paul wheaton
  • Anne Miller
master gardeners:
  • Christopher Weeks
  • Timothy Norton
gardeners:
  • thomas rubino
  • Jeremy VanGelder
  • Matt McSpadden

PEP Badge: Oddball

BB oddball - sand badge
 
pollinator
Posts: 1495
855
2
trees bike woodworking
  • Likes 2
  • Mark post as helpful
  • send pies
    Number of slices to send:
    Optional 'thank-you' note:
  • Quote
  • Report post to moderator
Submission flagged incomplete
In order to progress in the Food Prep and Preservation PEP I’d need a rocket stove. I was also curious to explore this method of cooking.

Initially I start a conversation about building a Moveable rocket oven or stove

I’m renting, so wanted an option I could take with me when I moved. At the time, I didn’t realise that rocket stoves could be small and portable and used on camping trips.

I then came across this video on YouTube on how to build a rocket stove from food tins.


I started another conversation discussing building your own rocket stove from tins

That lead me to discovering stoves built from four cement / concrete building blocks. It’s a neat solution but I didn’t want to buy concrete blocks and I don’t have the tools to cut one anyway.

So I returned to the tin idea. I don’t have any large food tins. My local grocery store don’t sell food in tins that big. I tried two others with no success. I headed to a local restaurant thinking I could ask if they had any empty tins. At first they were confused and then they told me that all their bulk goods they get in plastic buckets. My next idea was Costco’s. I had read about it in another thread I started regarding Amazon alternatives. Costco’s was not a good option for me and I added my experience to the Amazon thread.

I decided to build a much smaller one with the 28oz tins I already had. I needed perlite so headed to Home Depot. It was stupidly expensive. I was feeling a little disheartened. The gulf between the video an my reality was big. On my way out of Home Depot I went down the flu and vent aisle and spotted something that looked just like a rocket stove called a Tee Vent. Next to it was a metal gas vent. The two locked together. This looked like a really neat solution.

This morning, I assembled everything I need.

I had a sheet of metal I found in the basement when we moved in and I cut it into a rectangle for the fuel tray.


I had an old metal bucket that had been an outdoor candle which fitted perfectly and could collect ash. I wanted to use my prototype on my barbecue - it’s a good fireproof table. I was worried about stability and decided to use a coat hanger to tie it down - my mind had been opened when I started working on PEA Metal Working Badge


I put the bits together and secured it to my barbecue


I had an old round cast iron grate which would act as a cooking surface and let the hot gases out and around the pot.


It worked! My rice was bubbling away.


I used:
One sheet of newspaper from the burnables bucket, the one I installed as part of my PEP Nest badge.
Ax shavings from the PEP Wooden spoon badge
Sticks from the PEP coat hooks badge
And a small wedge from a log which I split into four


So little fuel - I am amazed.

I now need to think about a semi permanent set up, one that’s a bit more stable and the right height for cooking. My proof of concept worked.
Staff note (gir bot) :

Someone flagged this submission as not complete.
BBV price: 1
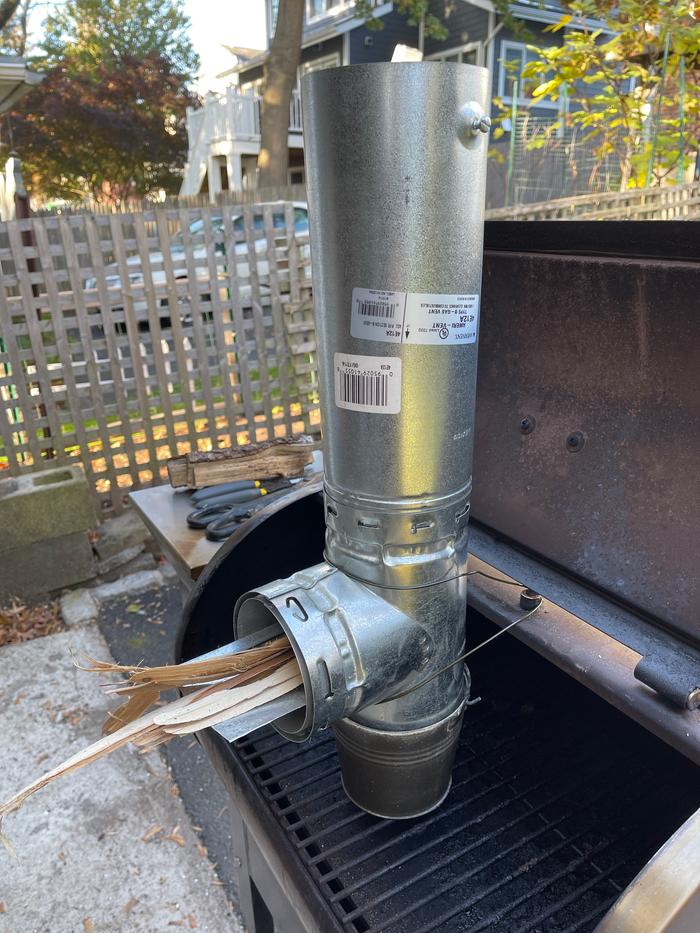
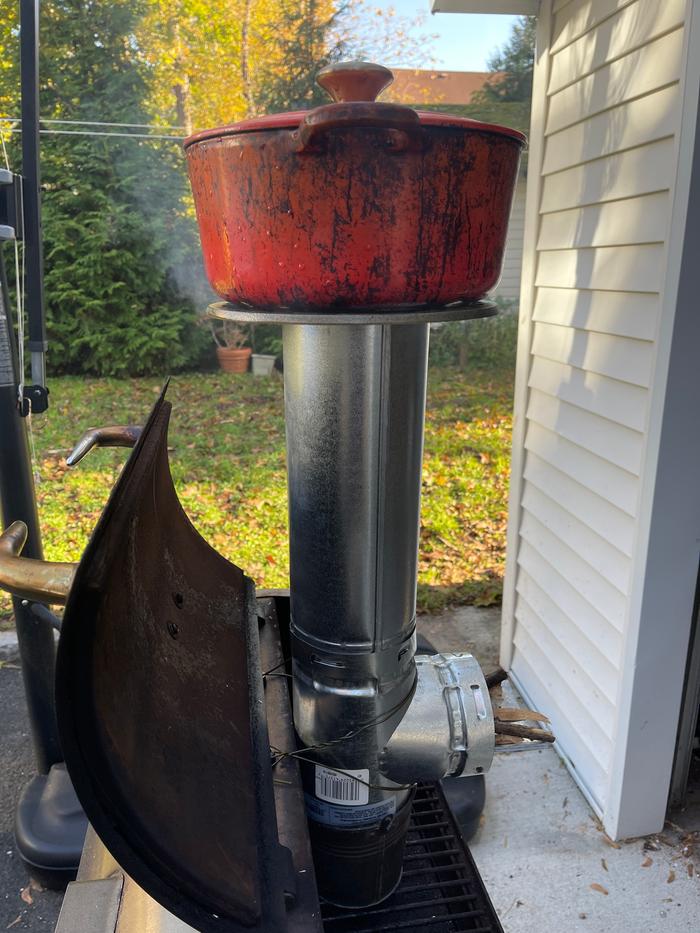
Note: After considerable staff discussion, we like the ingenuity & the proof of concept. We're less thrilled about the use of galvanized metal. That can release toxic fumes when heated. We think it would take a seasoned pro about 5 minutes to make this. The minimum time for PEP oddballs is 7 minutes so we must reject this attempt. Since you don't have the tools for cinder blocks maybe try again with fire bricks?

 
Edward Norton
pollinator
Posts: 1495
855
2
trees bike woodworking
  • Likes 2
  • Mark post as helpful
  • send pies
    Number of slices to send:
    Optional 'thank-you' note:
  • Quote
  • Report post to moderator

After considerable staff discussion, we like the ingenuity & the proof of concept. We're less thrilled about the use of galvanized metal. That can release toxic fumes when heated. We think it would take a seasoned pro about 5 minutes to make this. The minimum time for PEP oddballs is 7 minutes so we must reject this attempt. Since you don't have the tools for cinder blocks maybe try again with fire bricks?


Thank you for taking the time to discuss this. I didn’t know about galvanized metal - I stupidly though that if it was used for the exhaust fumes from a furnace then there wouldn’t be an issue. I also didn’t realise that Odd Ball doesn’t take into consideration time spent getting supplies. From my experience of ‘professionals’ they never turn up with the parts they need, they then have to disappear for several hours, not answer their phones, come back two days later and charge you for two visits!  
 
gardener
Posts: 581
Location: Pembrokeshire, UK
434
2
dog forest garden gear fungi foraging trees building medical herbs woodworking homestead
  • Likes 1
  • Mark post as helpful
  • send pies
    Number of slices to send:
    Optional 'thank-you' note:
  • Quote
  • Report post to moderator
I feel it is a bit unfair to mark a jack-of-all trades Permie, such as Edward, against a seasoned pro for their oddball submissions. Whilst I agree that galvanized metal is not a good choice for this, I do think a redesigned version using steel or even aluminium sheet (which would be a kind of big brother to the beer can hobo stove - see here) would be worth reconsidering. Just my 0.02
 
gardener
Posts: 3132
2095
  • Likes 5
  • Mark post as helpful
  • send pies
    Number of slices to send:
    Optional 'thank-you' note:
  • Quote
  • Report post to moderator

Luke Mitchell wrote:I feel it is a bit unfair to mark a jack-of-all trades Permie, such as Edward, against a seasoned pro for their oddball submissions. Whilst I agree that galvanized metal is not a good choice for this, I do think a redesigned version using steel or even aluminium sheet (which would be a kind of big brother to the beer can hobo stove - see here) would be worth reconsidering. Just my 0.02


I think the issue is that it would be virtually impossible to be perfectly fair on something so subjective as PEP oddball. It would open the door for people to say it really took them three hours to do a thirty minute job in order to get more points, and could ultimately reward people for aiming for mediocrity. The ultimate purpose for PEP is to demonstrate how good you are so an Otis will want to pick you to inherit their homestead. As PEP becomes more popular, there will likely be some stiff competition. I think aiming for professionalism is a good way to get there, and it provides at least somewhat of a reliable standard by which to judge projects as fairly as possible.
 
steward
Posts: 15594
Location: Northern WI (zone 4)
4886
7
hunting trees books food preservation solar woodworking
  • Likes 1
  • Mark post as helpful
  • send pies
    Number of slices to send:
    Optional 'thank-you' note:
  • Quote
  • Report post to moderator
I've been through a few discussions with Paul about oddball submissions.  As I understand it, his "Pro factor" math is based on a professional rocket stove maker in her workshop with the tools and parts on hand.  

It is a great adaptation of off-the-shelf materials!
 
Edward Norton
pollinator
Posts: 1495
855
2
trees bike woodworking
  • Likes 1
  • Mark post as helpful
  • send pies
    Number of slices to send:
    Optional 'thank-you' note:
  • Quote
  • Report post to moderator
Update on rocket cooker

I soaked it in a bath of citric acid after doing a trial run on a small section. The results are mixed and I’m not going any further down this road. I now have a bucket of ‘waste’ solution that I’m unsure of what to do with. It’s potentially got zinc and lead ions dissolved in it. I’m thinking of wiring it up and ‘replating’ . . .

I could try and build a portable rocket stove using metal as suggested in another thread. That would require new skills, time and money. I’m currently reassessing all my BB priorities based on my big five year project list.
 
Edward Norton
pollinator
Posts: 1495
855
2
trees bike woodworking
  • Likes 3
  • Mark post as helpful
  • send pies
    Number of slices to send:
    Optional 'thank-you' note:
  • Quote
  • Report post to moderator
Approved submission
Winter Window Layer System

This project was the convergence of ideas on Permies.

1) 31 ways to save on winter heating for $30 or less
2) Install a Really Good Layered Winter Curtain System - PEP Nest Straw Badge Bit.

At the time, I was looking to finish my Nest Straw Badge and this was a valuable four pointer.

So I started a conversation : Could I do the badge bit for under $30?
A really good, layered, winter curtain system

The answer was no, the cost of natural materials is far higher and it was suggested I stopped using Amazon, which in turn started another conversation!

Trying to quit Amazon - alternatives please

I then reread the requirements for the badge bit. It required a valance which I thought was more of a style statement than functionality, which I discussed in my original conversation. By now, I had my straw badge, so I was free to drop the valance. I still wanted to finish the project in the spirit of the original badge.

I visited a thrift shop and bought a queen size sheet that I could use as the sacrificial layer, a woven bed spread and a very big thick thermal blanket. All three were 100% natural materials.

I would build a wooden snug fitting frame, make an oil cloth for the window facing layer and staple the other two layers to the frame. I would finish with a double layer of cotton cut from an old duvet cover and then attach handles.

Here's one of the windows - I have two in total and they're exactly the same size:


I cut a frame and used staples to fix all four corners, three staples each side. I did this because the wood is very thin and light pine. Any joint work would be hard and I don't have a fine tooth saw. In addition, the joints would benefit from glue and I don't want to use glue.


I made some oil cloth for the first layer, the layer next to the window. You can read all about that here - Oil Cloth Badge Bit


This is a sacrificial layer that also has to be damp / mould proof. It might need replacing, so rather than staple it to the wood, I used eye-lets and screws so if it needs replacing, it can easily be done.


I flipped the frame over and stapled the thick insulated cotton blanket


Then went on another woven blanket and then two laters of cotton duvet cover


The frame is a snug fit. I thought I'd need to make some toggles to hold it in place.


The last step was to add handles. I cut these from the left over wood from the frame. It’s pretty thin pine, so I decided to drill holes and nail the handles on rather than risk screws which could easily have split the wood.


Project finished. Not only are they reducing heat loss, the also block out a lot of light. This is a big bonus as our house backs onto a business that has 6 massive spot lights which flood the car park with so much light, I might see if I can set up a solar cooker and see if I can boil some rice!

So, the original post on 31 ways to save on winter heating suggested the cost would be less than $30.

Here are my costs:

Home Depot
Timber  - 4, 1 x 2 x 8 boards $14.20 + Tax = $15.20
Linseed Oil - $8.97 + Tax = $9.59
Mineral Oil - $12.97 + Tax = $13.88
Brush - $1.87 + Tax = $2.00

Thrift Shop
blankets and sheet - $34.14

Not costed
Eye-lets
Staples
Screws
Duvet

I still have some off cuts of wood and cloth, a pint of linseed, 3 pints of mineral oil.

Total cost per window : $37.41

Off the peg solution using man made materials from $150 . . .
Custom permie friendly solution . . . many, many hundreds of dollars
Staff note (gir bot) :

Someone approved this submission.
Note: Certified for 2 oddball points

 
  • Mark post as helpful
  • send pies
    Number of slices to send:
    Optional 'thank-you' note:
  • Quote
  • Report post to moderator

wayne fajkus wrote:Bottle feeding a newborn lamb. When we found her, she was on the other side of the fence and very cold. Momma won't feed her. Duties are split between my wife and I. We keep her in the house overnight to make feeding easier. This will last 4 to 6 weeks(?) until she can eat on her own.


that is super cute!
 
pollinator
Posts: 3137
Location: Meppel (Drenthe, the Netherlands)
1035
dog forest garden urban cooking bike fiber arts
  • Likes 1
  • Mark post as helpful
  • send pies
    Number of slices to send:
    Optional 'thank-you' note:
  • Quote
  • Report post to moderator
Hi Edward. I did consider making something like that for the living room window here. But that window is so very large! This 'window quilt', when made of natural materials, will become much too large. I think it will collapse under its own weight.

So I will have to do something different, probably insulating roller blinds (probably they're not made of natural materials), several next to each other to cover the wide window. Or I'll wait until I can move from here ...
 
Edward Norton
pollinator
Posts: 1495
855
2
trees bike woodworking
  • Likes 2
  • Mark post as helpful
  • send pies
    Number of slices to send:
    Optional 'thank-you' note:
  • Quote
  • Report post to moderator
It's certainly a challenge. When I lived in the UK we had large sliding glass doors leading into the patio. They filled the whole end of the room, which was lovely as you had a full floor to ceiling, wall to wall view of the garden. In the winter though, you could feel the cold. I ended up installing two sets of curtains, both lined, one on top of the other. The curtains closest to the window were the cheapest and thickest I could buy which were in a sale as the pattern was pretty horrible. They were on a curtain track close to the wall. We then bought really nice curtains on a wooden pole that went over and hid the the horrible ones. It worked really well. Maybe you could try something similar . . . or move!
 
If you settle for what they are giving you, you deserve what you get. Fight for this tiny ad!
permaculture bootcamp - learn permaculture through a little hard work
https://permies.com/wiki/bootcamp
reply
    Bookmark Topic Watch Topic
  • New Topic