
• Post Reply Bookmark Topic Watch Topic
  • New Topic
permaculture forums growies critters building homesteading energy monies kitchen purity ungarbage community wilderness fiber arts art permaculture artisans regional education skip experiences global resources cider press projects digital market permies.com pie forums private forums all forums
this forum made possible by our volunteer staff, including ...
master stewards:
  • Carla Burke
  • Anne Miller
  • Nancy Reading
  • John F Dean
  • r ransom
  • paul wheaton
  • Timothy Norton
stewards:
  • Jay Angler
  • Pearl Sutton
  • Andrés Bernal
master gardeners:
  • Christopher Weeks
gardeners:
  • M Ljin
  • Thekla McDaniels
  • May Lotito

pros and cons of emergency brick rocket stoves for cooking

 
steward
Posts: 16559
Location: Pacific Wet Coast
11129
duck books chicken cooking food preservation ungarbage
  • Likes 23
  • Mark post as helpful
  • send pies
    Number of slices to send:
    Optional 'thank-you' note:
  • Quote
  • Report post to moderator
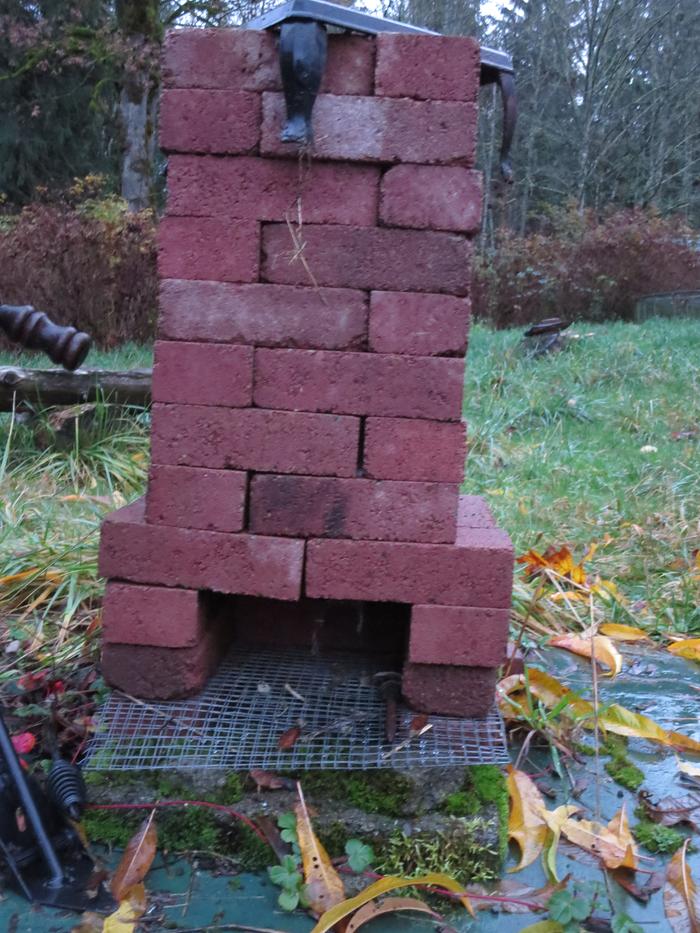
The internet seems to have 3-4 variations on a simple, "stack bricks and cook" rocket stove. My goal is to have a stack of bricks by the shed, and when that horrible earthquake happens, or a multi-day power outage, to be able to go out, stack the bricks according to a simple plan, light a fire and cook/heat water. This will require enough "emergency planning" to have the basic ingredients on hand, but even if we did prebuild it, the shaking would have knocked it down anyway!

First off, I'm going to exclude all the ones that are focused on "cheap" because most of those don't have a tall enough chimney to qualify as a rocket stove, and even in an emergency, I don't want a face full of smoke.

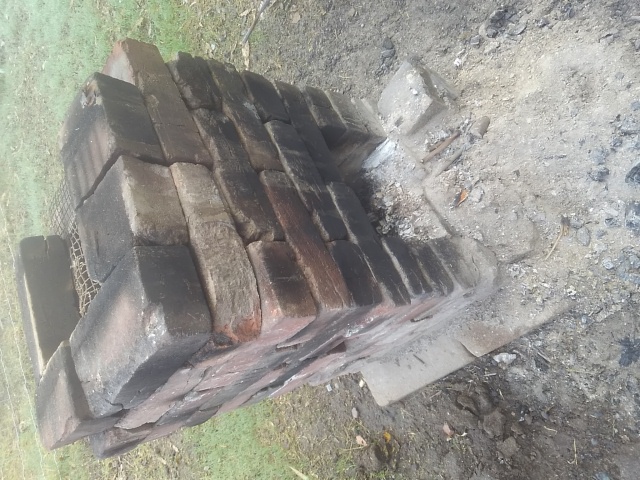
Model A:  stack bricks but not secondary air intake.
Like this picture:

source

Nicole identified the downsides and made upgrades.

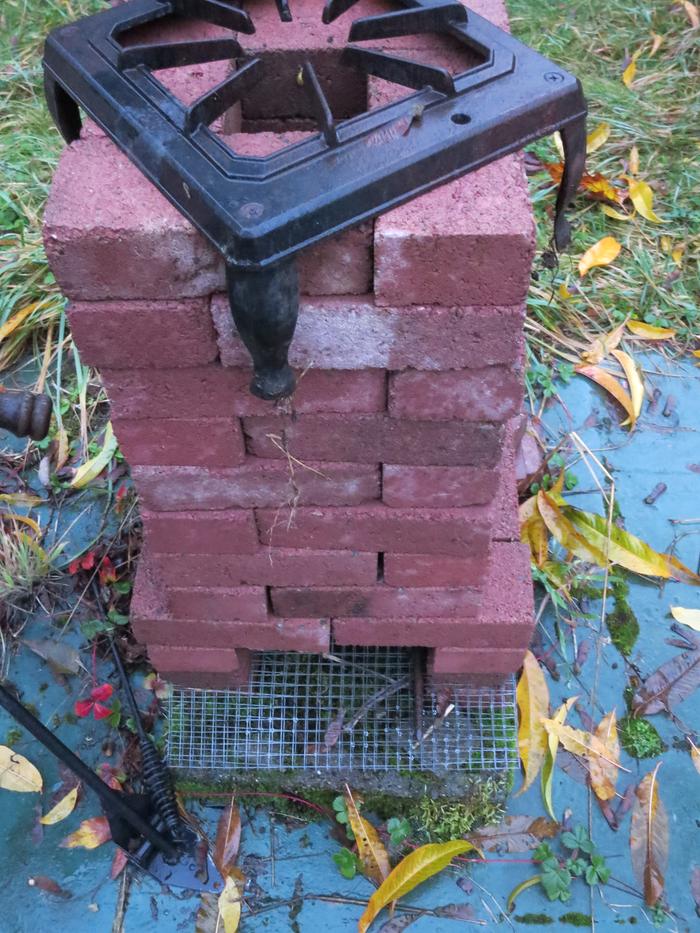
Model B: Stack bricks using a piece of metal mesh to allow air underneath and the wood to sit on the mesh.
Make it taller, and add some sort of a grill to make sure there's airflow out the chimney so the pot doesn't smother things.


source

Model C:  This one involves you breaking a brick in half (unless you're using salvaged bricks and already have some half bricks.  The air intake is on one side, while the wood feed is on a different side. The stacking is a bit more complicated, but not by much - I was able to draw an understandable diagram and I'm not that much of an artist (but maybe someone has a 3D drawing of this they can post?)

This *doesn't* require the metal mesh (which may off-gas some nasty stuff, but that's better than starving or freezing to death).

Again, many of the ones on the web were on the short side.


This design could have the advantage of letting the prevailing wind bring in the air, while sheltering the fire.

Does anyone have a Model D?

Does anyone have input/pros/cons of particularly Model B and C, as I think Nicole has covered the issues with A, which is why things would have to be really bad before I went there!
 
master pollinator
Posts: 1189
Location: Illinois
301
  • Likes 19
  • Mark post as helpful
  • send pies
    Number of slices to send:
    Optional 'thank-you' note:
  • Quote
  • Report post to moderator
For my next project I may try a brick rocket. I am pretty happy with the adobe one I made this week, but it is heavy, and will be a little pain to move out of the rain.

You mention height as a problem, and I saw that with mine. Adding a few extra inches on top helped.
 
master pollinator
Posts: 6129
Location: Canadian Prairies - Zone 3b
1904
  • Likes 16
  • Mark post as helpful
  • send pies
    Number of slices to send:
    Optional 'thank-you' note:
  • Quote
  • Report post to moderator
After eating many decades of fire smoke, it bothers me.

I would drop a half barrel (or a 2/3 barrel) onto it for a secondary chimney.

It also serves as a movable wind screen -- fire people know how the wind will shift around on you.
 
Posts: 11
Location: Port Hadlock, United States
1
  • Likes 12
  • Mark post as helpful
  • send pies
    Number of slices to send:
    Optional 'thank-you' note:
  • Quote
  • Report post to moderator
Can you make Dakota hole mixed with bricks to make a stove?
 
steward & manure connoisseur
Posts: 5510
Location: South of Capricorn
3581
dog rabbit urban cooking writing homestead ungarbage
  • Likes 15
  • Mark post as helpful
  • send pies
    Number of slices to send:
    Optional 'thank-you' note:
  • Quote
  • Report post to moderator
I'm really glad to see this topic.
I've tried a few variations on homemade/emergency stoves and frankly so far I've not been impressed. But I have been overwhelmed by the amount of info and needs for materials that I can't find out where I am (rockwool and vermiculite board, special clays, etc), to be honest.
I tried making something out of large cans (the can inside can method) and it seems unless you're fitting cans together you can't get enough height to have it work as a rocket.
So far it seems that bricks are the way to go, although considering current economic and social issues I am looking at maybe buying a metal K-style stove for outdoor cooking (not heating), as in the threads https://permies.com/t/286758/simple-rocket-stove-design-outdoor and  https://permies.com/t/137493/Emergency-small-rocket-stove-commercially
 
pollinator
Posts: 113
Location: SE France
35
fungi trees food preservation medical herbs wood heat composting
  • Likes 17
  • Mark post as helpful
  • send pies
    Number of slices to send:
    Optional 'thank-you' note:
  • Quote
  • Report post to moderator
Hello,Salut

Currently following the fashion for a hacking cough, mad enough to frighten all manner of critters.
My house rocket is being temperamental,so sweet words and cajoling.

The emergency rocket is under the terrace where it has been for a while, can t decide where is the best place to put eventhough it is totally mobile if heavy.
15 fire bricks, one of which I chopped in 2 just like in the starter message pictures.
The hearth is the holey metal plate used to ring out paint rollers, those fuzzy things used to paint big wall surfaces.
And just as has been written already, not enough draft.
I don t know the technical term in any language, it s a hollow square brick, which could be used on a roof smoke stack, about as tall as the brick assembly.
Popped that on the bricks and the rocket simply took off.
No mortar or anything and not heaps of billowing smoke.
I was rather impressed with the result.

So we are describing not just an emergency stove but a mobile emergency stove.
Thank you all for inspiring me to go scratch my head deciding where to place my heavy as...... mobile stove unit  
And sorry, photographs remain beyond me for the moment. I ll split some logs instead heyho

Blessings
MH
 
Jay Angler
steward
Posts: 16559
Location: Pacific Wet Coast
11129
duck books chicken cooking food preservation ungarbage
  • Likes 10
  • Mark post as helpful
  • send pies
    Number of slices to send:
    Optional 'thank-you' note:
  • Quote
  • Report post to moderator

lorrie hughes wrote:Can you make Dakota hole mixed with bricks to make a stove?


In some ecosystems, absolutely. I'm on glacial till, so "hole digging" often requires the rock drill and feathers and irons to make big rocks into smaller rocks.

For people in appropriate soil and topography, and maybe even in groundhog territory so they dig the hole for you, a Dakota hole with bricks or rocks to give one the height that makes it a real rocket rather than a smoky campfire, would be a great emergency option.

You would want to make sure you were high enough up that your hole wouldn't collect water - the most common "emergencies" I've read about in the last month have involved atypically heavy rain. This is expected to the north of me starting tomorrow, but I think we're far enough south to miss the worst of it.
 
pollinator
Posts: 1014
Location: 10 miles NW of Helena Montana
595
hugelkultur chicken seed homestead
  • Likes 15
  • Mark post as helpful
  • send pies
    Number of slices to send:
    Optional 'thank-you' note:
  • Quote
  • Report post to moderator
Last year one of my grandsons was helping me make a bunch of fire starters, cardboard egg cartons filled with dryer lint and melted candle wax poured over it.
Well, I didn't think a blow torch was really to safe for him to use, (he was six at the time), so decided we would build a brick rocket stove out of a bunch of old bricks I had, (bricks came from a demolition of an old wall and the bricks were made in the 1880's).
We had fun building it and getting it fired up.  An old pan on top to melt the wax and we were in business!
I used the rocket stove a couple times after that and then realized the bricks were failing from the heat.  Turns out 140 year old bricks don't last long with that heat.  I dismantled it a few months ago.  
I am thinking of making a new one with "good" brick, semi-permanent.   I have almost 20 extra chickens to butcher yet, wonder if I built one big enough to hold the scalding pot???   I could put one of my grandkids in charge of it.....  
 
Jay Angler
steward
Posts: 16559
Location: Pacific Wet Coast
11129
duck books chicken cooking food preservation ungarbage
  • Likes 12
  • Mark post as helpful
  • send pies
    Number of slices to send:
    Optional 'thank-you' note:
  • Quote
  • Report post to moderator

Dennis Barrow wrote: I am thinking of making a new one with "good" brick, semi-permanent.   I have almost 20 extra chickens to butcher yet, wonder if I built one big enough to hold the scalding pot???   I could put one of my grandkids in charge of it.....  


If I was doing semi-permanent and planning to use it regularly, I would use a "J-tube" pattern that self-feeds so you don't have to be constantly watching that the wood gets pushed in. That is more complicated to build, but the increased usefulness would be worth it. The style of house I'm in, doesn't justify trying to cook on an outdoor stove. I can't even get hubby to BBQ due to the nuisance factor, let alone do major cooking on a rocket stove outdoors.

However, if we have a bad earthquake - anything over a 5 - we could easily loose our chimney or even our whole house, and definitely electricity. Cooking outdoors would become an important option.

I don't have enough bricks to do a side-by-side test, but I am thinking of trying a sequential test, as no one has suggested they've used a "model C" stove with the side air intake, and I really want to know how well that one works in real life. Alas, that will take more time than I currently have...
 
pollinator
Posts: 806
Location: SE Indiana
479
dog fish trees writing
  • Likes 11
  • Mark post as helpful
  • send pies
    Number of slices to send:
    Optional 'thank-you' note:
  • Quote
  • Report post to moderator
Mine is similar to all of those, but it isn't just for emergencies and it also isn't permanent. It doesn't take even five minutes to set up and there isn't room for it, the oven and the grill all at the same time, so I adjust according to what we are cooking. The whole fireplace is made of creek rock and some of them have cracked over the years, and the top of the oven is a bit more rusted than I like. I plan to tear it all down this winter and rebuild where the grill, smoker, burners and oven are all permanent. Now I use the lid to an old Weber grill to keep it working in the rain, but it won't be big enough for the whole setup. I have the lid to a large gas grill; it's made of nice stainless steel and plenty big but sort of heavy which is a bit of a problem if it's hot, so I'll have to figure a way to set it permanent as well. I'm thinking I might use steel fence posts as legs for that.
 
Thom Bri
master pollinator
Posts: 1189
Location: Illinois
301
  • Likes 14
  • Mark post as helpful
  • send pies
    Number of slices to send:
    Optional 'thank-you' note:
  • Quote
  • Report post to moderator

Tereza Okava wrote:I'm really glad to see this topic.
I've tried a few variations on homemade/emergency stoves and frankly so far I've not been impressed. But I have been overwhelmed by the amount of info and needs for materials that I can't find out where I am (rockwool and vermiculite board, special clays, etc), to be honest.
I tried making something out of large cans (the can inside can method) and it seems unless you're fitting cans together you can't get enough height to have it work as a rocket.
So far it seems that bricks are the way to go, although considering current economic and social issues I am looking at maybe buying a metal K-style stove for outdoor cooking (not heating), as in the threads https://permies.com/t/286758/simple-rocket-stove-design-outdoor and  https://permies.com/t/137493/Emergency-small-rocket-stove-commercially


I don't think you need all the fancy stuff for just an emergency stove. My first try worked but wasn't great. I just added more height to the chimney and it worked fine. Took a few hours spread over 2 days. Clay, sand and grass.
https://permies.com/t/391644/Rocket-stove
 
pollinator
Posts: 411
Location: New Mexico USA zone 6
119
3
  • Likes 20
  • Mark post as helpful
  • send pies
    Number of slices to send:
    Optional 'thank-you' note:
  • Quote
  • Report post to moderator
I would think that what might be an emergency would be different, depending on where a person lives. Pre-stacked bricks might just fall apart in earthquake country. A Dakota fire hole might just catch a lot of water when there's excessively heavy rain or snow . Others have mentioned soil that can't readily be dug in.  An emergency might require suddenly moving any kind of fire to a better location. Fuel availability could be an issue. Seasons might make a big difference.

I think "temporary" is a key term to keep in mind. Or maybe "flexibility" is better. Coming up with solutions that will work specifically for you, that you have tested before the emergency, is the best thing you can do for yourself. Just remember, high-tech isn't always going to be the best answer. The best answer is always the one that actually works best for you.
 
Posts: 1026
Location: Sierra Nevada foothills, 350 m, USDA 8b, sunset zone 7
301
  • Likes 22
  • Mark post as helpful
  • send pies
    Number of slices to send:
    Optional 'thank-you' note:
  • Quote
  • Report post to moderator
These micro stoves will be very weak to not cause frustration.
My outside temporary stove does not look great, but works great. So good that I decided to build a kitchen stove of the same type in my house (70% done). It's called Podgornikov type firebox in some places and is used for cooking stoves.

In a basic (no bottom grate) version you need:
-8 bricks for the bottom
-5*3 bricks for firebox
-6*5 bricks for the riser part
-4 bricks for the pan/plate support
You may have a 75% firebox ceiling to make it more L-tube like for better flane density, or remove it when coal radiation is desired for slow cooking.
It takes 10 minutes to assemble.
So 57 bricks, but it's worth, because it works

I cooked a lot dishes on it. The best paellas and manestras (skillet directly on fire), soups and stews in pots on the plate. I used it also for grilling and smoking.
I also use it for forging (with blower or without) when I don't want to start my gas forge.

KIMG2539.JPG
[Thumbnail for KIMG2539.JPG]
 
gardener
Posts: 1075
Location: Zone 6 in the Pacific Northwest
566
2
homeschooling hugelkultur kids forest garden foraging chicken cooking bee homestead
  • Likes 15
  • Mark post as helpful
  • send pies
    Number of slices to send:
    Optional 'thank-you' note:
  • Quote
  • Report post to moderator

Lif Strand wrote: Or maybe "flexibility" is better. Coming up with solutions that will work specifically for you, that you have tested before the emergency, is the best thing you can do for yourself.[/i].


This is a really good reminder.  An emergency plan is good to have but even better to practice it so that I can do it under pressure in adverse conditions. Practicing building and using these over and over again with a variety of materials would be a helpful body of knowledge and skill to draw on, especially if disaster struck while I was not at home and got stuck somewhere and had to make do with whatever I could find.

Now to just get myself out of my brain to go and do it, whether or not it works out the first time.  I have the tendency to like to spend long hours planning before doing.
 
Dennis Barrow
pollinator
Posts: 1014
Location: 10 miles NW of Helena Montana
595
hugelkultur chicken seed homestead
  • Likes 8
  • Mark post as helpful
  • send pies
    Number of slices to send:
    Optional 'thank-you' note:
  • Quote
  • Report post to moderator

Jay Angler wrote:

Dennis Barrow wrote: I am thinking of making a new one with "good" brick, semi-permanent.   I have almost 20 extra chickens to butcher yet, wonder if I built one big enough to hold the scalding pot???   I could put one of my grandkids in charge of it.....  


If I was doing semi-permanent and planning to use it regularly, I would use a "J-tube" pattern that self-feeds so you don't have to be constantly watching that the wood gets pushed in. That is more complicated to build, but the increased usefulness would be worth it. .


I like that idea.  But then my mind says.. "my grandkids are young, 7, 8 ,11 and I think having them be in charge of the fire would help teach responsibility."

Don't know if I will get one built before butcher time tho.  Might have to just use the propane burner.  But then maybe I need to get out of the procrastination club for a bit.  ;-)

 
Posts: 148
14
  • Likes 8
  • Mark post as helpful
  • send pies
    Number of slices to send:
    Optional 'thank-you' note:
  • Quote
  • Report post to moderator
Here is a concrete cap block  prototype which if it works will handle larger pans and pots and larger pieces of wood because the blocks are much bigger.

15 1/2  x  7 1/2  x  3 1/2 inches

https://permies.com/t/370415/CapBlock-Stove-show-photos
 
pollinator
Posts: 255
87
2
  • Likes 12
  • Mark post as helpful
  • send pies
    Number of slices to send:
    Optional 'thank-you' note:
  • Quote
  • Report post to moderator
I tried to do a smaller version of a brick rocket stove and found a couple issues.

First, rare is a chimney in Honolulu; therefore, no fire bricks.  I used normal garden pavers.

Next, the stove worked, until the bricks cracked and crumbled, leading to an unstable cooking surface and the danger of the fire spreading.

Third, I had no metal grill or crushed can to use as a divider somehow, to allow air in under the fuel.

So I built a lighter-weight (about 40 pounds as opposed to 70) perlite and concrete "rocket" stove out of a 5-gallon bucket and some plastic square tubing cut from a play basketball hoop my neighbors threw away (instead of the PVC pipe in the following video:)


I put some small plastic containers in near the top and taped them to the bucket, to act as negative space, which produced handholds in the finished product.

I have not tested it yet, so I don't know how it performs.  But I have something that is ready to go, takes about as much space as those garden pavers, didn't cost much, and should work pretty well, judging from similar results online.

Here is Green Shorts testing his similar version, made with perlite.  I did not put in rebar offsets.  I'll use a small, round grill I salvaged from a thrift store, plus some rocks or broken terra cotta pots, or something, to offset it and allow airflow underneath the pan.


Note he also tries a makeshift J-tube feeding inlet as well, from bricks...something you might find applicable if you are using bricks only.
 
Posts: 27
Location: Manton, CA
6
4
trees wood heat homestead
  • Likes 10
  • Mark post as helpful
  • send pies
    Number of slices to send:
    Optional 'thank-you' note:
  • Quote
  • Report post to moderator

Cristobal Cristo wrote:
You may have a 75% firebox ceiling to make it more L-tube like for better flane density, or remove it when coal radiation is desired for slow cooking.


I love your design. It looks simple and doable.

What exactly did you mean by your remarks on the "75% firebox ceiling"?  Could you explain that in more detail?

Also, what size bricks are you using?
 
Cristobal Cristo
Posts: 1026
Location: Sierra Nevada foothills, 350 m, USDA 8b, sunset zone 7
301
  • Likes 11
  • Mark post as helpful
  • send pies
    Number of slices to send:
    Optional 'thank-you' note:
  • Quote
  • Report post to moderator
Oscar,

A traditional Podgornikov type kitchen stove firebox has a cast iron ash grate and the top of the firebox will be located at least 40 cm/16" below the plate to allow cleaner combustion. Traditional/older/not improved kitchen stove designs still use low firebox design impairing clean combustion (easy to spot them by noticing firebox doors located just under the top plate). I have experimented with it and also with L-tubes. L-tubes generate dense torch-like flame that is good for quick bringing to boiling temperatures as long as fire is going on. Hot radiating coals will be obscured by horizontal ceiling of the firebox hampering slow cooking and not fully utilizing the fuel potential. L-tube burns cleaner. I like to have both so I came with an idea of having variable geometry firebox. The one that I'm building in my house will have a grate, because a lot of continuous cooking produces too much ash that has to go somewhere to not impair combustion of the new fuel.
The ceiling level of the firebox has built-in brick ledges on which I can put:
-large firebrick (or two smaller pieces) to create a ceiling, leaving around 60x230 mm port
-piece of thick, dry, wood plank that will act a consumable ceiling and form a port when I need intense flame, but will burn and will create coals when I want coal phase cooking; I have not tried it yet
-stainless steel damper that I will be able to operate with a poke from the firebox opening (when I want to open it I will lift the hinged plate to rest vertically against the front side of the firebox); if 304 stainless will not stand it I will make it from 330

The dimension of the firebox I'm building is 230x230x195mm, so firebrickxfirebrick, 3 bricks high. The temporary outside one is built from regular red bricks, so firebox is 8x8x8". The house version firebox has additional lower level 100 mm deep (over the grate). I have calculated that it should have equivalent fuel capacity to fi120 mm batch box and since it burns quickly it should deliver the same power, for which I assumed 3.4 m2 ISA, but just in case, I designed a chimney shortcut to preheat top o the stove before letting the exhaust to the bottom chimney intake..
I will document it in a separate thread.
 
Oscar Daniels
Posts: 27
Location: Manton, CA
6
4
trees wood heat homestead
  • Likes 10
  • Mark post as helpful
  • send pies
    Number of slices to send:
    Optional 'thank-you' note:
  • Quote
  • Report post to moderator

Cristobal Cristo wrote:Oscar,

A traditional Podgornikov type kitchen stove firebox has a cast iron ash grate and the top of the firebox will be located at least 40 cm/16" below the plate to allow cleaner combustion. Traditional/older/not improved kitchen stove designs still use low firebox design impairing clean combustion (easy to spot them by noticing firebox doors located just under the top plate). I have experimented with it and also with L-tubes. L-tubes generate dense torch-like flame that is good for quick bringing to boiling temperatures as long as fire is going on. Hot radiating coals will be obscured by horizontal ceiling of the firebox hampering slow cooking and not fully utilizing the fuel potential. L-tube burns cleaner. I like to have both so I came with an idea of having variable geometry firebox. The one that I'm building in my house will have a grate, because a lot of continuous cooking produces too much ash that has to go somewhere to not impair combustion of the new fuel.
The ceiling level of the firebox has built-in brick ledges on which I can put:
-large firebrick (or two smaller pieces) to create a ceiling, leaving around 60x230 mm port
-piece of thick, dry, wood plank that will act a consumable ceiling and form a port when I need intense flame, but will burn and will create coals when I want coal phase cooking; I have not tried it yet
-stainless steel damper that I will be able to operate with a poke from the firebox opening (when I want to open it I will lift the hinged plate to rest vertically against the front side of the firebox); if 304 stainless will not stand it I will make it from 330

The dimension of the firebox I'm building is 230x230x195mm, so firebrickxfirebrick, 3 bricks high. The temporary outside one is built from regular red bricks, so firebox is 8x8x8". The house version firebox has additional lower level 100 mm deep (over the grate). I have calculated that it should have equivalent fuel capacity to fi120 mm batch box and since it burns quickly it should deliver the same power, for which I assumed 3.4 m2 ISA, but just in case, I designed a chimney shortcut to preheat top o the stove before letting the exhaust to the bottom chimney intake..
I will document it in a separate thread.


Thank you Cristobal!!! I love your explanation.   Thanks for explaining things simply. I'm new to rocket stoves and the first time I read one of your explanations I don't always get it.  But then when I read them again slowly and visualize everything you're saying, it all clicks.  I suddenly understand what you are talking about.  Yay!!  Please leave a link to your new post in this thread when you start your new one.    I'd like to make your stove.  
 
Cristobal Cristo
Posts: 1026
Location: Sierra Nevada foothills, 350 m, USDA 8b, sunset zone 7
301
  • Likes 10
  • Mark post as helpful
  • send pies
    Number of slices to send:
    Optional 'thank-you' note:
  • Quote
  • Report post to moderator
Oscar, I will. Some spoiler picture. You can notice the two supporting ledges on the left and right.
KIMG2541.JPG
[Thumbnail for KIMG2541.JPG]
 
Douglas Alpenstock
master pollinator
Posts: 6129
Location: Canadian Prairies - Zone 3b
1904
  • Likes 14
  • Mark post as helpful
  • send pies
    Number of slices to send:
    Optional 'thank-you' note:
  • Quote
  • Report post to moderator

Lif Strand wrote:I would think that what might be an emergency would be different, depending on where a person lives. Pre-stacked bricks might just fall apart in earthquake country. A Dakota fire hole might just catch a lot of water when there's excessively heavy rain or snow . Others have mentioned soil that can't readily be dug in.  An emergency might require suddenly moving any kind of fire to a better location. Fuel availability could be an issue. Seasons might make a big difference.

I think "temporary" is a key term to keep in mind. Or maybe "flexibility" is better. Coming up with solutions that will work specifically for you, that you have tested before the emergency, is the best thing you can do for yourself. Just remember, high-tech isn't always going to be the best answer. The best answer is always the one that actually works best for you.


There is great wisdom in this.

If I'm at home, the whole thing will be a big nuisance. I have all the stuff right here. Yawn.

If I'm travelling somewhere when a natural disaster hits, and all I have is a backpack and the clothes I'm wearing, the SKILLS to whip up an emergency cooker with local materials may be worth their weight in gold. Even to boil water safe for drinking is a lifesaver ...

It doesn't cost much to add skills to your carry-on bag.
 
Posts: 403
Location: SW Missouri
88
hugelkultur duck trees chicken pig bee solar wood heat
  • Likes 12
  • Mark post as helpful
  • send pies
    Number of slices to send:
    Optional 'thank-you' note:
  • Quote
  • Report post to moderator
You don’t need the little wire shelf for putting the wood on, you just slide a piece of pipe in the corner that runs from the front to the back
 
Posts: 22
Location: Devon, UK
8
  • Likes 8
  • Mark post as helpful
  • send pies
    Number of slices to send:
    Optional 'thank-you' note:
  • Quote
  • Report post to moderator
Slightly off-topic but the following video appeared in my feed and piqued my interest.  Refractory bricks can be tricky to source so it's really nice to know they could be made locally
 
steward
Posts: 23005
Location: Pacific Northwest
13922
13
homeschooling hugelkultur kids art duck forest garden foraging fiber arts sheep wood heat homestead
  • Likes 11
  • Mark post as helpful
  • send pies
    Number of slices to send:
    Optional 'thank-you' note:
  • Quote
  • Report post to moderator
I realized that I never got around to updating that that original brick rocket stove thread!

The main things I learned were that:

  • The more bricks you have, the better! But, if you don't have enough bricks, it will still work
  • A larger firebox is nice...but requires more bricks
  • A taller chimney is nice...but requires more bricks.


A larger firebox allows you to get bigger sticks in there, fiddle with the fire a bit more and not have to constantly be managing the fire.

A larger air flow makes it easier to clean out ash and not have the air flow clogged. Side airflow probably works really well, too. But, I'm kind of used to this type now.

The taller chimney results in a better draft. It's also nice being able to stand (or sit in a chair) by it to cook the food. A low rocket stove means bending over a lot!

Our current iteration of rocket stove. Sorry about the lighting--I took the picture at dusk


I increased the width and height of the firebox, which really helps. In the process, the draft area also got increased to one brick wider and deeper.


Currently, the chimney is 34 bricks, and the firebox/wide-section is 17 bricks (with one brick broken in half. It's the slightly darker bricks in the front on top of the grate). For a total of 51 bricks. I used two large cinderblocks for the base.
 
Jay Angler
steward
Posts: 16559
Location: Pacific Wet Coast
11129
duck books chicken cooking food preservation ungarbage
  • Likes 5
  • Mark post as helpful
  • send pies
    Number of slices to send:
    Optional 'thank-you' note:
  • Quote
  • Report post to moderator

Nicole Alderman wrote: Currently, the chimney is 34 bricks, and the firebox/wide-section is 17 bricks (with one brick broken in half. It's the slightly darker bricks in the front on top of the grate). For a total of 51 bricks. I used two large cinderblocks for the base.


This is very useful to know. I think I currently have about 34 bricks in my stash. That will be good enough for a short term emergency. However, there are people who've lost power for a week or longer following a bad storm, and a bad earthquake in the winter could be a disaster.

It sounds like it would be worth the effort for me to keep scrounging more material.  For an earthquake and aftershocks, a low chimney that can be quickly taken apart would allow water to be boiled and basic hot food to be made. As the earth settles, we can build a taller chimney for comfort and ease of use.

Your info about the wider wood feed to take advantage of larger material is also noted. Again, if I'm using "gravity + bricks", I can start with small wood during an immediate crisis situation, and build it bigger for longer term.
 
I agree. Here's the link: https://woodheat.net
reply
    Bookmark Topic Watch Topic
  • New Topic