• Post Reply Bookmark Topic Watch Topic
  • New Topic
permaculture forums growies critters building homesteading energy monies kitchen purity ungarbage community wilderness fiber arts art permaculture artisans regional education skip experiences global resources cider press projects digital market permies.com pie forums private forums all forums
this forum made possible by our volunteer staff, including ...
master stewards:
  • Nancy Reading
  • Carla Burke
  • r ranson
  • John F Dean
  • paul wheaton
  • Pearl Sutton
stewards:
  • Jay Angler
  • Liv Smith
  • Leigh Tate
master gardeners:
  • Christopher Weeks
  • Timothy Norton
gardeners:
  • thomas rubino
  • Jeremy VanGelder
  • Maieshe Ljin

Small homemade gadgets

 
pollinator
Posts: 675
Location: Western Canadian mtn valley, zone 6b, 750mm (30") precip
105
trees composting toilet building solar wood heat ungarbage
  • Likes 2
  • Mark post as helpful
  • send pies
    Number of slices to send:
    Optional 'thank-you' note:
  • Quote
  • Report post to moderator

Jay Angler wrote:Permies who have "time" just because of self-isolation may be a rarer breed than you think!


Thanks for the response, Jay. I'm no stranger to living on a homestead and pursuing tasks & projects — been doing it for decades, and so have most of my friends.  Homesteaders aren't generally a lazy bunch just yearning for something, anything to do with their excessive down time. LOL  Nor do I think that people practicing backyard permaculture are folks without things to do.  All I can think of is that possibly you took my post in a different way than I intended it... and anyway the post was not aimed at you specifically, Jay.

However, all the above aside, there still may be some people who, for instance, used to go to work at an off-homestead job who now are not able to do this, for one reason or another — and who may be working on something such as what this thread is about. My shout out was to that sort of Permies member.

 
steward
Posts: 12425
Location: Pacific Wet Coast
6991
duck books chicken cooking food preservation ungarbage
  • Likes 4
  • Mark post as helpful
  • send pies
    Number of slices to send:
    Optional 'thank-you' note:
  • Quote
  • Report post to moderator
Sorry Joel - I shouldn't have been a bit goofy! In case you didn't seem him, here is Sammy the Scarecrow!
https://permies.com/t/139611/permaculture-upcycling/ungarbage/Scarecrow-case-Scareeagle

He may not look exactly like a gadget, but considering I had to build for our climate (wet), I did have to think differently about how to build him (buckets and used chicken wire instead of straw for example).

What I was hoping was that if we had a few new posts to this thread, someone who *has* been doing something cool, will post pictures. Let's hope!
 
Posts: 5
2
  • Likes 6
  • Mark post as helpful
  • send pies
    Number of slices to send:
    Optional 'thank-you' note:
  • Quote
  • Report post to moderator
This isn't something I've designed, but I recently came across this guy's YouTube channel and I'm definitely going to make his plastic bottle cutter. He goes into some depth on how to make it, use it, and how handy the plastic tape it generates is across a wide variety of applications. One man's trash is another man's tool:

 
Posts: 4
  • Mark post as helpful
  • send pies
    Number of slices to send:
    Optional 'thank-you' note:
  • Quote
  • Report post to moderator
So happy I found all these homemade gadgets !
My neighbor has a weld shop and would be Interested in sure . What I would like is an auger big enough to dig 2' wide holes so I could plant , say a quarter acre of berries and also plant a 3 sisters or 5 sisters garden , using the auger to dig the hills . Thanks , Gary

Sorry my phone wanted to say anger even though I typed in auger !
 
Joel Bercardin
pollinator
Posts: 675
Location: Western Canadian mtn valley, zone 6b, 750mm (30") precip
105
trees composting toilet building solar wood heat ungarbage
  • Likes 2
  • Mark post as helpful
  • send pies
    Number of slices to send:
    Optional 'thank-you' note:
  • Quote
  • Report post to moderator

Gary Bogdan wrote:So happy I found all these homemade gadgets !
My neighbor has a weld shop and would be Interested in sure . What I would like is an auger big enough to dig 2' wide holes so I could plant , say a quarter acre of berries and also plant a 3 sisters or 5 sisters garden , using the auger to dig the hills


Two-inch (and larger) augers are often found in the conveyor mechanisms of various machines, so could be the source for that part. Then something might be welded up, for fitting into a drill. Gary, maybe you or your neighbot could take some pics here of useful gadgets made by you or by him?
 
Joel Bercardin
pollinator
Posts: 675
Location: Western Canadian mtn valley, zone 6b, 750mm (30") precip
105
trees composting toilet building solar wood heat ungarbage
  • Likes 2
  • Mark post as helpful
  • send pies
    Number of slices to send:
    Optional 'thank-you' note:
  • Quote
  • Report post to moderator

Amber Adams wrote:This isn't something I've designed, but I recently came across this guy's YouTube channel and I'm definitely going to make his plastic bottle cutter


You're right, Amber, he's got a good Youtube channel going — I've bookmarked it. Thanks.
 
Joel Bercardin
pollinator
Posts: 675
Location: Western Canadian mtn valley, zone 6b, 750mm (30") precip
105
trees composting toilet building solar wood heat ungarbage
  • Likes 6
  • Mark post as helpful
  • send pies
    Number of slices to send:
    Optional 'thank-you' note:
  • Quote
  • Report post to moderator
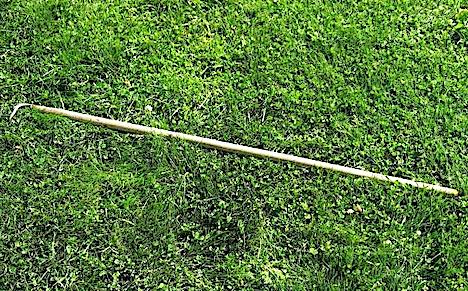
I'd seen a friend using a store-bought retriever to pull items from the front of his truck bed to the rear, or across the bed from one side to the other. It’s called a "cargo management tool". Simple principle. So, I decided to make one. It's basically a long-handled, L-shaped tool.

I used a length of broom stick on hand (52" long), and some 3/8” round steel rod. I forged an eight-inch piece of the steel rod, using an acetylene torch to heat the rod into the bright-orange heat range (around 1700* F), hammering it flat for about three inches on one end, and hammered the opposite end into a fanned-out, duck-bill sort of shape. Then, with the middle portion heated, I bent this metal head to about 90 degrees. A bit of grinding on the working tip rounded it off more and removed burrs. At the other end of the head, the part that would attach to the handle, I drilled a couple of screw holes.

I flattened off about a four-inch portion of one end of the broom stick. I spread some epoxy glue on the flat side of the metal head, applied the head onto the flattened part of the wooden stick, then drove in a couple of short wood screws. 24 hours later, the retriever was ready to use. I keep it in the bed of my truck all the time.

Obviously, the second project (a tree-pruning aid) was simpler to fashion. It’s just an old broom handle with a hole drilled into an end, into which I drove the wood-screw type end of a hardware-store utility hook. Often I’m way up a ladder when I need to pull hard-to-reach fruit-tree branches nearer and make pruning easier, or sometimes just possible at all. Sure, it’s almost effortless to make, but it’s very handy.
Truck-hook.jpg
Truck bed retriever
Truck bed retriever
Tr.-hook-detail.jpg
Detail of hook head
Detail of hook head
Tree-hook.jpeg
Tree-pruning hook
Tree-pruning hook
 
gardener
Posts: 1322
741
8
hugelkultur monies foraging trees composting toilet cooking bike solar wood heat rocket stoves ungarbage
  • Likes 8
  • Mark post as helpful
  • send pies
    Number of slices to send:
    Optional 'thank-you' note:
  • Quote
  • Report post to moderator
I'd been meaning to make something like this for a while and finally the other day I realized by opportunity to harvest wild apples around here was done for the season so I set about making an apple picker for the high branches.  At first I was going to metalsmith up something more complicated (and admittedly nicer all around) but then started thinking about the random stuff I already had on hand that could be cobbled together to make one.  I post a shot of the stuff I started with, a vinegar container from the recycle bin, some longer screws and bolts, and a couple pieces of scrap grid beam I've been making for another project.  In the end I used a few different screws and grid beam from the first photo to get a longer reach on the tines.  Then I bolted it all to an old extending pole I've kept around for years knowing it would be useful some day.  A bit of the ever handy duct tape to soften sharp edges and I've got a cheap functional apple picker!

DSC05573.JPG
The basic parts I started with. (though they did change some by the time I was done.)
DSC05578.JPG
A photo of the finished apple picker.
DSC05579.JPG
A different angle of the picker.
DSC05580.JPG
Action shot!
Action shot!
 
Rocket Scientist
Posts: 1809
Location: Kaslo, BC
525
building solar woodworking rocket stoves wood heat greening the desert
  • Likes 3
  • Mark post as helpful
  • send pies
    Number of slices to send:
    Optional 'thank-you' note:
  • Quote
  • Report post to moderator
Very nice picker David. Do you have problems with seeing the apple to guide the tines to just the right spot because the vinegar jug gets in the way? If so, wondering if it could be made out of a see-through clear plastic container instead?
 
Joel Bercardin
pollinator
Posts: 675
Location: Western Canadian mtn valley, zone 6b, 750mm (30") precip
105
trees composting toilet building solar wood heat ungarbage
  • Likes 3
  • Mark post as helpful
  • send pies
    Number of slices to send:
    Optional 'thank-you' note:
  • Quote
  • Report post to moderator

David Huang wrote:At first I was going to metalsmith up something more complicated (and admittedly nicer all around) but then started thinking about the random stuff I already had on hand that could be cobbled together to make one.  I post a shot of the stuff I started with, a vinegar container from the recycle bin, some longer screws and bolts, and a couple pieces of scrap grid beam I've been making for another project.


Hey, that picker's great David! I like it as it is — to my mind, no need for an artful metal piece. It functions, and actually looks interesting too!

Plus, it's inspirational: it demonstrates what can be done with odds & ends, along with a bit of imagination and finesse.
 
David Huang
gardener
Posts: 1322
741
8
hugelkultur monies foraging trees composting toilet cooking bike solar wood heat rocket stoves ungarbage
  • Likes 3
  • Mark post as helpful
  • send pies
    Number of slices to send:
    Optional 'thank-you' note:
  • Quote
  • Report post to moderator
Thanks Gerry and Joel.  I do like how it demonstrates what we can do with odds and ends too.  To answer your question Gerry, I was generally able to position the tines seeing well enough around the vinegar container.  However, as I was picking apples I decided that if I find myself with some sort of clear container in a similar size and shape I would change out to that.  I think having a clear container would be advantageous.
 
pollinator
Posts: 1165
Location: Boston, Massachusetts
506
6
urban books building solar rocket stoves ungarbage
  • Likes 7
  • Mark post as helpful
  • send pies
    Number of slices to send:
    Optional 'thank-you' note:
  • Quote
  • Report post to moderator
Here's one from a month ago. We have been giving our dog fluids via subcutaneous injections. The syringes have very little to hold onto, and are therefore difficult to operate.
I have a machine shop at work, so, plan A was to machine a handle out of a solid block of aluminum (too much work)... plan B was assemble it from 3 parts (still a lot of work) or solder the parts together? (less work)...
I had some copper tubing to make finger rings, but not the right size tubing for a sleeve to fit the barrel of the syringe... I'd have to make some (more work again)

Here's plan C, the "don't go home empty-handed plan": all cut and bent from one piece of the tubing I had chosen for the finger rings (3/4" copper plumbing pipe, from the scrap bin). Done in under 20 minutes.
Turns out the gap in the sleeve is a feature, not a bug, since it allows the gadget to slip on/off without having to thread the whole long needle tube through.
syringe-ring.jpeg
[Thumbnail for syringe-ring.jpeg]
syringe-with-ring.JPG
[Thumbnail for syringe-with-ring.JPG]
 
Gerry Parent
Rocket Scientist
Posts: 1809
Location: Kaslo, BC
525
building solar woodworking rocket stoves wood heat greening the desert
  • Likes 2
  • Mark post as helpful
  • send pies
    Number of slices to send:
    Optional 'thank-you' note:
  • Quote
  • Report post to moderator
Great job Kenneth!  A couple of questions. 1) Did you solder the ends of the finger loops to the body?  2) Did you heat up the copper before bending?
 
Kenneth Elwell
pollinator
Posts: 1165
Location: Boston, Massachusetts
506
6
urban books building solar rocket stoves ungarbage
  • Likes 4
  • Mark post as helpful
  • send pies
    Number of slices to send:
    Optional 'thank-you' note:
  • Quote
  • Report post to moderator
No annealing, it was soft enough to flatten and bend using a small hammer.
No soldering required!!! It is all made from one section of pipe, all one piece.
The length of pipe is 3x diameter of syringe barrel. The finger rings were centered on the quarter points of length, two saw cuts for each leaving 1/4 of the circumference of the pipe. The ends and center section that would wrap around the syringe were cut away to leave 1/3 of the circumference of the pipe.
The ends an center were flattened before forming into a circle, and the finger rings needed a little flaring with a ball pein hammer to make the curve smooth.
If I were trying to get the ends to meet, the 3x diameter would’ve been 3.14159 x (diameter + tubing wall thickness + an allowance for clearance)... far too fussy on the maths, especially with handy whole numbers in metric (30mm) that could be done in my head by using ‘3’ instead.
The other feature of the open shape (intentional) is that it springs a little bit to grip onto the syringe, staying put.
 
Joel Bercardin
pollinator
Posts: 675
Location: Western Canadian mtn valley, zone 6b, 750mm (30") precip
105
trees composting toilet building solar wood heat ungarbage
  • Likes 2
  • Mark post as helpful
  • send pies
    Number of slices to send:
    Optional 'thank-you' note:
  • Quote
  • Report post to moderator
Now fellas, I find it really hard to believe that in the much altered period we've been living through in the past couple years no one here has been crafting some small, useful gadget. ?? 😁  I mean, I can't believe that...
 
pollinator
Posts: 259
Location: New Zealand
307
chicken food preservation fiber arts woodworking homestead
  • Likes 9
  • Mark post as helpful
  • send pies
    Number of slices to send:
    Optional 'thank-you' note:
  • Quote
  • Report post to moderator
Here's a great gadget! A while ago, my partner and I made a pair of wool combs for long-staple fleeces. They're made of a neighbour's maple branch pruning they chucked in the council grass strip in front of their house, some scrap sheet iron, and nails forged from an old clothes horse I found on the side of the road and biked home with.

I modeled them off of several medieval archaeological finds as I have never combed wool before and wanted to use a tried-and-true design from someone who knew what they were doing better than me! I also liked the simple elegance of the design, and the fact that the metal plate prevents the splitting of the wood by taking the brunt of the lateral force from the nails.

Found out that the teeth are just about perfect spacing for flax rippling as well, as a bonus!
IMG_2253.JPG
Wool comb doubling as a flax heckle
Wool comb doubling as a flax rippling tool
 
Joel Bercardin
pollinator
Posts: 675
Location: Western Canadian mtn valley, zone 6b, 750mm (30") precip
105
trees composting toilet building solar wood heat ungarbage
  • Likes 9
  • Mark post as helpful
  • send pies
    Number of slices to send:
    Optional 'thank-you' note:
  • Quote
  • Report post to moderator
I’m posting a couple of simple gadgets... bumping the thread mainly with hopes to get folks to post some of their own (and maybe better ones).

One is a weeding tool, made as a gift for a friend who used mine for a while, and liked it a lot — the original being shown & explained in page-1, post #4 in this thread.

The other is something I made for taking a few fasteners with a small load of stuff (hammer or cordless drill & bits, small number of screws or small nails). Generally, it's when going to do a minor task. For instance, I use it when carrying all that’s needed in my hands, or in my small work bag  — since it’s handier than a tray, box, or bag of screws. I simply epoxied a strong button magnet onto a section of a paint-stirring stick.

2-gadgets.JPG
[Thumbnail for 2-gadgets.JPG]
little-gadget.JPG
[Thumbnail for little-gadget.JPG]
 
David Huang
gardener
Posts: 1322
741
8
hugelkultur monies foraging trees composting toilet cooking bike solar wood heat rocket stoves ungarbage
  • Likes 8
  • Mark post as helpful
  • send pies
    Number of slices to send:
    Optional 'thank-you' note:
  • Quote
  • Report post to moderator
A while back I was helping my girlfriend with the build out for her new metalsmithing/jewelry school, Urban Metal Studio.  One of the things we did was set up a nifty exhaust system with 6 stations.  Each station has its own inline adjustable fan.  They all feed into a much larger duct system which was already existing that takes it out a preexisting roof mount.  It was extra nice to find all that in place already.  The quirk though is that with 6 separate stations/fans we needed to make sure the exhaust being pulled in one went up to the roof vent and didn't instead spew out at another station.  Basically when the system is on all the fans need to be running at least a little bit to prevent back flow and instead keep it all moving up and out the roof vent.  The first thought was just to tell everyone they had to keep the adjustable knobs set to at least a mark we made on them.  Of course this didn't work in practice.  Too many Gilligan's in permies parlance!  So instead I adapted the adjustable knobs with some stops so that they now all automatically hit a stopping point when being turned down that is before they are fully turned off.  Someone needs to work to override it and thus it now functions perfectly in a group studio situation.  

Since it is a metalsmithing school I just used some of the equipment and a bit of scrap sheet copper to fashion an attachment to the dial and a tiny extension arm mounted to the boxes which the adapted dial runs into, stopping it.

As an aside, it is so nice to work in a space where the exhaust can be adjusted low when it's not needed, and each station only gets turned up when needed instead of the traditional fashion where one big fan is always powering the whole thing on high.  It is much quieter this new way, not to mention more efficient!

Adapted-adjustment-dial.jpg
This is one of the adjustment dials I adapted with the extra copper bits to keep it from being turned all the way down.
Line-of-vented-stations.jpg
This shot shows the line of stations that all have individual adjustment knobs that must be kept running at least a little bit.
 
David Huang
gardener
Posts: 1322
741
8
hugelkultur monies foraging trees composting toilet cooking bike solar wood heat rocket stoves ungarbage
  • Likes 5
  • Mark post as helpful
  • send pies
    Number of slices to send:
    Optional 'thank-you' note:
  • Quote
  • Report post to moderator
At the metalsmithing studio I mentioned in the above post I once did a short little project with some members/students on a way to make a simple wall mounting system like a French cleat.  It used a bit of cut off copper pipe and some scrap sheet copper.  There are lots of ways the mounting system can be used.  I'm thinking of a new body of artwork that will take advantage of this.  However, with one of my example pieces I decided to make a wall hook for hanging tongs on.  Copper or bamboo tongs are used in the studio to remove parts from the pickle (a mild acid bath for cleaning metal).  These tongs are always moving about getting misplaced, or just not where you need them when you need them.  I thought making a clear home where they belonged would be a good idea.  So I grabbed a piece of thicker copper wire and made a longer hook to solder onto my little wall mounted pipe section.  Its a simple mounting mechanism where it is easy to put the piece on or take it off the wall, yet it's a very sturdy mount.  I suspect other Permies could find many other uses for such a thing.

Tong-holding-hook.jpg
Here is the hook in use with a couple bamboo tongs on it.
Hook-for-tongs.jpg
This shot shows it without tongs. I like how it's visually mounted so you don't see any screws or other hardware.
hook-wall-mount-system.jpg
Here I have pulled it off the wall so you can see the guts of it. Very simple, screwed into the wall are two stacked bits of metal making a channel. Then the single sheet of metal on the back of the hook slides into that channel.
 
David Huang
gardener
Posts: 1322
741
8
hugelkultur monies foraging trees composting toilet cooking bike solar wood heat rocket stoves ungarbage
  • Likes 5
  • Mark post as helpful
  • send pies
    Number of slices to send:
    Optional 'thank-you' note:
  • Quote
  • Report post to moderator
Earlier this year I redesigned my raising stakes so that they will mount more easily and securely into a vise without slipping while I hammer on them.  Some of you here might find this of interest, esp. if you decide to the bb for the SKIP metalworking badge where you raise a small bowl, since you will need some type of stake to do this on.

I actually redesigned my stakes to make them easier to manufacture and use so I could make a couple dozen sets of them for workshops I was teaching.  They worked quite well.  Just recently I made a detailed post on my website explaining how these work more clearly (I hope).  The goal was to help others who want to make their own and (shameless plug) to help people who purchase any of the sets I sell understand how to use them.

The basics are that I get a piece of round bar steel, weld on a 3" x 3" plate with a series of 1/4" holes drilled in it, and shape the ends with a grinder.  These are held in a vise with jaws at least 5 inches wide (wider is better) in such a way that there is something forming a hard stop above the jaws and immediately below the jaws so the stake can't slip down while it's being hammered on.  The series of holes is needed to adapt to the specific measurements of individual vises and to allow for different mounting angles.  I've been working with them for a few months now and find the system works great.  I just finished doing two workshops using them for the first time with groups of people and it all went wonderfully, with the only small hitch being vises that swivel vertically as well as horizontally.  I didn't think those would hold up to the hammering, and I was right.  The vertical vise swivel would eventually slip down resulting in the exact problem the new stake system was overcoming, except it was the vise slipping instead of the stake slipping in the vise!  

Anyway, here are a couple shots of the new stakes.  If you want much more detail about the system then check out the post on my site.
20221101_145738.jpg
The set of 5 stakes with mounting hardware.
20221101_154208.jpg
An example of one screw configuration for mounting in a vise.
20221101_154510.jpg
Here is that stake mounted in a vise. (note this is the vertical swivel type vise I don't recommend for this type work.)
20221101_180557.jpg
The smallest stake mounted in a better style vise at the angle I tend to use this one at. It makes the pointy tip on the vessel in the photo.
 
Joel Bercardin
pollinator
Posts: 675
Location: Western Canadian mtn valley, zone 6b, 750mm (30") precip
105
trees composting toilet building solar wood heat ungarbage
  • Likes 3
  • Mark post as helpful
  • send pies
    Number of slices to send:
    Optional 'thank-you' note:
  • Quote
  • Report post to moderator
Nice work on all your items, David. Those stakes are very fine. Clever little gadget for the adjuster there.

Thanks for sharing.
 
Posts: 126
Location: NW England
31
  • Likes 2
  • Mark post as helpful
  • send pies
    Number of slices to send:
    Optional 'thank-you' note:
  • Quote
  • Report post to moderator

wayne fajkus wrote:This is a log splitter i made and the plow type thing i made it from. I cut it out of plow. Forged the curve out to make it flat. Welded sucker rod handle to it. Quenched it.

It works well. I can beat on it pretty good. The handle gives me control


I know this as a 'fro'.
 
Anthony Powell
Posts: 126
Location: NW England
31
  • Likes 4
  • Mark post as helpful
  • send pies
    Number of slices to send:
    Optional 'thank-you' note:
  • Quote
  • Report post to moderator

Francis Mallet wrote:I've been wanting to share this for a while. It's called an "hypsomètre" in French but the English translation, hypsometer, isn't exactly the same tool (although they both do the same thing).
It uses the properties of similar triangles to measure the height of structures.

Mine is 28 inches long, the same distance from my eye to my fist. You can make the stick any length but matching it to your own size will simplify things (in this case a = b which means that a / b = 1).

To use: hold the stick vertically at arms length and move until it covers the whole object you want to measure. Mark the spot where you stand and count how many stick lengths between that spot and the object. If the stick is adjusted to your size then that distance is the object's height.

Here's an illustration that might help: Mesurer un arbre (ou autre élément vertical)


The alternative is a piece of paper or card, folded to make a 45 degree angle. With your eye at the 45 angle, stand far enough away for the lower edge to point to the tree bottom, the upper edge to the tree top. Your distance from the tree base = the tree height, given a vertical tree and horizontal ground. Also where the top of the tree should fall, if it's coming your way.
 
David Huang
gardener
Posts: 1322
741
8
hugelkultur monies foraging trees composting toilet cooking bike solar wood heat rocket stoves ungarbage
  • Likes 3
  • Mark post as helpful
  • send pies
    Number of slices to send:
    Optional 'thank-you' note:
  • Quote
  • Report post to moderator
I was just out in my metalsmithing studio this afternoon melting some wax out of a vessel and it occurred to me that I've never shared my wax melting gadget here.  I suppose it is a pretty specialized tool hardly anyone would have a use for, but I'll share it anyway.  As part of my process in making these copper vessels I fill the piece with wax (traditionally pitch is used) which provides a nice balance of support so the piece doesn't collapse inward when I hammer on it, and give so it can still push back a little bit allowing me to make the designs.

The wax or pitch needs to be melted out in such a way that you are heating it from below so the molten material always has an escape route.  You don't want pressure to build up as the material liquifies and expands, because then you are essentially making a bomb.  (insert horror stories here!)

For years, well decades really, I rigged up various things I had on hand to hold the pieces upside down as I melted the wax out in the collection tray.  Then earlier this year, or was it last year, I finally made a gadget I'd been thinking about.  It's a simple elevated circle with 3 rods that can be screwed in or out as needed to best fit the piece being worked on.  Underneath is some chicken wire to both let the molten wax drip through, but also catch the plug of wax that eventually drops down preventing it from splashing into a pool of molten wax.  

I wish I'd made this decades ago!
DSC06133.JPG
A view of the gadget as I've started melting wax.
DSC06134.JPG
The "safety net" catching the wax plug preventing the splash of hot wax.
 
Joel Bercardin
pollinator
Posts: 675
Location: Western Canadian mtn valley, zone 6b, 750mm (30") precip
105
trees composting toilet building solar wood heat ungarbage
  • Likes 2
  • Mark post as helpful
  • send pies
    Number of slices to send:
    Optional 'thank-you' note:
  • Quote
  • Report post to moderator
Interesting set-up, David. Looks effective, & sounds like it's evolved through phases of earlier arrangements. Thanks for posting. Might be useful for people who work with wax for other purposes, I'd think.

Give us a sense of scale: diameter of the metal (steel?) hoop, diameter of the ready-rod you used for legs, how high off the pan-bottom does the rim of the hoop sit?  I assume you welded or brazed the fittings to the hoop.


And this one is just casual curiosity...  It just may be completely relative to how you utilize wax, but can you re-use the wax? After it's drained out, do you let the wax cool completely before collecting it, or scrape it up while still very pliable?
 
Jay Angler
steward
Posts: 12425
Location: Pacific Wet Coast
6991
duck books chicken cooking food preservation ungarbage
  • Likes 2
  • Mark post as helpful
  • send pies
    Number of slices to send:
    Optional 'thank-you' note:
  • Quote
  • Report post to moderator
I'd be interested in what you're using as your heat source? There was something I wanted to do with molten wax, but Hubby was concerned about fire issues.
 
David Huang
gardener
Posts: 1322
741
8
hugelkultur monies foraging trees composting toilet cooking bike solar wood heat rocket stoves ungarbage
  • Likes 3
  • Mark post as helpful
  • send pies
    Number of slices to send:
    Optional 'thank-you' note:
  • Quote
  • Report post to moderator

Joel Bercardin wrote:
Give us a sense of scale: diameter of the metal (steel?) hoop, diameter of the ready-rod you used for legs, how high off the pan-bottom does the rim of the hoop sit?  I assume you welded or brazed the fittings to the hoop.


And this one is just casual curiosity...  It just may be completely relative to how you utilize wax, but can you re-use the wax? After it's drained out, do you let the wax cool completely before collecting it, or scrape it up while still very pliable?


Thanks Joel.  

For a sense of scale, the diameter or the hoop is 9 inches.  At first I thought this would be way bigger than I'd need, but it was what was handy in the scrap bin.  Now though I'm glad I went this size.  I don't often do vessels so large the openings would be 9 inches, but it's nice to have the capacity.  Often enough I do them with openings close to 6 inches so this will be nice for those pieces too.

The threaded rods inside the ring holding the vessel are 3/8".  I wanted them strong enough to hold the weight of a larger piece filled with wax.  The legs are 1/2" rod.  They didn't really need to be this big, but again it's what was in the scrap bin at the time.

The hoop itself is about 8 inches up off the pan.  This leaves me enough space to get my torch underneath, without there being an excessive distance for the wax to fall.

The wax I'm using is what bronze casters frequently use to make models which eventually get burned out.  If the wax is melted out instead of completely burned off then it can be used over and over again.  In fact, what I am using originally came from bronze casting that happened back when I was in college.  There it was melted out into a water bath and raked off quickly before it could combust.  No one else seemed to want it at that point so trash bags of it were getting thrown away.  I saved it and after some effort processing it to get rid of all the excess water, have been using it over and over now for a couple decades.
 
David Huang
gardener
Posts: 1322
741
8
hugelkultur monies foraging trees composting toilet cooking bike solar wood heat rocket stoves ungarbage
  • Likes 3
  • Mark post as helpful
  • send pies
    Number of slices to send:
    Optional 'thank-you' note:
  • Quote
  • Report post to moderator
Oh, I forgot to add that I generally let the tray fill up with wax, then once it's completely cooled I'll flip it over and knock it out, breaking it into pieces for reuse.  I have also used scrapers to scrape it up once it gets to the warm pliable stage.  If it's warm and sunny enough outside you can also set the tray in the sun to let it get to the scrapeable state, with this wax at least.  Different waxes have different working characteristics.  For what it's worth, I'm using #2AB56 Brown Art Bronze Wax made by JF McCaughin.

Jay, my heat source is a torch.  Generally I'm using a propane "weed burner" type torch, though mine is a bit shorter.  Wait, I actually have an old blog post about the torch I use.  In workshops we are often using Smith or Prest-O-Lite acetylene torches since that is what most facilities have on hand.  They work, but a larger bushier flame is better.
 
Joel Bercardin
pollinator
Posts: 675
Location: Western Canadian mtn valley, zone 6b, 750mm (30") precip
105
trees composting toilet building solar wood heat ungarbage
  • Likes 4
  • Mark post as helpful
  • send pies
    Number of slices to send:
    Optional 'thank-you' note:
  • Quote
  • Report post to moderator
Here’s a vid that offers a how-to for making a spring-loaded, adjustable welder’s clamp. It’s for modest-size (but not teeny-tiny) pieces. The guy who made the clamp shows some examples of the gadget in action.

The parts are pretty common. You could probably make this within an hour… and I just might do it myself.


Adjustable-Clamp.png
[Thumbnail for Adjustable-Clamp.png]
 
Joel Bercardin
pollinator
Posts: 675
Location: Western Canadian mtn valley, zone 6b, 750mm (30") precip
105
trees composting toilet building solar wood heat ungarbage
  • Likes 3
  • Mark post as helpful
  • send pies
    Number of slices to send:
    Optional 'thank-you' note:
  • Quote
  • Report post to moderator
I've been feeling this thread is languishing from neglect.

I thought I'd upload the URL for this Youtube vid I came across. In part, it's my attempt to revive this thread in Permies members' minds. There's lots in the vid, generally the sort of stuff gadgeteers like us can appreciate.  Many interesting techniques, and some easy-to-make gadgets. A succession or mixed-bag of ideas!

I've taken away several ideas that were worth seeing in this how-to (I'm glad it's a Web video, where you can skip back and re-watch just how something is done).


PS: I found it easy to separate which things I would use from those I would not.
 
gardener
Posts: 3249
Location: Cascades of Oregon
815
  • Likes 4
  • Mark post as helpful
  • send pies
    Number of slices to send:
    Optional 'thank-you' note:
  • Quote
  • Report post to moderator
Does a tool modification count? I use a triangular file to put a notch in the center of the shoe on my pneumatic staplers. The notch indexes hardware cloth or wire to make sure the wire is centered in the staple. It has no effect on normal usage. You can feel the wire as it finds the groove and prevents the need for offensive verbal punctuation.
David, I never thought of replacing my red pitch with sculpture wax great idea. I use some automotive body tools like T-dollies for some of my raising projects.
 
Look! I laid an egg! Why does it smell like that? Tiny ad, does this smell weird to you?
12 DVDs bundle
https://permies.com/wiki/269050/DVDs-bundle
reply
    Bookmark Topic Watch Topic
  • New Topic