


Someone flagged this submission as not complete.
BBV price: 2
Note: The hotpad needs to be wool and needs to be 10x10 inches.


Someone flagged this submission as not complete.
BBV price: 1
Note: It needs to be wool, and it needs to be 10x10


paul wheaton wrote:If you are going to do cotton, you have to have a strategy to make it thicker, or have an insulative layer. There are cotton fabric hot pads, but they have an insulative layer.
Someone flagged this submission as not complete.
BBV price: 1
Note: Your hotpad looks great but the requirement for this BB remains at 10"x10"
 3
3


Nicole Alderman approved this submission.
Note: I hereby certify that this badge bit is complete!


Someone flagged this submission as not complete.
BBV price: 1
Note: " - Show your hot pad in progress"
 1
1


Someone approved this submission.
Note: I certify this BB complete!
 3
3


Someone approved this submission.
Note: This BB is complete!
 2
2


Nicole Alderman wrote:This is a badge bit (BB) that is part of the PEP curriculum. Completing this BB is part of getting the sand badge in textiles.
In this project, you will knit (or crochet) a hot pad out of wool yarn.
To document completion of the BB, provide proof of the following as pics or video (< 2 min):
- Show your wool yarn and needles or crochet hooks
- Show your hot pad in progress
- Show your completed hot pad
- Unfelted, it should measure about 10 by 10 inches (If you felt it, it will end up smaller, and that's okay!)
Here's a tutorial on how to knit (for a tutorial on crocheting, check out the dishcloth Badge Bit)!
Pick yarn and needles
First you need to pick your yarn. Look for wool yarn. If it says "prewash," you will not be able to later felt it. That's okay if that's what you want. The reason we chose wool for this Badge Bit is because it is fire and heat resistant--perfect for hot pads!
Note: If you chose a thicker yarn, your project will go a LOT faster!
Next, choose your needles. Look on your yarn. There should be a place where it says needle size. Sometimes there's a range.
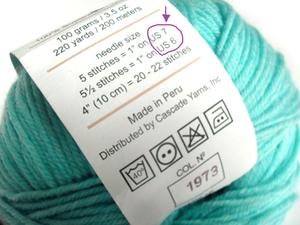
For a nice tight knit on this, you'll probably want the smaller needle size, or even to go down one size lower. If you choose to felt it afterward, you can go up a size or two. Hot pads are really forgiving!
Make a slip knot
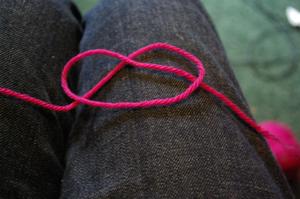
Next, you'll want to make a slip knot. There are LOTS of ways to do this. And, even if you get it wrong, it's not the end of the world. Here's a tutorial on how to make one type of slip knot.
Here's my slip knot.
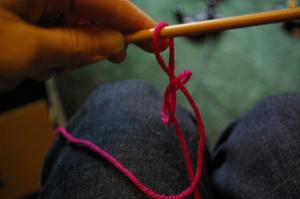
Here it is on my needle
Cast On
Now it's time to cast on. There are two methods to casting on--that is, making loops ("stitches") on your needle. This determine how WIDE your hot pad will be.
I prefer the first method in the following video, because it basically teaches you the knit stitch. What you're doing is making a knit stitch and putting it back on your left needle (when NOT casting on, the lop stays on your right needle).
You're going to cast on (create) enough stitches to make your hot pad about 10 inches wide. You'll want to STREEEEEETCH your little loops/stitches out to really see how wide they are. When stretched, they should be about 9 or 10 inches (often, on your next row, they'll magically stretch out even wider).
Here's 38 stitches on my size 10 needles with "worsted weight" wool yarn. My, that doesn't look wide enough!
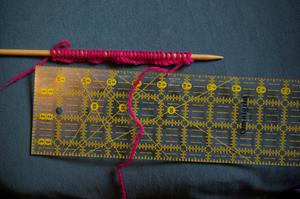
Here they are stretched out. Way too wide! It's fine if it's wide, but it'll take longer to make!
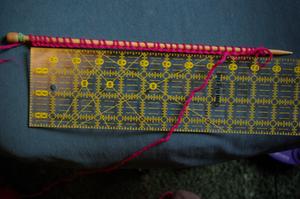
So, I slipped off 8 stitches. Now it measures about 9 inches, which will probably magically increase to 10 inches on the next row.
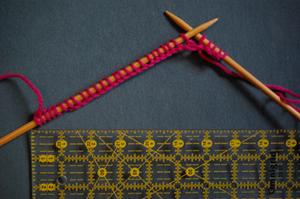
Knit
Now it's time to knit! You're going to do what you just did in the last row, but instead of putting the loop back on your left needle, you're going to LEAVE IT on your right needle. So, as you knit along, there will be less stitches on your left needle, and more and more on your right. You're doing it correctly!
Here's a great video on how to knit
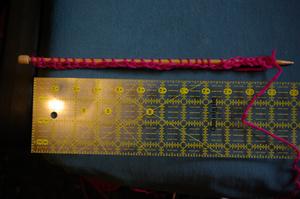
I've just made my second row, and when I stretch out my stitches, it is more than 10 inches. But, that's because I'm really stretching it. It will probably be around 10 inches slack.
Keep Knitting Rows
Now that you've made your first row, you're going to move your needle that's full of loops/stitches to your left hand, and knit another row!
Keep doing this, over and over and over and over again until your hot pad is as long as it is wide!
----------
Here you can see that I've knit about 8 more rows.
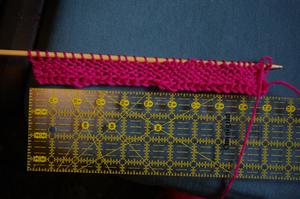
And, it looks like my hot pad is just under 10 inches. I probably should have cast on 34, rather than 30 stitches. But, since this is for my 2 year old, I'm not goind to worry. I could, however, take my needle out and unravel the hot pad and start again if I really wanted it 10 inches.
Cast off
Now that you've gotten it as long as it is wide, it's time to cast off, WITHOUT dropping all those stitches! To do this, you knit two stiches, then pull the right one UP and OVER the left stitch and off the needle. You'll only have one stitch now on your right needle. Then you knit another stitch, and pull the rightmost one UP and OVER your left stitch and needle. Keep doing this until you only have one stitch left. Measure out about 5-8 inches of yarn and cut the yarn (*gasp!*) and put the yarn through the last stitch/loop. Pull it tight!
You might want to weave your few inches of yarn through your hot pad a few times and tie some knots, just to be on the safe side (that's what I always do, anyway!)
(OPTIONAL)Felt/Full the Hot Pad
If you want a really thick hot pad that you can take things out of the oven with, without burning your hand, you can felt your hot pad!
The basics of felting (also called "fulling" when one is felting something that's already made):
* Hot water loosens the fibres, allowing them to tangle. And when you scrub it around in the hot water, it really tangles them up!
* Cold water tightens the fibres, shrinking them up.
To make a really well felted thing, with no little holes, you want to use a lot of hot water and a lot of movement. You can either do this by hand in the sink or bathrub--just scrub your hotpad around in hot water for a while. OR, your can throw it in the washing machine and let it churn away in hot water. Make sure to check it frequently in the washing machine (TURN THE MACHINE OFF before sticking your arm in!). Things that are felting tend to go from the same size to the same size, to a little smaller to *BAM* a whole lot smaller! So, check on it!
Once it's down to about the size you want, stretch and scrub it until it's the shape you want. Let it dry in that shape. *Poof!* Now you have a hot pad!
Here's some of my hot pads that I've made. Mine are double-long, folded over, and sewn on the sides so I can stick my hands in them, but the process is the same
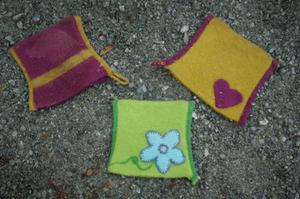
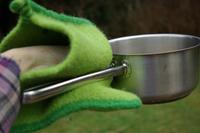
You're hot pad will still qualify if it's lumpy, bumpy, and even if you drop some stitches and it gets narrower as you knit/crochet. This is a beginner project, and you're still likely learning how to wield the long needles and not get tangled in yarn. By the time you've finished this hot pad, though, you should be able to knit/crochet with confidence, and be ready to make something that requires a bit more accuracy. All this hot pad needs to do is keep your table from burning
Test test test.
Inge Leonora-den Ouden approved this submission.
Note: Well done!
 2
2


Nicole Alderman wrote:This is a badge bit (BB) that is part of the PEP curriculum. Completing this BB is part of getting the sand badge in textiles.
In this project, you will knit (or crochet) a hot pad out of wool yarn.
To document completion of the BB, provide proof of the following as pics or video (< 2 min):
- Show your wool yarn and needles or crochet hooks
- Show your hot pad in progress
- Show your completed hot pad
- Unfelted, it should measure about 10 by 10 inches (If you felt it, it will end up smaller, and that's okay!)
Here's a tutorial on how to knit (for a tutorial on crocheting, check out the dishcloth Badge Bit)!
Pick yarn and needles
First you need to pick your yarn. Look for wool yarn. If it says "prewash," you will not be able to later felt it. That's okay if that's what you want. The reason we chose wool for this Badge Bit is because it is fire and heat resistant--perfect for hot pads!
Note: If you chose a thicker yarn, your project will go a LOT faster!
Next, choose your needles. Look on your yarn. There should be a place where it says needle size. Sometimes there's a range.

For a nice tight knit on this, you'll probably want the smaller needle size, or even to go down one size lower. If you choose to felt it afterward, you can go up a size or two. Hot pads are really forgiving!
Make a slip knot
Next, you'll want to make a slip knot. There are LOTS of ways to do this. And, even if you get it wrong, it's not the end of the world. Here's a tutorial on how to make one type of slip knot.
Here's my slip knot.

Here it is on my needle

Cast On
Now it's time to cast on. There are two methods to casting on--that is, making loops ("stitches") on your needle. This determine how WIDE your hot pad will be.
I prefer the first method in the following video, because it basically teaches you the knit stitch. What you're doing is making a knit stitch and putting it back on your left needle (when NOT casting on, the lop stays on your right needle).
You're going to cast on (create) enough stitches to make your hot pad about 10 inches wide. You'll want to STREEEEEETCH your little loops/stitches out to really see how wide they are. When stretched, they should be about 9 or 10 inches (often, on your next row, they'll magically stretch out even wider).
Here's 38 stitches on my size 10 needles with "worsted weight" wool yarn. My, that doesn't look wide enough!

Here they are stretched out. Way too wide! It's fine if it's wide, but it'll take longer to make!

So, I slipped off 8 stitches. Now it measures about 9 inches, which will probably magically increase to 10 inches on the next row.

Knit
Now it's time to knit! You're going to do what you just did in the last row, but instead of putting the loop back on your left needle, you're going to LEAVE IT on your right needle. So, as you knit along, there will be less stitches on your left needle, and more and more on your right. You're doing it correctly!
Here's a great video on how to knit
I've just made my second row, and when I stretch out my stitches, it is more than 10 inches. But, that's because I'm really stretching it. It will probably be around 10 inches slack.

Keep Knitting Rows
Now that you've made your first row, you're going to move your needle that's full of loops/stitches to your left hand, and knit another row!
Keep doing this, over and over and over and over again until your hot pad is as long as it is wide!
----------
Here you can see that I've knit about 8 more rows.

And, it looks like my hot pad is just under 10 inches. I probably should have cast on 34, rather than 30 stitches. But, since this is for my 2 year old, I'm not goind to worry. I could, however, take my needle out and unravel the hot pad and start again if I really wanted it 10 inches.
Cast off
Now that you've gotten it as long as it is wide, it's time to cast off, WITHOUT dropping all those stitches! To do this, you knit two stiches, then pull the right one UP and OVER the left stitch and off the needle. You'll only have one stitch now on your right needle. Then you knit another stitch, and pull the rightmost one UP and OVER your left stitch and needle. Keep doing this until you only have one stitch left. Measure out about 5-8 inches of yarn and cut the yarn (*gasp!*) and put the yarn through the last stitch/loop. Pull it tight!
You might want to weave your few inches of yarn through your hot pad a few times and tie some knots, just to be on the safe side (that's what I always do, anyway!)
(OPTIONAL)Felt/Full the Hot Pad
If you want a really thick hot pad that you can take things out of the oven with, without burning your hand, you can felt your hot pad!
The basics of felting (also called "fulling" when one is felting something that's already made):
* Hot water loosens the fibres, allowing them to tangle. And when you scrub it around in the hot water, it really tangles them up!
* Cold water tightens the fibres, shrinking them up.
To make a really well felted thing, with no little holes, you want to use a lot of hot water and a lot of movement. You can either do this by hand in the sink or bathrub--just scrub your hotpad around in hot water for a while. OR, your can throw it in the washing machine and let it churn away in hot water. Make sure to check it frequently in the washing machine (TURN THE MACHINE OFF before sticking your arm in!). Things that are felting tend to go from the same size to the same size, to a little smaller to *BAM* a whole lot smaller! So, check on it!
Once it's down to about the size you want, stretch and scrub it until it's the shape you want. Let it dry in that shape. *Poof!* Now you have a hot pad!
Here's some of my hot pads that I've made. Mine are double-long, folded over, and sewn on the sides so I can stick my hands in them, but the process is the same


You're hot pad will still qualify if it's lumpy, bumpy, and even if you drop some stitches and it gets narrower as you knit/crochet. This is a beginner project, and you're still likely learning how to wield the long needles and not get tangled in yarn. By the time you've finished this hot pad, though, you should be able to knit/crochet with confidence, and be ready to make something that requires a bit more accuracy. All this hot pad needs to do is keep your table from burning
Test test test.
Inge Leonora-den Ouden approved this submission.
Note: well done!


They say time's the great healer, and that's true. It's just not a very good anaesthetist, is the problem,
Whose lunar deity is not male is destined to be dominated by his wife. -- Old Hindu proverb
The first post of the BB states for wool to be used.

|
It's a beautiful day in the tiny ad neighborhood
Learn Permaculture through a little hard work
https://wheaton-labs.com/bootcamp
|


