• Post Reply Bookmark Topic Watch Topic
  • New Topic
permaculture forums growies critters building homesteading energy monies kitchen purity ungarbage community wilderness fiber arts art permaculture artisans regional education skip experiences global resources cider press projects digital market permies.com pie forums private forums all forums
this forum made possible by our volunteer staff, including ...
master stewards:
  • Nancy Reading
  • Carla Burke
  • r ranson
  • John F Dean
  • paul wheaton
  • Pearl Sutton
stewards:
  • Jay Angler
  • Liv Smith
  • Leigh Tate
master gardeners:
  • Christopher Weeks
  • Timothy Norton
gardeners:
  • thomas rubino
  • Jeremy VanGelder
  • Maieshe Ljin
  • Mark post as helpful
  • send pies
    Number of slices to send:
    Optional 'thank-you' note:
  • Quote
  • Report post to moderator
This is a badge bit (BB) that is part of the PEP curriculum.  Completing this BB is part of getting the straw badge in Plumbing.

In this Badge Bit, you will install a valve in an existing plumbing pipe.  Often a house is plumbed in a curious way that leaves something to be desired.  Like a valve!  Let's install one!

Here's one where they're replacing an existing valve:


To complete this BB, the minimum requirements are:
  - install or replace a valve that is part of a plumbing system
  - solder, pex, crimp, etc is fine as long as it's a permanent installation

To show you've completed this Badge Bit, provide proof of the following as pics or video (less than two minutes):
  - the piping before you start
  - the project halfway through
  - the finished project
COMMENTS:
 
steward
Posts: 15505
Location: Northern WI (zone 4)
4846
7
hunting trees books food preservation solar woodworking
  • Likes 2
  • Mark post as helpful
  • send pies
    Number of slices to send:
    Optional 'thank-you' note:
  • Quote
  • Report post to moderator
Approved submission
I had a leak in my piping right by an ancient gate valve.  So while fixing the leak I replaced the gate valve with a full flow ball valve.
Valve-that-s-older-than-me.jpg
Valve that's older than me
Valve-on-the-floor-with-some-parts-and-tools.jpg
Valve on the floor with some parts and tools
Random-photo.jpg
Random photo
Random photo
New-full-flow-ball-valve.jpg
New full flow ball valve
Staff note (jordan barton) :

I hereby certify this BB complete!

 
gardener
Posts: 1569
Location: Washington State
985
6
forest garden trees rabbit earthworks composting toilet fiber arts sheep wood heat woodworking rocket stoves homestead
  • Likes 2
  • Mark post as helpful
  • send pies
    Number of slices to send:
    Optional 'thank-you' note:
  • Quote
  • Report post to moderator
Approved submission
Here is my submission for the Install a Valve in Existing Pipe - Straw (1 pt) - Plumbing BB.

To document the completion of the BB, I have provided:
1  - the piping before you start - before I disconnected the kitchen faucet supply lines
                Note: the corroded gate valve allows about 2 gallons of water per hour through the valve and the assembly/connection
                         to copper is corroded and unlikely to unscrew with damaging the copper so I chose not to remove the ball valve
2  - the project halfway through - gate valve installed and closed (no more leaking cold water)
3  - the finished project - reassembled  :)
4  - the backside of the assembly showing corrosion on the Gate valve and closed ball valve

1.JPG
before
before
2.JPG
during
during
3.JPG
after-valve open
after-valve open
4.JPG
after from different perspective - valve closed
Staff note (jordan barton) :

I hereby certify this badge bit complete, along with your new plumbing air badge!

Staff note (Tina Wolf) :

Very clever work around!

 
Opalyn Rose
gardener
Posts: 1569
Location: Washington State
985
6
forest garden trees rabbit earthworks composting toilet fiber arts sheep wood heat woodworking rocket stoves homestead
  • Likes 1
  • Mark post as helpful
  • send pies
    Number of slices to send:
    Optional 'thank-you' note:
  • Quote
  • Report post to moderator
Approved submission
Here is my submission for the Install a Valve in Existing Pipe - Straw (duplicate) - Plumbing BB.

To document the completion of the BB, I have provided:
 - the piping before you start - this toilet does not have a working shut off valve
 - the project halfway through - compression fitting and ball valve installed
 - the finished project - reassembled  :)
1.JPG
old copper valve does not work
2.JPG
existing pipe and replacement parts
3.JPG
cutting pipe - had to cut again
4.JPG
installing compression fitting
5.JPG
valve installed
valve installed
6.JPG
plumbing reassembled :)
Staff note (gir bot) :

Mike Haasl approved this submission.

 
pollinator
Posts: 1495
855
2
trees bike woodworking
  • Likes 1
  • Mark post as helpful
  • send pies
    Number of slices to send:
    Optional 'thank-you' note:
  • Quote
  • Report post to moderator
Approved submission
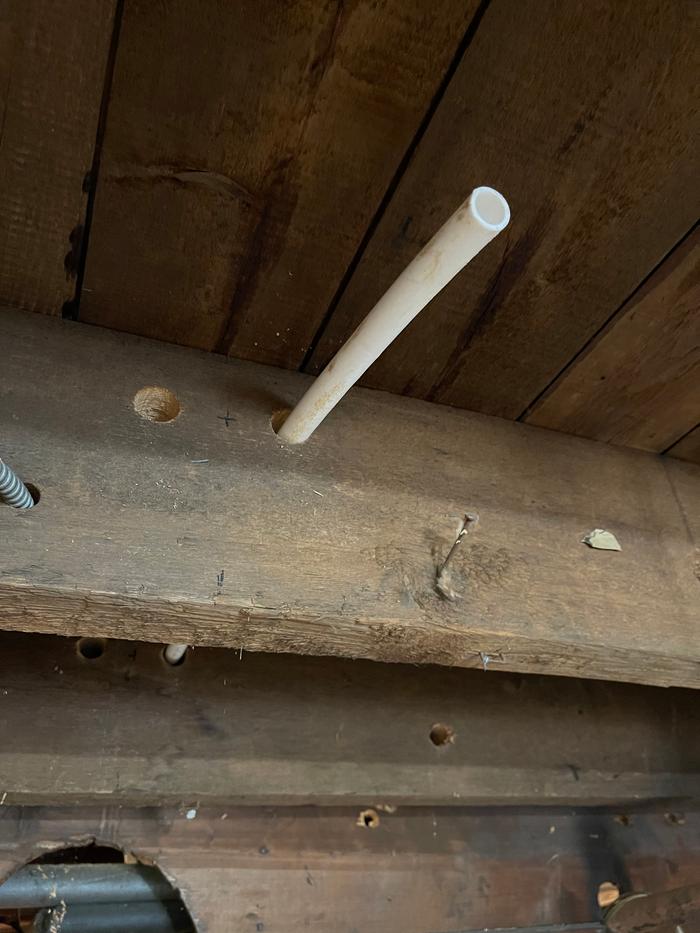
This is part of a bigger project to replace most of the plumbing in my house. The existing plumbing is leaky, corroded, copper pipe with very few fixings. It mostly hangs of the joists in the basement.

I recently renovated the downstairs bathroom / toilet under the stairs. I replaced the 1/2 inch copper with 3/4 inch PEX. It is my intention to extend the hot and cold pipes to the second floor converting a small bedroom to an ensuite bathroom, which is why I put in the higher capacity pipe.

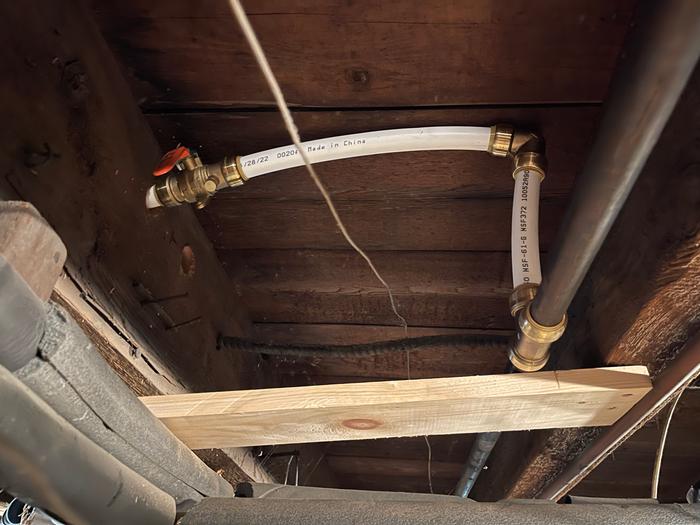
I shut of the water. Cut a section of copper pipe and added a T section. I had previously drilled 1 1/4 inch holes through the joists to thread the PEX. I installed a shut off valve so I could carry on working on the plumbing upstream with minimal disruption for the rest of the family. It will also enable me to shut off the branch when I extend upstairs.


Holes drilled for hot and cold 3/4 inch PEX


Valve added to section


Valve installed and connected to existing water pipe with a new T section


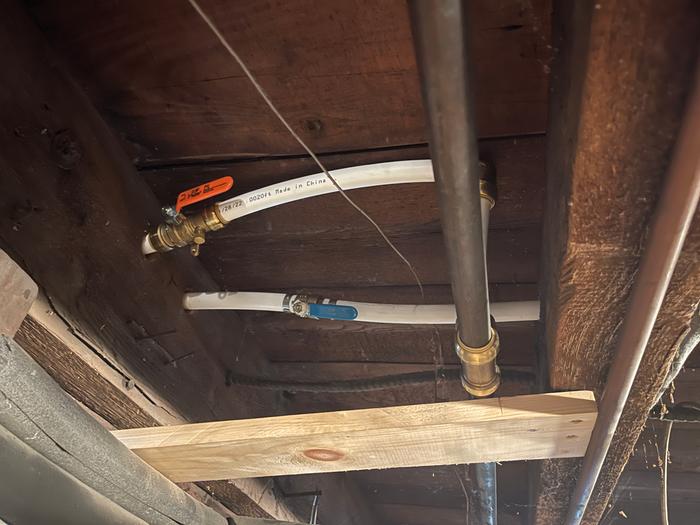
Second valve installed using crimp system. Both valves open and working as intended

Initially I used sharkbite system. It’s expensive and awkward in tight spaces. I’m new to plumbing in the US and this was what seemed like a good idea at the time. I then discovered the crimp system which is cheaper and preferable. This is the system I will use going forward.
Staff note (gir bot) :

Mike Haasl approved this submission.

 
gardener
Posts: 325
Location: NW Washington - Zone 8b (15 to 20 °F / -9.4 to -6.7 °C)
270
2
cattle goat foraging trees earthworks cooking building solar sheep wood heat
  • Mark post as helpful
  • send pies
    Number of slices to send:
    Optional 'thank-you' note:
  • Quote
  • Report post to moderator
Approved submission
Two years in a row the plumbing has frozen and burst in this building. After the first time, I shut off the supply but that also shut off the supply to a livestock tank that I would prefer remain functional in the winter.  So I installed a shut off valve in a water supply line just to this building today. Now I will be able to shut off the supply to this building without also shutting off the supply to the livestock tank.
20230830_101325.jpg
Before starting.
Before starting.
20230830_143733.jpg
Dug up the pipe.
Dug up the pipe.
20230830_141911.jpg
Tools and valve ready
20230830_144833.jpg
Valve installed.
Valve installed.
20230830_153750.jpg
Access riser pipe set in place and started backfilling.
20230831_083729.jpg
Inside pipe.
Inside pipe.
20230831_083744.jpg
Done backfilling.
Done backfilling.
Staff note (gir bot) :

Jen Fulkerson approved this submission.
Note: Great job. I hope this will make your life a little easier.

 
Posts: 22
Location: Baltimore, MD
8
transportation tiny house bike
  • Mark post as helpful
  • send pies
    Number of slices to send:
    Optional 'thank-you' note:
  • Quote
  • Report post to moderator
Approved submission
I replaced my utility sink, faucet, supply lines, and both shut off valves today. Here are the pictures of the cold supply shut off valve.
1-old-valve.jpg
[Thumbnail for 1-old-valve.jpg]
2-draining-lines.jpg
[Thumbnail for 2-draining-lines.jpg]
3-new-valve-on.jpg
[Thumbnail for 3-new-valve-on.jpg]
4-new-valve-and-supply-line.jpg
[Thumbnail for 4-new-valve-and-supply-line.jpg]
5-all-working.jpg
[Thumbnail for 5-all-working.jpg]
Staff note (gir bot) :

Timothy Norton approved this submission.

 
Why is your dog always so ... moist? Check this tiny ad for some sort of cure:
Back the BEL - Invest in the Permaculture Bootcamp
https://permies.com/w/bel-fundraiser
reply
    Bookmark Topic Watch Topic
  • New Topic