• Post Reply Bookmark Topic Watch Topic
  • New Topic
permaculture forums growies critters building homesteading energy monies kitchen purity ungarbage community wilderness fiber arts art permaculture artisans regional education skip experiences global resources cider press projects digital market permies.com pie forums private forums all forums
this forum made possible by our volunteer staff, including ...
master stewards:
  • Nancy Reading
  • Carla Burke
  • r ranson
  • John F Dean
  • paul wheaton
  • Pearl Sutton
stewards:
  • Jay Angler
  • Liv Smith
  • Leigh Tate
master gardeners:
  • Christopher Weeks
  • Timothy Norton
gardeners:
  • thomas rubino
  • Jeremy VanGelder
  • Maieshe Ljin

Sturdy firewood rack - PEP BB dimensional.sand.rack

BB dimensional lumber woodworking - sand badge
  • Likes 5
  • Mark post as helpful
  • send pies
    Number of slices to send:
    Optional 'thank-you' note:
  • Quote
  • Report post to moderator
This is a badge bit (BB) that is part of the PEP curriculum.  Completing this BB is part of getting the sand badge in Dimensional Lumber Woodworking.

Firewood burns better when it's dry.  It's much more convenient when it's all in one place near the fire.  Let's build a rack to safely house that firewood!  


To complete this BB, the minimum requirements are:
  - Must be able to hold at least one face cord of firewood (32 square feet)
  - Requires some structural integrity so a 10 year old won’t accidentally tip it over
  - Firewood must be exposed to wind, but protected from rain
  - At least 80% of the firewood rack is made from dimensional lumber
  - No treated wood

To document your completion of the BB, provide pics or video (<2 min) of the following:
  - Location where the rack will go
  - Construction partially underway
  - The finished rack
  - Explanation of how it won't tip over

Clarifications:
 - Thermally treated wood is acceptable
COMMENTS:
 
Dave Burton
steward
Posts: 6440
Location: United States
3118
transportation forest garden tiny house books urban greening the desert
  • Likes 4
  • Mark post as helpful
  • send pies
    Number of slices to send:
    Optional 'thank-you' note:
  • Quote
  • Report post to moderator
Approved submission
This is where the firewood rack that I am building is going.


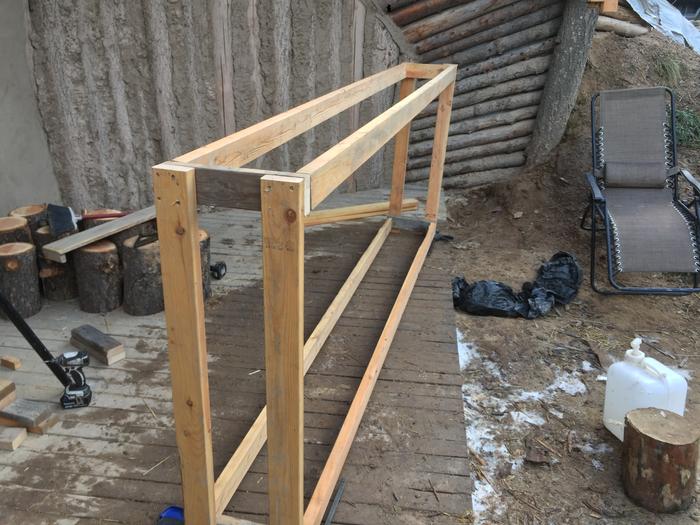
This is the wood that I have marked before cutting to build my firewood rack. The dimensions I made for the firewood rack to hold at least 32 square feet of wood are 9 feet 6 inches by  3 feet 6 inches. I added an additional 5.5 inches vertically on the bottom to account for a 2 inch clearance on the bottom and the width of the 2 by 4. I made the firewood rack 14 inches deep, so that 15 inch pieces of firewood will comfortably rest on it.


This is the wood after I cut it.


These are progress pictures of me constructing my firewood rack.


This is my completed firewood rack after I installed it at Allerton Abbey.


To prevent my firewood rack from falling over when a ten-year old roughouses with it, I screwed my firewood rack into the wall of Allerton Abbey.

Staff note (Mike Haasl) :

I hereby certify this BB complete!

 
Beau M. Davidson
steward
Posts: 10760
Location: South Central Kansas
2989
9
kids purity fungi foraging trees tiny house medical herbs building woodworking wood heat homestead
  • Likes 4
  • Mark post as helpful
  • send pies
    Number of slices to send:
    Optional 'thank-you' note:
  • Quote
  • Report post to moderator
Approved submission
Today, I made some firewood racks to house more wood behind the Fisher Price House. I modeled them after the ones in front if the house. To insure they don't collapse on a toddler (or other kind of mammal) I screwed the top into the house studs. Pretty sturdy.
5764784F-3CD1-4800-A742-7746B35BCAF6.jpeg
place where they went
A41E2CDD-FC7A-4C9E-BD0C-F225496AFFB7.jpeg
shelves and top rack cuts
EA387418-1E20-44DD-9E5B-0AF5666C4E8D.jpeg
clearance holes with the drill press
964E383A-47DB-440E-BBA8-B773C1A3D299.jpeg
first bay in place
first bay in place
70F4F9DE-B142-47F8-8D88-7C21DC81256D.jpeg
testing anti fall feature
03168A3C-3CA4-4F0E-9D0C-195821F49866.jpeg
corner screw example
4BC9AB50-390C-43D7-9FD1-9897E4DD54EB.jpeg
all four bays
all four bays
Staff note (jordan barton) :

I hereby certify this badge bit complete!

 
Bryan Tran
Posts: 64
Location: Niagara Falls, Ontario, Canada
66
3
food preservation woodworking rocket stoves
  • Likes 5
  • Mark post as helpful
  • send pies
    Number of slices to send:
    Optional 'thank-you' note:
  • Quote
  • Report post to moderator
Approved submission
Made my first firewood rack today! Used a bunch of scrap wood from an axe throwing place nearby. Construction was a little tricky because of the material quantity and quality, and took a bit longer than expected, but overall I'm satisfied with the result. Screwed the rack to the fence in a couple spots to secure it. Dimensions are 4' x 8' x 16"
BB0BE7F5-2F80-4D16-9818-CB7CEDA67BEF.jpeg
Location for rack
Location for rack
D0FB6181-2B55-45DD-8030-C946ADEC3A0A.jpeg
Cutting wood
Cutting wood
2EF15BC2-C14F-4737-A932-5948F2688814.jpeg
Construction
Construction
AB072AAB-509B-4623-8204-661A837D8857.jpeg
Levelling the base
Levelling the base
27DF0C68-5CAB-4F13-805C-3C6BBA03A397.jpeg
Left bay up
Left bay up
0D4F808C-42A7-430C-8E70-C091FC62F636.jpeg
Finished
Finished
73EE612E-8194-406E-9AA9-AF65659106A3.jpeg
Sturdy
Sturdy
63C5FBB1-BCAE-4FD9-B4DF-D3346C5744E1.jpeg
Affixed to fence
Affixed to fence
D506D790-42B0-43EB-A0D6-0EDAD803696C.jpeg
Affixed to fence 2
Affixed to fence 2
BF74CBEA-4DE1-4260-BAC3-8414100E5EEB.jpeg
Loaded up
Loaded up
Staff note (gir bot) :

Mike Haasl flagged this submission as an edge case BB.
BBV price: 0
Note: Sorry Bryan, it looks like your photos didn't come through.  Could you edit and try attaching them again?

Staff note (gir bot) :

Mike Haasl approved this submission.
Note: Now the photos loaded..  Sorry for the confustion

 
Bill Bacon
Posts: 34
Location: Eastern Missouri 6a
24
kids dog trees chicken bike building
  • Likes 3
  • Mark post as helpful
  • send pies
    Number of slices to send:
    Optional 'thank-you' note:
  • Quote
  • Report post to moderator
Approved submission
Made a rack with some heat treated 2x4s and stuck it under the deck.  It was the closest covered place to the door and fit nicely between the two posts.  The part for logs is 54"x89" (4806 sq inches/144 sq in per sqft = 33.375 sqft) and 11.5" deep.

IMG_20210918_130143_927.jpg
The spot
The spot
IMG_20210906_110539_895.jpg
Bottom under construction
IMG_20210906_154927_096.jpg
Mostly done
Mostly done
IMG_20210912_172700_857.jpg
Installed
Installed
IMG_20210912_110624_748.jpg
Attaching to deck
Attaching to deck
IMG_20210912_115819_464.jpg
Super safe tip test with my daughter in the background >_<
IMG_20210912_112912_559.jpg
Length
Length
IMG_20210912_112950_301.jpg
Height
Height
Staff note (gir bot) :

Mike Haasl approved this submission.

 
Christopher Weeks
master gardener
Posts: 3289
Location: Carlton County, Minnesota, USA: 3b; Dfb; sandy loam; in the woods
1603
6
forest garden trees chicken food preservation cooking fiber arts woodworking homestead ungarbage
  • Likes 2
  • Mark post as helpful
  • send pies
    Number of slices to send:
    Optional 'thank-you' note:
  • Quote
  • Report post to moderator
Approved submission
I don’t exactly need a firewood rack yet as we haven’t built the heater, but I know I’ll need one here, so I put one up.

ETA: Oh, the interior measurements are: 15.25" deep, 62" wide, and 78.25" tall. That's 33.69 sqft...whew!
42D8569B-53EB-4A41-8498-124193F175DA.jpeg
This space to the left of our basement door will house firewood. It’s under a deck and also under a deep eave on the roof above the deck.
19B1A987-E00C-4B14-A664-856A286295FD.jpeg
Just using 2x4s from the lumber yard.
D00CC9CC-F093-4ABE-9E95-6BDB94CC9395.jpeg
To prevent squashing ten year olds, I’ve toenailed (toescrewed?) into the deck joists above.
7E69E1BB-A572-4768-A801-D0CC97D46FE0.jpeg
The uprights are in place.
1C84BE9D-4E20-4881-ACE0-EF2D84E6C4A7.jpeg
And it’s done. Seems sturdy. I may run two more boards across, but I’ll wait and see if it feels necessary.
Staff note (gir bot) :

L. Johnson approved this submission.
Note: Nicely done.

 
Opalyn Rose
gardener
Posts: 1569
Location: Washington State
985
6
forest garden trees rabbit earthworks composting toilet fiber arts sheep wood heat woodworking rocket stoves homestead
  • Likes 3
  • Mark post as helpful
  • send pies
    Number of slices to send:
    Optional 'thank-you' note:
  • Quote
  • Report post to moderator
Approved submission
Here is my submission for the Dimensional Lumber Woodworking Aspect - Sand for Straw - Make a Firewood Rack BB.

Wheaton Labs: While at Allerton Abbey, I dismantled part of a deck that was no longer being used so I could repurpose the lumber to build a firewood rack at the Bun Warmer under the berm shed.  The build was challenging due to the angles of the roof at the south "attic" end of the berm shed.  

The internal firewood storage space of the rack is 5'-0" tall and 6'-6' long.  Subtracting the internal 2x6 brace the storage space is 32.4 square feet - just over one face cord.  

For structural integrity, I attached the rack to the berm shed at six different locations - four at the top and two at the bottom.  I also tried to climb and tip over the unit and it did not budge.  

To show I've completed this Badge Bit, I have provided the following:
  - Location where the rack will go
  - Construction partially underway
  - The finished rack
  - Explanation of how it won't tip over (above)
1.JPG
Bun Warmer - Firewood rack willl go on other side of cross brace on the left
2.JPG
Another angle of future firewood rack location
3.JPG
Building the base of the rack in the shop
4.JPG
trying to shake things up - rack is stable and tied into berm shed at six locations
5.JPG
rack from same angle as photo #1
6.JPG
Finished :)
Finished :)
Staff note (gir bot) :

Christopher Weeks approved this submission.
Note: Neat!

 
Luke Mitchell
gardener
Posts: 580
Location: Pembrokeshire, UK
434
2
dog forest garden gear fungi foraging trees building medical herbs woodworking homestead
  • Likes 1
  • Mark post as helpful
  • send pies
    Number of slices to send:
    Optional 'thank-you' note:
  • Quote
  • Report post to moderator
Hi all, I've recently been building freestanding firewood stores. I've got one finished and another is in-progress. Each store is 2.16 m2 (23.25 sq. ft) so together they would hold more than a cord of firewood. The stores, however, do not sit up to a house (although they could) as they are sited on our land which, one day, will be our home. Do you think these stores would be suitable for this BB when complete?
wood-store.jpg
[Thumbnail for wood-store.jpg]
 
Mike Haasl
steward
Posts: 15505
Location: Northern WI (zone 4)
4846
7
hunting trees books food preservation solar woodworking
  • Mark post as helpful
  • send pies
    Number of slices to send:
    Optional 'thank-you' note:
  • Quote
  • Report post to moderator
That looks like it should qualify as long as the wood is exposed enough to the wind.  With the sides solid I'd hope the back is a little open to allow airflow through.
 
Rebekah Harmon
Apprentice Rocket Scientist
Posts: 853
Location: 4a, high mountain dessert
410
3
kids foraging rabbit fiber arts medical herbs bee
  • Mark post as helpful
  • send pies
    Number of slices to send:
    Optional 'thank-you' note:
  • Quote
  • Report post to moderator
Submission flagged incomplete
I built a free-standing fire wood rack. After my she shed project, I have SO MANY scraps of lumber and pallet wood lying around. I need a place to store it so I can use it in my she shed this winter. I used mostly pallet wood for this project, Heat-treated stuff, no chemicals. I used a pallet as the base, which will keep air flowing under the wood. The over-all rack is sturdy because I used several cross-beams to brace each side. Re-used nails and a few screws are holding it together. On top, I cut a few scraps of roofing metal so the rain and snow will slide off. With a footprint of 3x4, it will hold 36+ square feet of firewood. Not bad for taking less than an hour!
20220819_093225.jpg
The spot where it will go
20220819_101753.jpg
patched pallet and sides on
20220819_105431.jpg
The roof over the top
20220819_105417.jpg
placed close to the she shed door for easy servicing
Staff note (gir bot) :

Someone flagged this submission as not complete.
BBV price: 2
Note: You're close Rebekah but to hold firewood it does need some vertical chunks of wood on either side to contain the stacks.  If you add those, I think it'll be certifiable

 
Luke Mitchell
gardener
Posts: 580
Location: Pembrokeshire, UK
434
2
dog forest garden gear fungi foraging trees building medical herbs woodworking homestead
  • Likes 4
  • Mark post as helpful
  • send pies
    Number of slices to send:
    Optional 'thank-you' note:
  • Quote
  • Report post to moderator

Mike Haasl wrote:That looks like it should qualify as long as the wood is exposed enough to the wind.  With the sides solid I'd hope the back is a little open to allow airflow through.


Great. The front and back are entirely open - this is to allow the wind to pass over, around and through the stacked logs (which are oriented end-grain to the wind) and dry them out. I've also stacked the logs outside for a while first to start the drying process. They are about 14% moisture at the moment.

I'm 80% done with the second log store at the moment. That one will be sited by the house for the time being. I'll take photos and submit my BB when that's done.
 
Rebekah Harmon
Apprentice Rocket Scientist
Posts: 853
Location: 4a, high mountain dessert
410
3
kids foraging rabbit fiber arts medical herbs bee
  • Mark post as helpful
  • send pies
    Number of slices to send:
    Optional 'thank-you' note:
  • Quote
  • Report post to moderator
Submission flagged incomplete
Ok, trying again. I made a place to stack my firewood bits left over from my pallet projects. It's made of mostly palletwood, heat treated, of course. See the blue paint on the ends? Anyways, I made it the footprint of a pallet, so it will stack more than a cord of wood. I put used metal roofing over the top, secured with self-tappers. I added wood to the sides, as suggested, so it will hold the wood in better. See how well it holds my hodge-podge?
20220819_093225.jpg
the place it will be built
20220819_101753.jpg
in progress
in progress
20220819_105431.jpg
adding a roof
adding a roof
20220901_160014.jpg
cross beams in place
Staff note (gir bot) :

Someone flagged this submission as not complete.
BBV price: 1
Note: Shoot, looks like you used plywood in the roof which is a no-no for "Dimensional Lumber Woodworking".  Sorry.  But the side supports look good...

 
Yeast devil! Back to the oven that baked you! And take this tiny ad too:
the permaculture bootcamp in winter (plus half-assed holidays)
https://permies.com/t/149839/permaculture-projects/permaculture-bootcamp-winter-assed-holidays
reply
    Bookmark Topic Watch Topic
  • New Topic