

|

|
|
|
|

|

|

|

|
.png)
|
 6
6


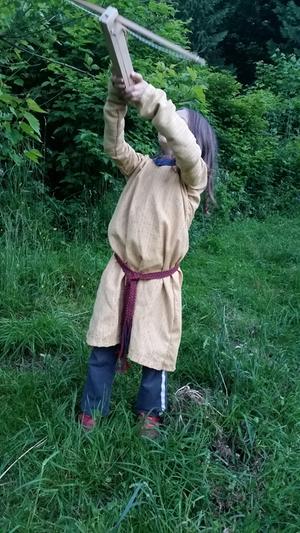
Jay Angler wrote:Awesome shirt, Nicole - but on the practicality side, is he going to wear it to work?
You've done part 1 and 2 - can you see yourself sewing him an efficient, low waste work shirt from what you learned?

~Permies FAQ ~ Dragons, Fairies and even a Mini-Paul! ~ You Know You're a Permie When...~ All About Permies, including tutorials ~Herbal Hugel Spiral of Randomness!~Tricks to Keep the Dirt from Sliding off a Hugel~List of Cascadia Bloggers and Facebook Pages!~

Skill verified by gir bot")

Skill verified by Mike Haasl")

Skill verified by paul wheaton")

Skill verified by Mike Haasl")

Skill verified by r ransom")

Skill verified by Mike Haasl")

Skill verified by Mike Haasl")

Skill verified by Mike Haasl") 4
4
Visit Redhawk's soil series: https://permies.com/wiki/redhawk-soil
How permies.com works: https://permies.com/wiki/34193/permies-works-links-threads

Skill verified by Nicole Alderman")

Skill verified by Mike Haasl")


 11
11

How Permies works: https://permies.com/wiki/34193/permies-works-links-threads
My projects on Skye: The tree field, Growing and landracing, perennial polycultures, "Don't dream it - be it! "
9
From some of the "period clothing" Youtube's I've watched, baggy was a big part of clothing back then, and they tended to "add" bulk to make the person the shape they wanted, rather than try and jam people into something that wasn't their shape.My idea was that I wanted a fitted shirt, so it had a more feminine outline and not end up too baggy.
Visit Redhawk's soil series: https://permies.com/wiki/redhawk-soil
How permies.com works: https://permies.com/wiki/34193/permies-works-links-threads
5
Jay Angler wrote:We were wondering if smocking would be "elastic" enough to replace the elastic at the top of underwear. It would be bulkier. Maybe there are reasons that "underwear" is a relatively new invention!
How Permies works: https://permies.com/wiki/34193/permies-works-links-threads
My projects on Skye: The tree field, Growing and landracing, perennial polycultures, "Don't dream it - be it! "
2
pax amor et lepos in iocando
6
I am currently reading "Fibershed" by Rebecca Burgess. I'm not far in, but the statistics regarding the waste, environmental damage and human damage being done by the clothing industry is huge. As with many "awakenings" the pendulum tends to swing from one extreme to the other - excessive waste to zero-waste. I have clearly pointed out in many of my posts, that a main reason for *not* making my own fabric for clothing, is the waste this would generate if I used the typical modern pattern. However, I've also identified that "zero-waste" is the opposite extreme and not my goal.-but with so many wonderful things to do with scrap fabric, I do wonder about where the obsession with zero-waste sewing has come from?
Visit Redhawk's soil series: https://permies.com/wiki/redhawk-soil
How permies.com works: https://permies.com/wiki/34193/permies-works-links-threads
4
pax amor et lepos in iocando
5
How Permies works: https://permies.com/wiki/34193/permies-works-links-threads
My projects on Skye: The tree field, Growing and landracing, perennial polycultures, "Don't dream it - be it! "
5
Melissa Ferrin wrote:Of course, fashion industry clothing is wasteful.
But I just meant that a quality made-to-measure garment can last an adult person decades or be worn by many children. And there are plenty of uses for scrap fabric. The time an effort going into to making patterns that use only rectangles and creat awkward garments, could instead go into patchwork and other scrap fabric projects.
"The only thing...more expensive than education is ignorance."~Ben Franklin. "We can easily forgive a child who is afraid of the dark; the real tragedy of life is when men are afraid of the light." ~ Plato


 5
5
Melissa Ferrin wrote:Of course, fashion industry clothing is wasteful.
But I just meant that a quality made-to-measure garment can last an adult person decades or be worn by many children. And there are plenty of uses for scrap fabric. The time an effort going into to making patterns that use only rectangles and creat awkward garments, could instead go into patchwork and other scrap fabric projects.
"Also, just as you want men to do to you, do the same way to them" (Luke 6:31)

Skill verified by Opalyn Rose") 10
10


 6
6
I think it's awesome that you're going to resurrect the dress and the fact that your niece is willing to wear it to school shows me how a classic pattern doesn't age!Most likely it will be the ribbon, though. That will support seams that haven't shown damage yet, and I can use it camouflage some areas where I think my stitches look messy.
Visit Redhawk's soil series: https://permies.com/wiki/redhawk-soil
How permies.com works: https://permies.com/wiki/34193/permies-works-links-threads
3
4
Judging from your description and what the damage looks like, putting "ribbon" on both sides would be ideal.Casie Becker wrote:Do I need to put the ribbon on both sides of the seams, if it will work on one side is it the inside or the outside?
If you have experience struggling with repairing damage like this I would welcome your advice.
Visit Redhawk's soil series: https://permies.com/wiki/redhawk-soil
How permies.com works: https://permies.com/wiki/34193/permies-works-links-threads
4
4
6
Zone 6b, dry, high desert in New Mexico 7500' elevation
have you checked your new USDA Hardiness zone? Check here: https://planthardiness.ars.usda.gov/
6

Skill verified by Ash Jackson") 12
12


Visit Redhawk's soil series: https://permies.com/wiki/redhawk-soil
How permies.com works: https://permies.com/wiki/34193/permies-works-links-threads
6
There is madness to my method.
"Life finds a way"- Ian Malcolm
"We're all mad here" - The Cheshire Cat
1
Exactly. And we've got people experimenting with peg looms which could be made specifically for the sizes needed for this pattern. Even if you didn't set up your loom specifically for the pattern width, spare rectangular scraps are more useful for upcycling into edgings, reinforcing bits, or even garden ties, than the squiggly bits left from most modern patterns.Cat Knight wrote:
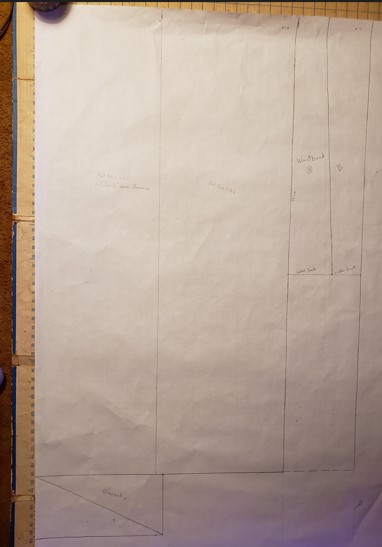
http://www.festiveattyre.com/p/how-to-make-easy-italian-chemise.html
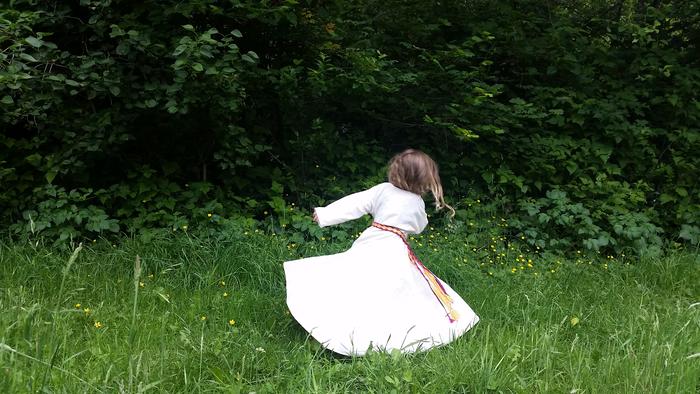
It is totally rectangles/squares (except the sleeve gores that are triangles cut from squares), and while I was making it I told hubby I bet this was because you could just weave the right size on your loom...
Visit Redhawk's soil series: https://permies.com/wiki/redhawk-soil
How permies.com works: https://permies.com/wiki/34193/permies-works-links-threads
7
Jay Angler wrote:
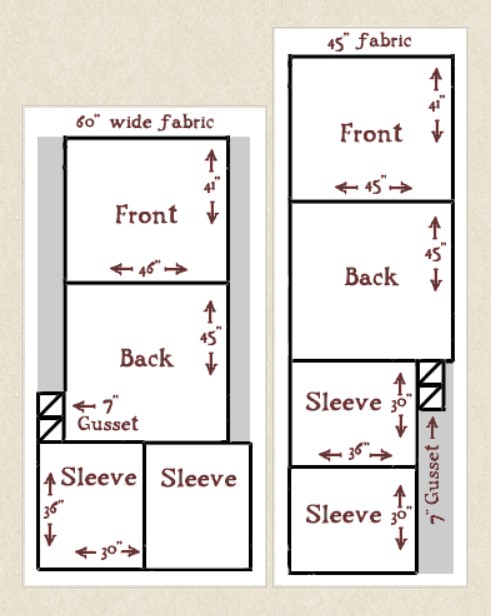
First a question: how many inches did you overlap the sleeve panel and each of the front and back panels? Did you use the 2" and 6" that was suggested?
Second question: did you do the 7" or a different size gusset?
Third question: how loose around the neckline do you find the finished chemise?
I find it interesting that this pattern cuts the gussets into triangles, whereas the "Pirate shirt" pattern keeps them as squares. This adds a seam across the hypotenuse of the triangle when you stitch the arms closed, which recreates the "square". It probably makes it easier for a beginner to sew the pattern, but it makes the underarms - already a weak point - possibly a little weaker. This is more likely to be an issue with home-spun fabric than a high thread count industrial cotton and if I were to attempt this with a lower count material, I'd be inclined to use a scrap of cotton bed-sheet as an interfacing on the triangles.
There is madness to my method.
"Life finds a way"- Ian Malcolm
"We're all mad here" - The Cheshire Cat
3


 6
6

 6
3
6
3
Visit Redhawk's soil series: https://permies.com/wiki/redhawk-soil
How permies.com works: https://permies.com/wiki/34193/permies-works-links-threads
7
Glenn Herbert wrote:I haven't made pants like the ones you describe - pants were not in use in that area and period - but I have seen patterns of similar description from the Middle East.
The tunic I and many others make is from a bog body in Sweden in the mid 14th century, known as the Bocksten Man. A search will bring up many images and patterns.


~Permies FAQ ~ Dragons, Fairies and even a Mini-Paul! ~ You Know You're a Permie When...~ All About Permies, including tutorials ~Herbal Hugel Spiral of Randomness!~Tricks to Keep the Dirt from Sliding off a Hugel~List of Cascadia Bloggers and Facebook Pages!~
2
Visit Redhawk's soil series: https://permies.com/wiki/redhawk-soil
How permies.com works: https://permies.com/wiki/34193/permies-works-links-threads
6

~Permies FAQ ~ Dragons, Fairies and even a Mini-Paul! ~ You Know You're a Permie When...~ All About Permies, including tutorials ~Herbal Hugel Spiral of Randomness!~Tricks to Keep the Dirt from Sliding off a Hugel~List of Cascadia Bloggers and Facebook Pages!~
6
Jay Angler wrote:I do think I've seen some info from Medieval times which suggested that most people wrapped strips of fabric around their legs rather than wearing "pants". I'm not sure whether it was because "wear and tear" made strips more efficient from the "time to produce vs time to wear out" perspective, or if they simply recognized that making pants fit effectively is much harder than making a tunic fit well!
Sometimes activism is chaining yourself to a bulldozer or blockading parliament. Far more often, it’s growing too many zucchinis and sharing them with your neighbours.


 3
3
Read about Permies.com site basics in this thread: https://permies.com/t/43625/Universal
10
![[Thumbnail for 40B77A93-94AB-4BDD-9829-D0DC09C0D4EB.jpeg]](/t/154258/a/205960/40B77A93-94AB-4BDD-9829-D0DC09C0D4EB.jpeg "Filename: 40B77A93-94AB-4BDD-9829-D0DC09C0D4EB.jpeg
Description:")
![[Thumbnail for 8E320139-FBD1-4133-8070-0BA1BB087B01.jpeg]](/t/154258/a/205961/8E320139-FBD1-4133-8070-0BA1BB087B01.jpeg "Filename: 8E320139-FBD1-4133-8070-0BA1BB087B01.jpeg
Description:")
![[Thumbnail for 6BA25443-3AD8-4C80-989C-243616254788.jpeg]](/t/154258/a/205962/6BA25443-3AD8-4C80-989C-243616254788.jpeg "Filename: 6BA25443-3AD8-4C80-989C-243616254788.jpeg
Description:")
Sometimes activism is chaining yourself to a bulldozer or blockading parliament. Far more often, it’s growing too many zucchinis and sharing them with your neighbours.
4
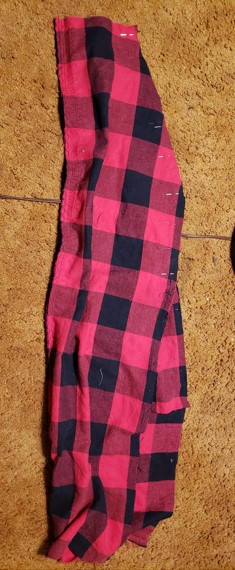
Interesting - that's pretty much how the black and red pants I made were done. The pants gussets are shorter relative to the material length, whereas your gussets are essentially tapered to the mid-point of the sleeve length. The real difference is that the pants fabric goes all the way up to the waist rather than stopping at the crotch, but the sleeve stops at the underarm. But the mechanics is essentially the same. Once you have a feel for the ratio you need for the body you're sewing for, it's a matter of straight lines. Much simpler than the complicated curves of many patterns I've tried to sew.I take the triangle that’s cut off the sleeve rectangle to add shaping, and sew it to the top of the sleeve, in lieu of a gusset.
Visit Redhawk's soil series: https://permies.com/wiki/redhawk-soil
How permies.com works: https://permies.com/wiki/34193/permies-works-links-threads
5
Jay Angler wrote:Once you have a feel for the ratio you need for the body you're sewing for, it's a matter of straight lines. Much simpler than the complicated curves of many patterns I've tried to sew.
Sometimes activism is chaining yourself to a bulldozer or blockading parliament. Far more often, it’s growing too many zucchinis and sharing them with your neighbours.
5
Mind-bending is right and you either need fabric that's identical on both sides, or to have a need for two pairs the same size. The only 'rectangle' involved is the shape of the starting fabric! I'm not sure that the seams would be comfortable to use them as farm pants either!Incidentally, if you want a really brain-bending pair of pants to try, I present Holly McQuillan’s zero-waste spiral trousers: https://fadanista.com/2020/01/01/zero-waste-spiral-trousers/.
Visit Redhawk's soil series: https://permies.com/wiki/redhawk-soil
How permies.com works: https://permies.com/wiki/34193/permies-works-links-threads
6


 4
4
Visit Redhawk's soil series: https://permies.com/wiki/redhawk-soil
How permies.com works: https://permies.com/wiki/34193/permies-works-links-threads
4
Sometimes activism is chaining yourself to a bulldozer or blockading parliament. Far more often, it’s growing too many zucchinis and sharing them with your neighbours.
4
There's an exception to every rule! That book looks interesting enough that I put in a "please purchase" request at my regional library. That said... the last 3 books I requested they buy seem to enter a 4th dimension, but I went in, buttonholed the Librarian, spent the better part of an hour finding which cracks they'd fallen into, and she promised things would get moving again!Phoenix Blackdove wrote:I've seen the comment in this thread a couple of times that zero-waste patterns are all baggy and/or use more fabric than "regular" patterns. That isn't necessarily the case, as this blog post talks about: ...
Visit Redhawk's soil series: https://permies.com/wiki/redhawk-soil
How permies.com works: https://permies.com/wiki/34193/permies-works-links-threads

|
It's a tiny ad only because the water is so cold.
building a permaculture community with hands on gardening and natural building
https://wheaton-labs.com/bootcamp
|


