• Post Reply Bookmark Topic Watch Topic
  • New Topic
permaculture forums growies critters building homesteading energy monies kitchen purity ungarbage community wilderness fiber arts art permaculture artisans regional education skip experiences global resources cider press projects digital market permies.com pie forums private forums all forums
this forum made possible by our volunteer staff, including ...
master stewards:
  • Nancy Reading
  • Carla Burke
  • r ranson
  • John F Dean
  • paul wheaton
  • Pearl Sutton
stewards:
  • Jay Angler
  • Liv Smith
  • Leigh Tate
master gardeners:
  • Christopher Weeks
  • Timothy Norton
gardeners:
  • thomas rubino
  • Jeremy VanGelder
  • Maieshe Ljin
  • Likes 5
  • Mark post as helpful
  • send pies
    Number of slices to send:
    Optional 'thank-you' note:
  • Quote
  • Report post to moderator
This is a badge bit (BB) that is part of the PEP curriculum.  Completing this BB is part of getting the straw badge in Textiles.

For this BB, you will hem trousers or skirt!

To complete this BB, the minimum requirements are:
- hem trousers or a skirt (using needle and thread - sewing machines are ok too)

To document your completion of the BB, provide proof of the following as pictures or a video (less than two minutes):
 - the the pants or skirt before altering (on a body)
 - show the alteration in progress
 - show pant or skirt after alteration on a body

Related Articles:
- How to Hem Pants
- How to Hem a Skirt

How to Hem a Skirt OR a Dress | Sew Anastasia


How to Hem Pants by Hand - Step by Step


COMMENTS:
 
Posts: 68
Location: Northeast Indiana (zone 6a)
73
home care urban food preservation fiber arts medical herbs homestead
  • Likes 1
  • Mark post as helpful
  • send pies
    Number of slices to send:
    Optional 'thank-you' note:
  • Quote
  • Report post to moderator
Approved submission
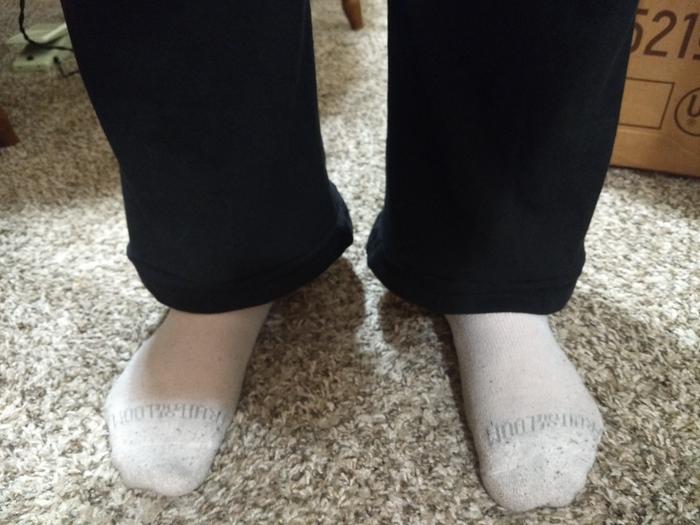
I was gifted a pair of pants that fit perfectly except for being several inches too long. The obvious answer was to hem them. I used my favorite method of hemming - turning up the hem so it makes a "cuff," sewing right below the original hem, trimming the excess, and folding the "cuff" back down so the original hem is still there. It takes a little more trial and error with the pinning to get the length right, but I don't have to worry about top stitching. It probably wouldn't have been too noticeable on these pants since they're black, but I still haven't figured out top stitching that looks good enough to satisfy me, so if I can keep the original hem it's worth the extra time finding the right length.
pants-too-long.jpg
These pants are several inches too long (I'm up on my toes on one foot so you can see where my heel is relative to the hem).
pinned.jpg
Turned up the cuffs and pinned them so I knew where to sew. This part takes some pinning and repinning to get the length right.
sewing.jpg
Sewing by machine around the hem.
hemmed.jpg
Hemmed! The seam hasn't been ironed yet so it looks a little wonky but once it's ironed it's nearly unnoticeable (especially since the pants are black).
Staff note (gir bot) :

Leigh Tate approved this submission.
Note: Nicely done!

 
pollinator
Posts: 223
Location: East Texas, USA
131
books chicken fiber arts sheep homestead ungarbage
  • Likes 1
  • Mark post as helpful
  • send pies
    Number of slices to send:
    Optional 'thank-you' note:
  • Quote
  • Report post to moderator
Approved submission
I hemmed my work trousers!
The trousers were too long, a side seam had torn open, and the old hem was wearing out and coming undone. First, I measured how much I would need to shorten them: 2.25 inches from the old fold, 4.25 with the old hem unfolded. Then I seam-ripped the old hem, hand-back-stitched the torn seam, cut off two inches, folded and ironed the new hem, and hand-back-stitched the new hem with black cotton thread.

IMG_1833.JPG
too long and torn
too long and torn
IMG_1834.JPG
seam-ripping
seam-ripping
IMG_1836.JPG
preparing to iron the new fold
IMG_1837.JPG
new fold
new fold
IMG_1839.JPG
stitching
stitching
IMG_1843.JPG
finished product
finished product
IMG_1845.JPG
finished product on model
IMG_1859.JPG
[Thumbnail for IMG_1859.JPG]
Staff note (gir bot) :

Mike Barkley approved this submission.

 
Posts: 36
Location: Alberta, Canada (Zone 3)
34
5
  • Likes 1
  • Mark post as helpful
  • send pies
    Number of slices to send:
    Optional 'thank-you' note:
  • Quote
  • Report post to moderator
Approved submission
Time to hem these over-long, frayed pants.
06762513-13B1-4CCB-AA8B-F4285C57C8C5.jpeg
Before
Before
DBB25662-D9FF-4BE2-BB61-2DC745F96122.jpeg
During
During
8172640E-650D-449F-8A8A-F8B746DDA174.jpeg
After
After
Staff note (gir bot) :

[url=https://permies.com/u/262093/Harmony-d%27Eyre]Harmony d'Eyre[/url] approved this submission.

 
Posts: 58
Location: Urban Central Scotland (Stirling)
27
kids forest garden urban bike fiber arts ungarbage
  • Mark post as helpful
  • send pies
    Number of slices to send:
    Optional 'thank-you' note:
  • Quote
  • Report post to moderator
Approved submission
This BB was motivation to finally hem the last pair of little one's school trousers that have been sitting around since August.

I use a long running stitch on the inside (so I can clip it out and lengthen the hem once he grows) with a nearly invisible catch on the outside. To hem them, I go down a side seam and back up, then across the top (where the previous hem would otherwise catch toes inside) to the other hem, then repeat. This no-cut style is great for those who are still growing. It also means that we can share them with other children once he's completely outgrown them.

P.s. hurrah, I've figured out how to name my photos in a post!
PXL_20211115_135256175.MP-01.jpeg
Unhemmed
Unhemmed
PXL_20211115_135529098.MP-01.jpeg
First hem marked
First hem marked
PXL_20211115_140052011.MP-01.jpeg
Ready for stitching
Ready for stitching
PXL_20211115_141812620.MP-01.jpeg
Action shot on side hem
PXL_20211115_150227258.MP-01.jpeg
Completed inside and outside
PXL_20211115_150523443.MP-01.jpeg
Trousers after hemming
Staff note (gir bot) :

Paul Fookes approved this submission.
Note: I certify this BB complete. Great set of photos well documented.

 
Posts: 12
4
3
  • Likes 1
  • Mark post as helpful
  • send pies
    Number of slices to send:
    Optional 'thank-you' note:
  • Quote
  • Report post to moderator
Approved submission
So my hubby had a pair of pants that were too long. I had them pinned and was mostly done with them when I read about taking pictures as I went in the book/on the forums. I hope that the pictures I took and my description will be enough. Funny enough when my hubby was trying them on the last time, the zipper popped open, so I had to fix that as well, but this time I took pictures! 😁
How I hemmed the pants:
I had my hubby put the pants on. I folded them to the correct length and pinned them.
Once he took them off, I turned them inside out and marked where they should be sewn. I considered leaving the extra length (like one of the previous posts), but my husband is the tallest in our current friends group and no one in our family group would fit his waist size. So, after I did a tack stitch and rechecked that they would fall correctly on him in his work shoes, I cut the excess off. I did have to make a small adjustment of about an inch, but I just folded that up and did a running stitch my hand with matching black thread.

How I fixed the zipper:
After watching a few videos, I used a small set of pliers and a set of hemostats to use as my tools. I gently pried open the zipper and put both side back in place. I very gently applied pressure to close the pull until I couldn't see much space. I then not so gently had to pull with consistent pressure until the fabric synced up as I pulled it all the way down. I was happily surprised when it "zipped" up as I pulled it back to the top. I'd fixed it. 😁

If anyone has any questions, I will answer as best and as quickly as I can.
Since this is my first post, I really hope I'm doing it correctly! 🤞😁
received_2006285172886633.jpeg
Hemmed pants
Hemmed pants
received_456826546186071.jpeg
Hand stitched
Hand stitched
received_321370559916003.jpeg
Hide knot/end thread knot
20220213_171227.jpg
On hubby (front)
On hubby (front)
20220213_171300.jpg
On hubby (back)
On hubby (back)
received_450914780055401.jpeg
Broken/detached zipper
20220127_200311.jpg
Tools I used to fix the zipper
20220127_200833.jpg
Working on the zipper
20220127_200921.jpg
Fixed
Fixed
20220127_200931.jpg
[Thumbnail for 20220127_200931.jpg]
20220127_201141.jpg
Close up of zipper
Close up of zipper
Staff note (gir bot) :

Nicole Alderman approved this submission.
Note: Since this is your first BB post, and you added in bonus zipper pictures, and the hand-sewing is evident, I'm going to certify this. Next time, get those before pictures! Welcome to permies!

 
Posts: 95
Location: Billings, MT
53
homeschooling kids trees food preservation fiber arts building
  • Mark post as helpful
  • send pies
    Number of slices to send:
    Optional 'thank-you' note:
  • Quote
  • Report post to moderator
Approved submission
Work pants had damage and were always a little long.  I cleaned them up by hemming them.  My sewing skills are not great, this is not pretty, but that's why I experiment and practice on my cruddy low risk clothes.

Staff note (gir bot) :

Someone approved this submission.
Note: Hint, orienting the pants so that you're sewing the inside from the top reduces the risk of getting the fabric caught - for next time!

 
Do not threaten THIS beaver! Not even with this tiny ad:
12 DVDs bundle
https://permies.com/wiki/269050/DVDs-bundle
reply
    Bookmark Topic Watch Topic
  • New Topic