• Post Reply Bookmark Topic Watch Topic
  • New Topic
permaculture forums growies critters building homesteading energy monies kitchen purity ungarbage community wilderness fiber arts art permaculture artisans regional education skip experiences global resources cider press projects digital market permies.com pie forums private forums all forums
this forum made possible by our volunteer staff, including ...
master stewards:
  • Nancy Reading
  • Carla Burke
  • r ranson
  • John F Dean
  • paul wheaton
  • Pearl Sutton
stewards:
  • Jay Angler
  • Liv Smith
  • Leigh Tate
master gardeners:
  • Christopher Weeks
  • Timothy Norton
gardeners:
  • thomas rubino
  • Jeremy VanGelder
  • Maieshe Ljin

Metalworking Badge Oddball Thread

BB metalworking - wood badge
 
steward
Posts: 15505
Location: Northern WI (zone 4)
4846
7
hunting trees books food preservation solar woodworking
  • Mark post as helpful
  • send pies
    Number of slices to send:
    Optional 'thank-you' note:
  • Quote
  • Report post to moderator
Some PEP badges allow for oddball points.  This was introduced in this thread.

When submitting something in the official Oddball badge, you get points based on the time it would take a professional to do the same task if they have a bit of luck.

When submitting something within a badge that allows oddball points (Homesteading, Metalworking, etc), they are based on the time it would take a talented newbie to do the same task.

When you did something that should be in a badge but there isn't a BB for it, post about it in that badge and maybe it will become a BB.  If that badge allows oddball points, you can submit it there, otherwise it has to go into Oddball badge.

Some examples:
You welded up a 20 foot unicorn - put it into the Metalworking Oddball thread
You made a candle - put it in the regular Oddball thread since it isn't a clear fit for an existing badge
You build a pump house - post it in Homesteading since it should be a BB there and/or put it in Homesteading Oddball
 
gardener
Posts: 325
Location: NW Washington - Zone 8b (15 to 20 °F / -9.4 to -6.7 °C)
270
2
cattle goat foraging trees earthworks cooking building solar sheep wood heat
  • Likes 4
  • Mark post as helpful
  • send pies
    Number of slices to send:
    Optional 'thank-you' note:
  • Quote
  • Report post to moderator
Approved submission
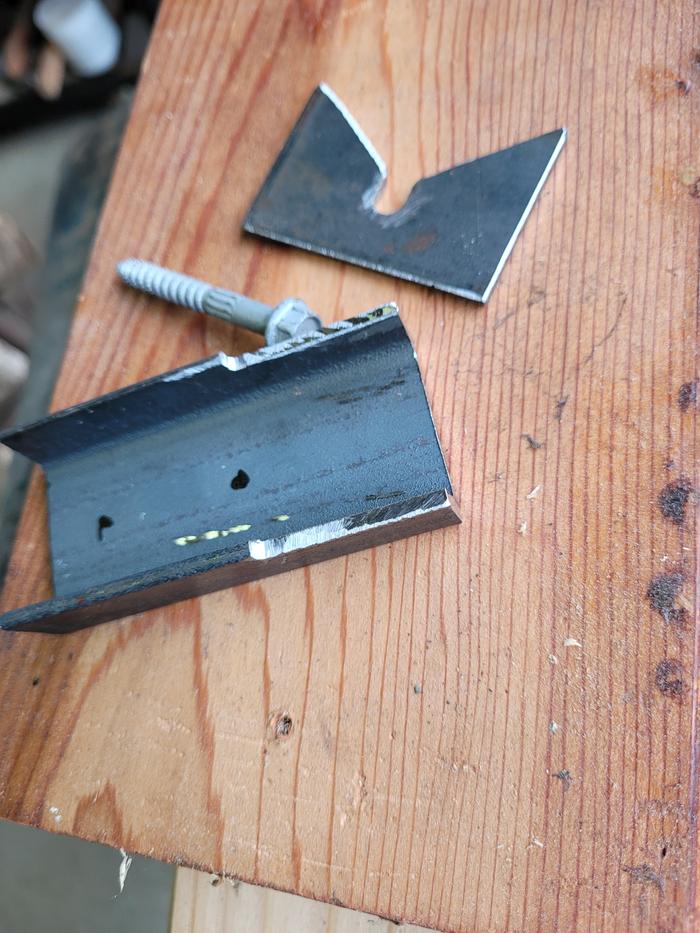
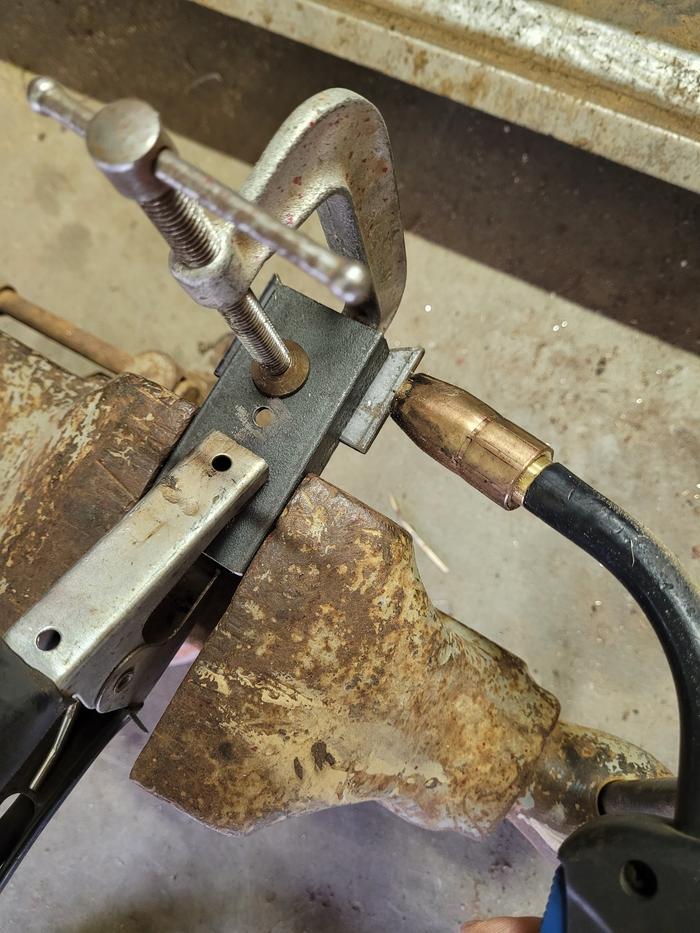
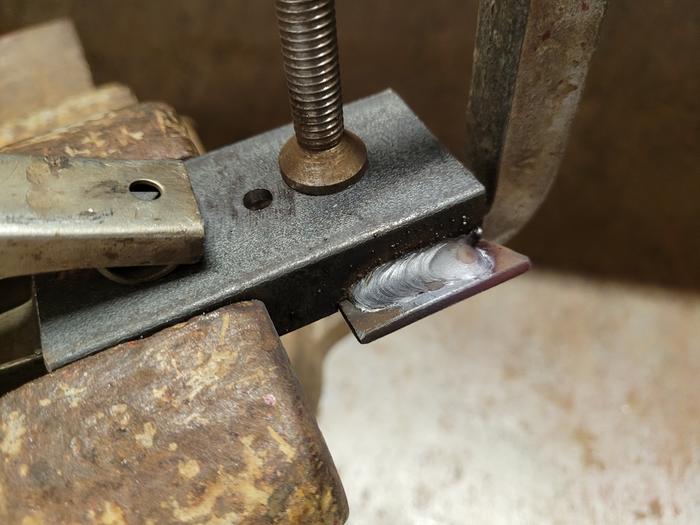
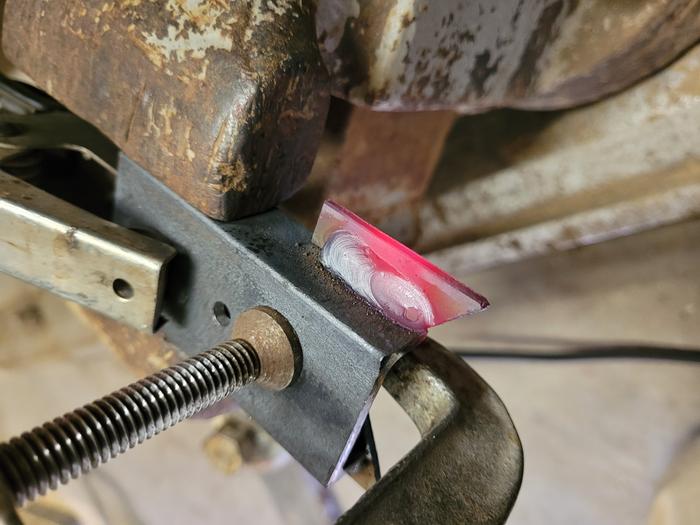
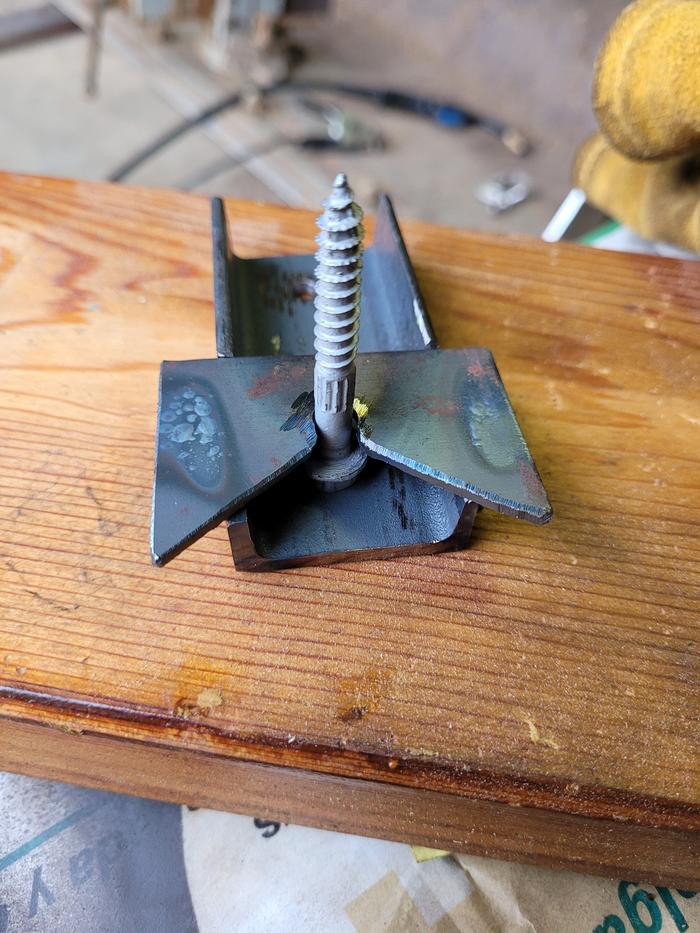
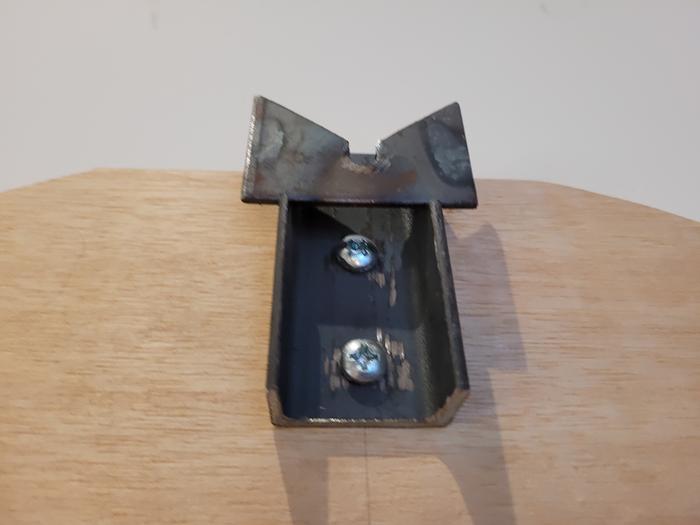
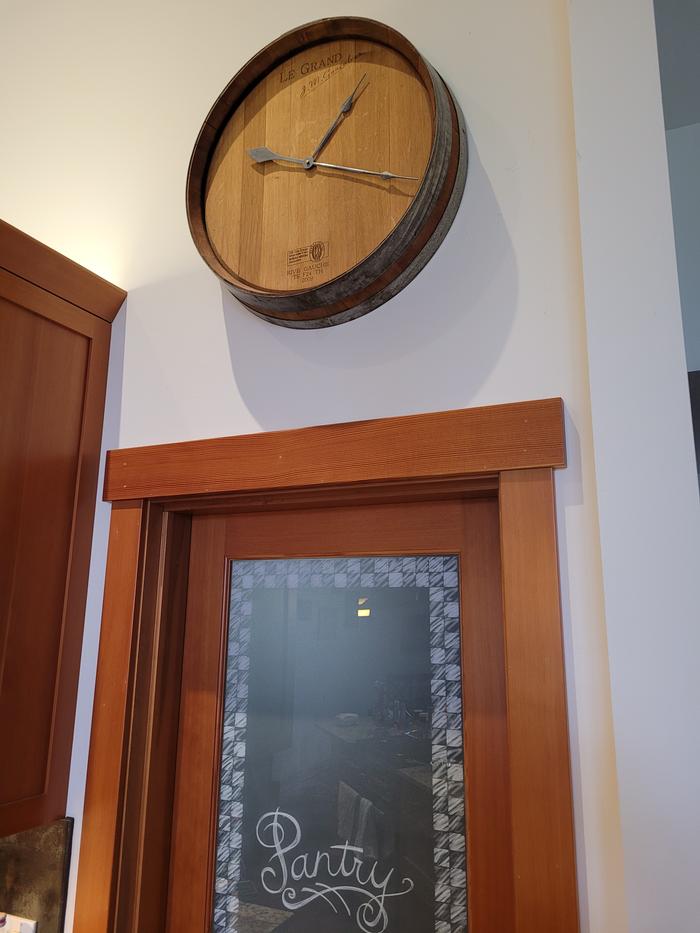
Otis wants to hang things on walls with confidence they will not fall off, and to do it without glue or paint or an Amazon purchase, right?  The wall clock I made using the end of a used wine barrel was apparently too heavy for the store bought picture hanging bracket and it bent and broke.  Luckily I noticed before it fell off the wall and did some damage.  So I decided it was time to fabricate a beefy steel hanger for it that I guarantee won't fail!


Bent and broken store bought bracket.


Raw materials for making a new bracket.


Parts dilled, cut out, and edges ground smooth.


Ready to weld.


First weld.


Next weld, still red hot.


Test fit.


Bracket installed on wall.


Lag installed on back of clock.


Clock hung back on wall.


Staff note (gir bot) :

Someone flagged this submission as not complete.
BBV price: 3
Note: Same job posted/approved already: https://permies.com/wiki/140/97787/pep-oddball/PEP-Badge-Oddball#1213019

Staff note (gir bot) :

Someone approved this submission.
Note: Moved from the Oddball badge along with the 1/2 point it earned there since it's a better fit for this thread.

 
R Parian
gardener
Posts: 325
Location: NW Washington - Zone 8b (15 to 20 °F / -9.4 to -6.7 °C)
270
2
cattle goat foraging trees earthworks cooking building solar sheep wood heat
  • Likes 3
  • Mark post as helpful
  • send pies
    Number of slices to send:
    Optional 'thank-you' note:
  • Quote
  • Report post to moderator
Approved submission
Recently a design flaw was discovered on the dump trailer when it got a flat tire. The person I had loaned it to went to install the spare tire and found that the sidewall of the spare was significantly worn, to the point of being dangerous to use. This was caused by the spare tire storage location, which is a metal rack on the neck of the gooseneck. The spare tire rested on this rack and was held in place only by gravity, so every bump and turn would cause the tire to shift position enough that over time it wore the tire sidewall rubber thin.  It also wore through the paint of the trailer in the contact points which allowed rust to start to take hold.

I decided this called for a permanent fix to this design flaw.  I used an angle grinder to grind off the rust and flaking paint. I fabricated a spare tire mount bracket by cutting down a store bought spare tire mount to the right length, and cutting a piece of 2"x1" channel steel to the right length, welded them together, painted them, and welded this to the trailer, then wire brushed and painted the remaining exposed steel.

Now the spare tire is securely held in place with two lug nuts making it harder to steal the spare and suspending it about 2" in the air so the rubber is not in contact with anything.
20210807_142629.jpg
Problematic spare tire storage area.
20210807_142706.jpg
Worn sidewalls of spare tire.
20210807_142740.jpg
Starting materials cut down to proper length.
20210807_144946.jpg
Welded together, cut off pieces also in view.
20210807_145311.jpg
Bottom painted.
Bottom painted.
20210807_145551.jpg
Top painted.
Top painted.
20210809_130502.jpg
Close up of rusty chipping worn area on trailer.
20210809_130548_05.jpg
Grinding rust and chipped paint off.
20210809_131615.jpg
Ground areas.
Ground areas.
20210809_135149.jpg
Welded fabricated mount to trailer.
20210809_141441.jpg
Painted welds and ground areas.
20210809_170747.jpg
Spare mounted on new mount.
20210809_170813.jpg
Tire no longer in direct contact with anything.
20210809_170851.jpg
Done.
Done.
Staff note (gir bot) :

Someone approved this submission.
Note: Certified for 1.5 metalworking oddball points

 
R Parian
gardener
Posts: 325
Location: NW Washington - Zone 8b (15 to 20 °F / -9.4 to -6.7 °C)
270
2
cattle goat foraging trees earthworks cooking building solar sheep wood heat
  • Likes 3
  • Mark post as helpful
  • send pies
    Number of slices to send:
    Optional 'thank-you' note:
  • Quote
  • Report post to moderator
Approved submission
A neighbor had a gate with unusual integral hinges, but it was missing one of the two hinges so it wasn't able to be used.  They had a need for the gate so I volunteered to fabricate a hinge for it using scrap metal from my boneyard.
20210902_131256.jpg
The one hinge that wasn't missing.
20210911_092613.jpg
The location of the missing hinge.
20210905_155402.jpg
The materials I started with from the boneyard.
20210905_160353.jpg
The section of pipe was too large diameter, so cut a piece out of it.
20210910_172456.jpg
Diameter reduced to proper fit around the gate.
20210910_173427.jpg
Welded the pipe to some channel steel.
20210910_174618.jpg
Welded the channel steel to some flat bar with bold holes drilled in it.
Welded the channel steel to some flat bar with bolt holes drilled in it.
20210910_174940.jpg
New hinge welding done.
20210910_175910.jpg
Paint the hinge.
Paint the hinge.
20210911_092653.jpg
Slide hinge onto gate.
20210911_093053.jpg
Grind paint/rust off the bottom of the gate.
20210905_160334.jpg
Cut a circle out of flat steel.
20210911_095632.jpg
Weld metal circle to bottom of gate to keep gate from being lifted out of the hinge.
20210911_095947.jpg
Paint bottom of gate and welds of retaining plate.
20210911_100057.jpg
All finished and ready to mount.
Staff note (gir bot) :

Mike Barkley approved this submission.
Note: Certified for 1.5 oddball points.

 
gardener
Posts: 3132
2095
  • Likes 1
  • Mark post as helpful
  • send pies
    Number of slices to send:
    Optional 'thank-you' note:
  • Quote
  • Report post to moderator
Approved submission
Had to fix a chainsaw. The plastic worm gear on the oiler stripped out. I couldn't find a replacement, and prefer metal anyway. I didn't have a piece of brass or bronze, so went with 6061-T6 aluminum.
20220101_180252.jpg
Stripped plastic gear. Plastic bad!
20220101_180317.jpg
All chucked up and ready to go.
20220101_181103.jpg
Boring the hole first.
20220101_183215.jpg
Turned the gear part to diameter.
20220101_190237.jpg
Cut the teeth
Cut the teeth
20220101_190934.jpg
Parting it off
Parting it off
20220101_194127.jpg
Filed two notches and slipped it on the motor shaft.
20220101_194953.jpg
It's alive!
It's alive!
Staff note (gir bot) :

Someone approved this submission.
Note: Certified for 2 oddball points!

 
gardener
Posts: 1871
Location: Japan, zone 9a/b, annual rainfall 2550mm, avg temp 1.5-32 C
930
2
kids home care trees cooking bike woodworking ungarbage
  • Likes 2
  • Mark post as helpful
  • send pies
    Number of slices to send:
    Optional 'thank-you' note:
  • Quote
  • Report post to moderator
Approved submission
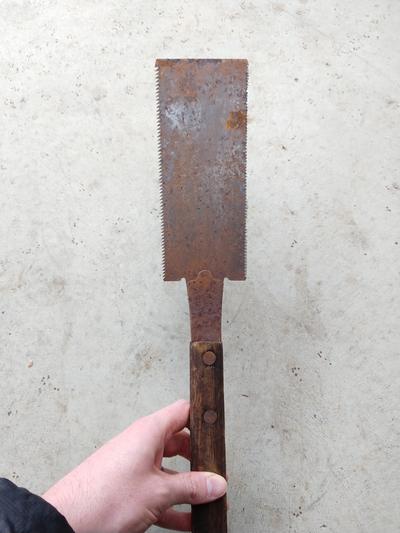
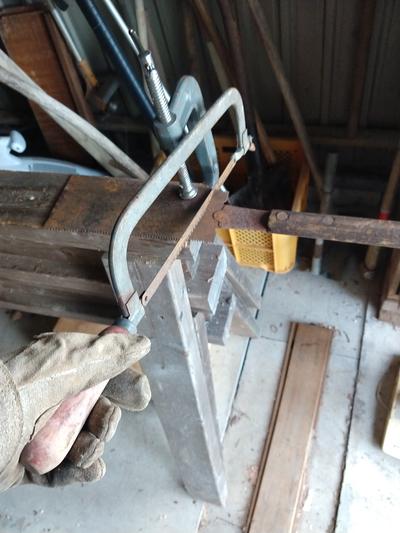
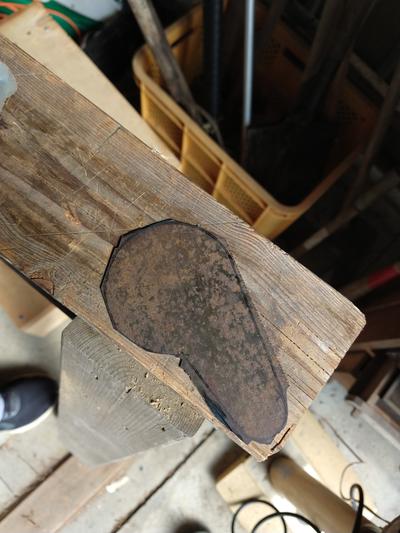
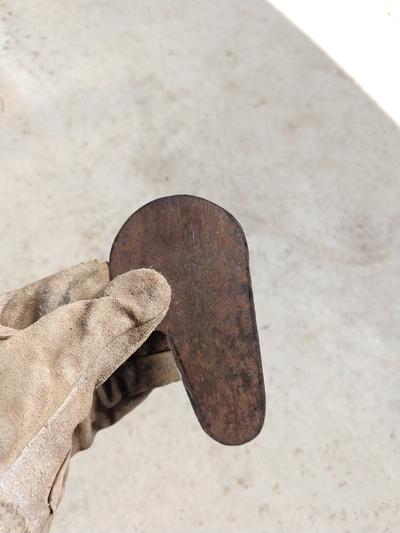
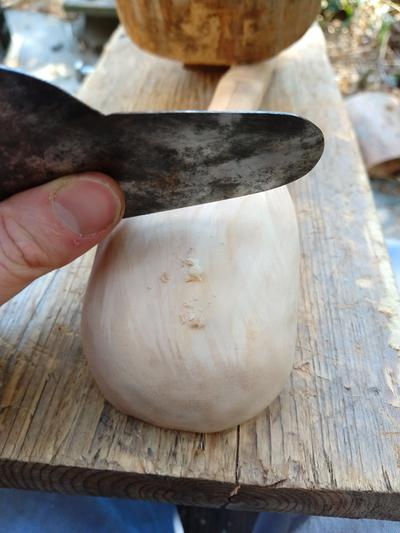
Today I finished making a curved card scraper from an old saw blade.

I generally avoid metalworking because it's really noisy and it terrifies me... but I suited up with my respirator, heavy leather gloves and goggles and had a go at it.

starting metal


removing handle


removing saw teeth


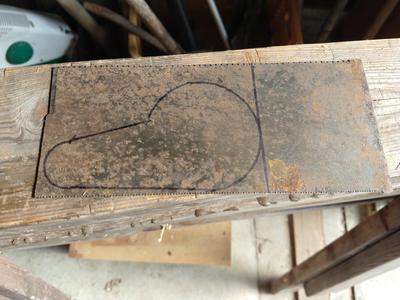
marking up


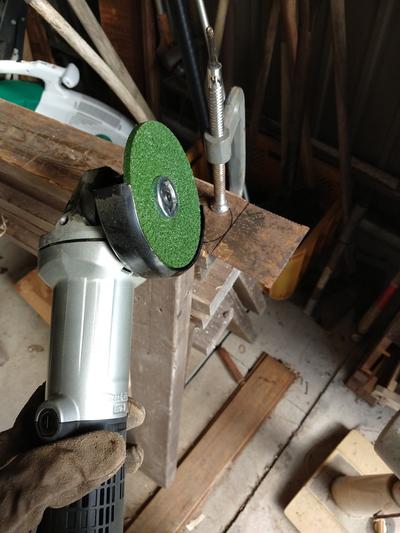
using disc grinder to remove bulk of waste


Short aside. I have no training in metalworking, but I quickly realized a danger and addressed it with extra caution. When you grind to sever metal, it could theoretically shoot off as a high velocity projectile. Once I realized this (thankfully before it happened) I made sure not to grind all the way through at any point, and snapped off the pieces with my heavy leather gloves or pliers as need be. I also picked up any metal shards and larger fragments with some U magnets and collected them in my metal scrap jar.

cut to shape with grinder


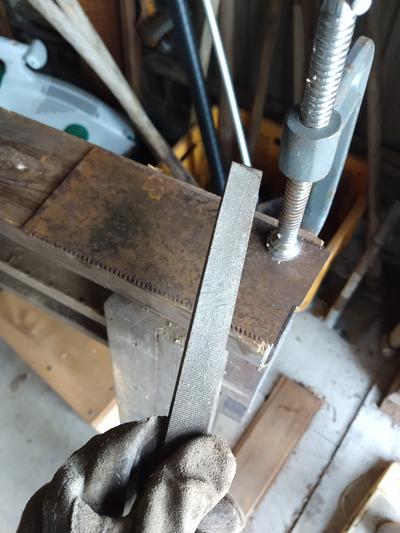
smoothed with a file


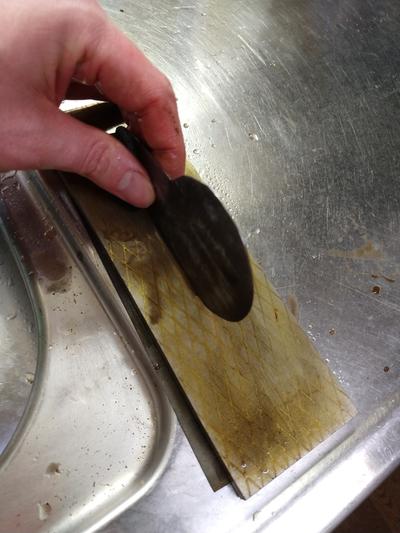
For sharpening I watched three different famous youtubers videos, compared the main points, and decided it was easier than I had always assumed because they all left out or did slightly different things with a similar overarching theme.


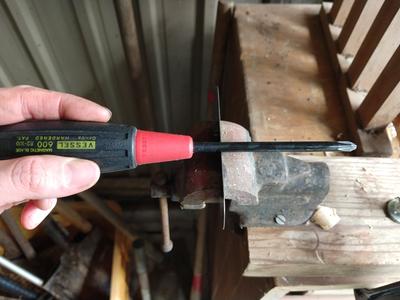
I don't have a burnisher. I do have a hardened steel screwdriver though. It worked well.


The resultant burr/hook is obvious, I can feel it with my fingertips around the edges. Using it is pretty easy. I get nice shavings. Now I can avoid huge amounts of sanding. I hate sanding even more than metalworking, I guess that's why this project happened!!!


It took me about 3 hours. I'm a newbie. I don't know if I'm talented or not. You tell me!

It's a little bit permie because I upcycled an old saw that had been rusting for ages into something quite useful.

Staff note (gir bot) :

Someone approved this submission.
Note: Certified for 1.5 oddball points

 
gardener
Posts: 388
Location: Zone 7a
264
6
kids rabbit chicken food preservation fiber arts
  • Likes 2
  • Mark post as helpful
  • send pies
    Number of slices to send:
    Optional 'thank-you' note:
  • Quote
  • Report post to moderator
Approved submission
I built a top-lit updraft gasifier (TLUD) from a metal barrel.
Before


Marking for the top cut and cutting wheel.


Top removed


Before and after cleaning up the edge with a grinding wheel.


Marking for bottom holes.


Drilling holes for that draft. Smaller bit for pilot holes, larger bit. Water to cool off the bits.


Installation of chimney into lid.


Finished
Staff note (gir bot) :

Someone approved this submission.
Note: Certified for 2 metalworking oddball points!

 
gardener
Posts: 1322
741
8
hugelkultur monies foraging trees composting toilet cooking bike solar wood heat rocket stoves ungarbage
  • Likes 2
  • Mark post as helpful
  • send pies
    Number of slices to send:
    Optional 'thank-you' note:
  • Quote
  • Report post to moderator
Approved submission
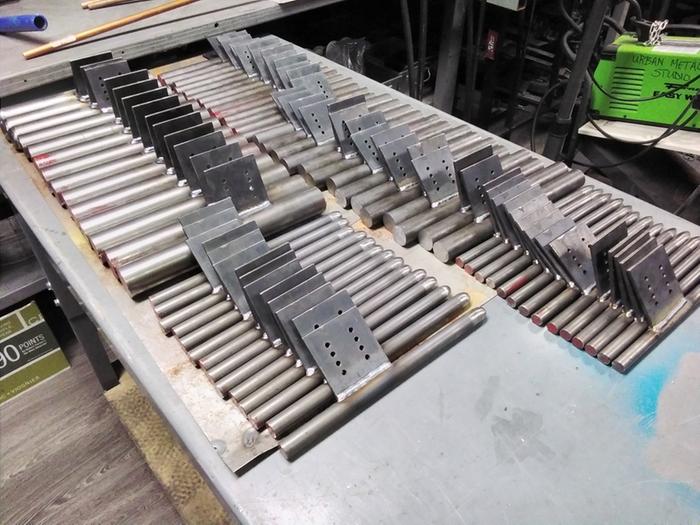
I meant to post this some time back but it slipped through the cracks.  One of the things I do as a metalsmith artist is teach workshops in the techniques I specialize in.  One of these techniques is angle raising, or in everyday language, how to hammer a flat piece of metal up into a bowl/vessel form.  The problem I constantly run into with these workshops is tooling.  For the raising class the issue is the raising stakes we hammer over.  There just aren't too many facilities that have enough stakes for a class of 12 students to all be working at once.  To compound things even more, in my approach I tend to use a larger range of stake sizes than is normal.  In short, my solution is to manufacture the stakes myself for the class (and offer them for sale afterward to pay for all the added labor involved).

This past year I redesigned my stakes to make them easier to make and easier to secure in a vise for working.  I made 14 sets of 5 stakes for a workshop which then filled up in about a day.  Once the waiting list got long enough the host studio asked if I'd do a second section of the class.  I agreed and then made another 14 sets.  So in total that was 140 stakes!  I only documented one of the batches of 14 which is what I'm submitting here for consideration as a metalworking oddball BB.

This batch took me about 2 weeks of work, say 60 to 80 hours, to manufacture.  I was working mostly with a 4.5 inch angle grinding for the laborious shaping work.  If these were being manufactured on a regular basis it would probably make more sense to invest the capital into other equipment like a mill or CNC machine, which would cut the time down I expect.  If this BB is approved you can figure the point value however you wish.  To be honest I'm not too concerned about that as I'm closer to being an Otis than someone hoping to appeal to an Otis.

Finally, here is a link to a post I made on my website with far more detail about these stakes and how they can be mounted in a vise if anyone is interested.  If anyone is looking to do the bb for raising a small bowl these are the sort of tools you'll need.  It's nice to be able to make them yourself!
20220810_153002.jpg
Here I am just starting to drill the holes for the holding plate to be welded on.
20220810_205402.jpg
The next day I am finally finishing up all the hole drilling. I did purchase the plates precut to 3" x 3" from the steel supplier.
20220812_132923.jpg
Here is a shot of some of the bar stock I am starting with. I purchased them all precut to 12".
20220812_132938.jpg
Here is another box of the steel bars I was starting with.
20220812_132951.jpg
Yet another pile of the steel bars. These were the biggest diameter ones at 1.75".
20220812_153355.jpg
Process shot along the way. Here is a line of the stakes with the plates welded on.
20220812_153411.jpg
A similar shot as above but with the welder in the photo.
20220812_154124.jpg
Here is the set up I had prior to welding. I used scrap metal to elevate the plates to the right height for meeting the bar stock.
20220812_154449.jpg
This is after I've welded the plate on. Now repeat many more times!
20220814_170140.jpg
This photo shows the batch after all the plates have been welded on. They are lined up ready for grinding. Some got a pre-grind prior to welding.
20220819_173202.jpg
A view of the large stake mounted in the vise to show how it got shaped and finished.
20220819_173216.jpg
Another angle of the finished large stake.
20220819_173235.jpg
One more angle of the finished large stake.
20220821_162801.jpg
Here is a shot of all 14 sets, or 70 stakes, completed.
20220325_Urban_Metal_0001ig.jpg
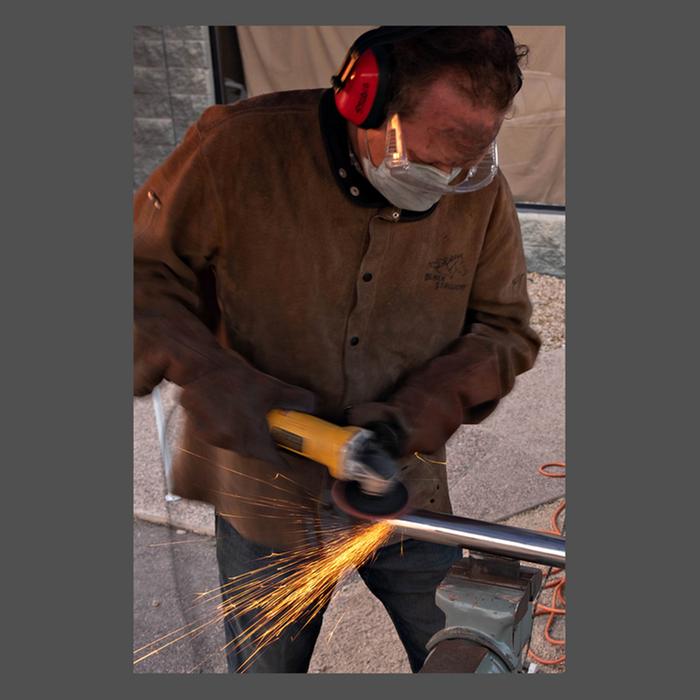
Action shot! A photographer was on hand one day taking photos around the studio.
20220325_Urban_Metal_0012ig.jpg
Close up action shot of sparks flying!
20220325_Urban_Metal_0014ig.jpg
Final action shot of me grinding steel.
Staff note (gir bot) :

Mike Haasl approved this submission.
Note: Certified for 70 oddball points!

 
David Huang
gardener
Posts: 1322
741
8
hugelkultur monies foraging trees composting toilet cooking bike solar wood heat rocket stoves ungarbage
  • Mark post as helpful
  • send pies
    Number of slices to send:
    Optional 'thank-you' note:
  • Quote
  • Report post to moderator
Approved submission
So after submitting a big major metalworking oddball project above here is a very minor one!  I'm preparing to do some darning of socks and sweaters for textile BBs and really just to have the holes repaired in my socks and sweaters.  Then I realized I don't have a darning needle!  While I could go to the store and pay a whole 99 cents for the two pack I'm going to instead make my own with scrap material that cost even more and will take more time to do.    While this project might not make economic sense I feel like I've got a way cooler darning needle.  It's also always empowering to realize you can make your own tools.

I decided to raid my silver scrap bin for an end cut of silver round wire that was too short for my normal work.  It seemed like a good gauge to start with and I won't ever need to worry about it rusting, just tarnishing.  I didn't check for sure, but I believe it was 12 gauge wire.  First I hammered it straight and flat, work hardening it in the process.  Then I forged the one end a bit to make a wider flat spot to make the eye of the needle in.  I contemplated splitting this with punches, but decided to just drill a small hole and saw out the opening with my jewelers saw.  Then it was a process of filing and sanding to smooth it all out, esp. the edges of the eye so it won't be cutting the fibers of the yarn/thread that will go in it.

In the end I took a bit over an hour to make this, which is really ridiculous for what it is.  Now that I have an approach to this worked out I'm sure it could go WAY quicker.  My guess would be a half hour if I'm being leisurely about it.
DSC06136.JPG
My initial scrap of silver wire, an auto body hammer to straighten and flatten, and a raising hammer to forge the end.
DSC06139.JPG
The end roughly forged out to flatten and widen it a bit.
DSC06141.JPG
Using a center punch to make an easy starting point for the small drill bit.
DSC06143.JPG
Using a hand drill and a #60 drill bit I make a small hole.
DSC06144.JPG
My jeweler's saw I'll use to saw out the eye.
DSC06146.JPG
Close up of sawing out the eye of the needle.
DSC06148.JPG
After sawing.
After sawing.
DSC06151.JPG
Next I used files and sandpapers to clean everything up, removing sharp edges, and making a semi-sharp point.
DSC06154.JPG
The finished darning needle.
DSC06157.JPG
The finished darning needle with a length of wool yarn threaded though it to prove the eye was sized properly.
Staff note (gir bot) :

Someone approved this submission.
Note: Certified for 1 point - neat project!

 
David Huang
gardener
Posts: 1322
741
8
hugelkultur monies foraging trees composting toilet cooking bike solar wood heat rocket stoves ungarbage
  • Likes 2
  • Mark post as helpful
  • send pies
    Number of slices to send:
    Optional 'thank-you' note:
  • Quote
  • Report post to moderator
Approved submission
Here's another small project that I'm guessing would fit best in metalworking oddball.  My home is an old 60's mobile home that has undergone lots of changes over its life.  At some point prior to me owning this there was a gas water heater in one of the little storage spaces with a vent pipe going up and out.  The part going out the roof has long since been covered over, but there was still an opening where it came out of the storage space up into the ceiling.  Not really an issue it's in an enclosed space you don't really see.  However, varmints are a perpetual problem with a mobile home in a lovely rural ecosystem ideal for breeding mice.  When I started storing extra jigsaw puzzles in the space I seem to have made a nice ladder for them turning this into a popular entry and exit point!  So it seems worth sealing up.

Digging around I found some old thinner gauge sheet copper I haven't had a use for in years.  As an extra bonus it still had some protective plastic sheeting on it.  (This is often put on sheet copper to keep one side scratch free.)  I'm leaving it on because I plan to use some steel screws from my large stash of salvage screws rather than purchasing brass ones.  I'm not really that concerned about galvanic corrosion happening here.  It would probably take decades before enough metal was corroded away for the screws to fail holding the plate, and then the only thing that happens is the plate falls.  Still, since an easy solution was already in place I left the plastic to form an electrical barrier between the two types of metal.

Anyway, I cut a section of the sheet copper to fit over and beyond the hole, filed the edges and corners down to remove burs and sharp points.  Then I got to play with my new toy/tool, a hand hole punch.  It was way nicer to use to make my screw holes instead of getting out a drill!  With the plate made I then just screwed it in place.  The ceiling material was soft enough to easily screw into by hand with a screwdriver.  My fear was that it would be too soft to hold, but it seemed to be fine, and as another bonus I found that the last bit of the screw length seemed to bite into something (wood?) with more resistance that held very secure.

Between making the plate and installing it I spent about an hour on this project.

Hopefully this deters mouse activity in this zone at least so my puzzles are in safer storage.  Side note:  It would be even nice to sell off my extra stock.  I've got some jigsaw puzzles for sale if anyone is interested!  

DSC06268.JPG
The hole in question that has become a rodent highway. Can you tell there was once a ceiling leak issue?!
DSC06259.JPG
The piece of thin sheet copper I started with.
DSC06262.JPG
Using a shear to cut off the section I need.
DSC06264.JPG
The edges and corners are filed to remove sharp points.
DSC06265.JPG
Install the correct size punch and die in my new toy in order to make holes for the screws that are the correct size.
DSC06266.JPG
Four holes in the corners of the plate are punched.
DSC06267.JPG
The copper plate still has protective plastic on it. I'm leaving this on to prevent galvanic corrosion between the copper sheet and steel screws.
DSC06270.JPG
The plate is screwed in place. Job done. This should stop varmint entry and exit from this spot at least.
Staff note (gir bot) :

Someone approved this submission.
Note: Certified for 1/2 oddball point

 
David Huang
gardener
Posts: 1322
741
8
hugelkultur monies foraging trees composting toilet cooking bike solar wood heat rocket stoves ungarbage
  • Likes 4
  • Mark post as helpful
  • send pies
    Number of slices to send:
    Optional 'thank-you' note:
  • Quote
  • Report post to moderator
Approved submission
One of my goals in this coming year is to really get a handle on harvesting, processing, cooking, and eating foods grown around me, whether from a garden or even better, growing wild on their own.  The challenge with wild harvesting is often getting calorie dense foods.  One that does grow around me is Shagbark Hickory.  I have tubs of the nuts I've collected but then realize I don't really have good systems or tools in place to crack and process them to get the nut meats out.  They are hard shelled nuts.  I've tried it with just a hammer as well as cranking them down in a vise.  Both methods work but tended to be inefficient and/or result in shell fragments flying all over the place.

So I tried to imagine something fairly simple I could make that would allow me to better process hickory nuts on a home scale.  Certainly this tool is not going to be effective for commercial operations, but I'm happy with the results.

I started with a section of copper pipe that seemed a good size for the general size of nuts that grow in my region.  The idea was to be able to crack them inside the pipe with a steel rod and hammer, thus containing any flying shell fragments.  So I cut a section of the pipe and found a hunk of hex steel rod that was a good size for this and first did a test run to see if this would even work.  It worked pretty well so I then proceeded to make the whole tool as I envisioned it.

The idea is that the tube assembly slides up and down on a couple brass rods allowing me to load nuts and remove the cracked ones.  The steel bar goes inside the tube and is struck with a hammer to do the cracking.  It's all mounted on an ash wood block with a small divot carved into it that helps the nuts sit in a good position for cracking.  I added a screw at the bottom of the divot to give a metal bit on the back side hoping this helps the nut cracking.

I used threaded brass inserts hammered into the wood block to screw the two brass rods into.  I also had to thread the ends of those rods.  The biggest pain in the butt ended up being the soldering job to attach the heavy brass tubing to the sides of the copper tube.  I thought that would be an easy solder job, but for heat reflection reasons I won't get into here I couldn't get the heat where I needed it most as easily as I anticipated.  I have ideas now for a different approach which I'll try if I ever make another.  Basically though, this should have gone much faster if I had that part figured out ahead of time.

I did finish the wood block with oil and wax.  I also spent the extra time to clean up my solder mess and put a basic patina on the copper tube assembly.  It's not a work of art, but I wanted it to look decent as I expect it to be a functional tool I'll use for many years to come.

Oh, I also forged and filed out a couple nut picks geared toward the specifics of picking the meats out of shagbark hickory nuts.

All told I think I spent about 4 hours or so on crafting this project.  That should be cut in half I'd think if I had the soldering operation better figured out, as there would have been much less time involved in both soldering and clean up.

I submit this for consideration as an oddball metalwork BB.
DSC06315.JPG
Some of the starting materials, a copper pipe, the tube cutter, a piece of scrap hex steel, and a wood block.
DSC06316.JPG
Setting it up for quick test of the idea.
DSC06317.JPG
Test successful.
Test successful.
DSC06322.JPG
Cutting the brass tubing.
DSC06324.JPG
Making a brass rim to finish the top edge of the pipe.
DSC06325.JPG
One of many attempts at soldering the brass tubes on the side of the copper pipe.
DSC06329.JPG
The parts and tools to forge the nut picks.
DSC06331.JPG
Fire!
Fire!
DSC06333.JPG
Forging and end out on the anvil.
DSC06334.JPG
Both nutpicks rough forged.
DSC06335.JPG
Shaping the picks with files.
DSC06336.JPG
Finishing the nutpicks with abrasive papers.
DSC06339.JPG
The tube assembly soldered together and cleaned up prior to patina.
DSC06340.JPG
Threading a brass rod.
DSC06341.JPG
The threaded end of the brass rod.
DSC06343.JPG
The brass inserts before hammering them into the wood block.
DSC06345.JPG
Brass inserts installed and the first brass rod screwed into place.
DSC06346.JPG
The completed hickory nut cracker with patina, minus the hex steel rod and hammer.
DSC06349.JPG
Nut in position.
Nut in position.
DSC06350.JPG
Nut loaded, tube down, cracking rod in place.
DSC06351.JPG
After a whack with the hammer lift the tube assembly up and remove the cracked nut.
DSC06353.JPG
This is the extent of my mess after cracking a bunch of nuts. Mostly it comes just from moving the cracked nuts to the tray.
DSC06354.JPG
A bunch of nuts processed with my new cracker, nut picks, and a pair of wire cutters for strategic snipping while picking out meats.
Staff note (gir bot) :

Someone approved this submission.
Note: Certified for 3 oddball points!

 
L. Johnson
gardener
Posts: 1871
Location: Japan, zone 9a/b, annual rainfall 2550mm, avg temp 1.5-32 C
930
2
kids home care trees cooking bike woodworking ungarbage
  • Likes 1
  • Mark post as helpful
  • send pies
    Number of slices to send:
    Optional 'thank-you' note:
  • Quote
  • Report post to moderator

David Huang wrote:
So I tried to imagine something fairly simple I could make that would allow me to better process hickory nuts on a home scale.  Certainly this tool is not going to be effective for commercial operations, but I'm happy with the results.


Coolest nutcracker ever!
 
David Huang
gardener
Posts: 1322
741
8
hugelkultur monies foraging trees composting toilet cooking bike solar wood heat rocket stoves ungarbage
  • Mark post as helpful
  • send pies
    Number of slices to send:
    Optional 'thank-you' note:
  • Quote
  • Report post to moderator

L. Johnson wrote:

David Huang wrote:
So I tried to imagine something fairly simple I could make that would allow me to better process hickory nuts on a home scale.  Certainly this tool is not going to be effective for commercial operations, but I'm happy with the results.


Coolest nutcracker ever!


Thanks!  I'm pretty happy with it myself.  
 
R Parian
gardener
Posts: 325
Location: NW Washington - Zone 8b (15 to 20 °F / -9.4 to -6.7 °C)
270
2
cattle goat foraging trees earthworks cooking building solar sheep wood heat
  • Likes 2
  • Mark post as helpful
  • send pies
    Number of slices to send:
    Optional 'thank-you' note:
  • Quote
  • Report post to moderator
Approved submission
I'll be traveling to Wheaton Labs bootcamp this weekend and decided to pay for the fuel to travel there by hauling UShip cargo on the way and on the way back home. I chose to tow a lighter weight car hauler style flatbed trailer to expand the options for potential cargo. This trailer has a set of metal ramps for loading wheeled cargo, and has racks under the deck to stow the ramps when not in use, however, the previous owner of the trailer apparently broke off the hinged doors that prevent the ramps from falling out while driving.  So I fabricated a new set of hinged doors, since the ramps are going to be required for at least two of the items I'm transporting.
20230806_102548.jpg
Location of missing door on left side.
20230806_102610.jpg
Location of missing door on right side.
20230806_102717.jpg
Grinding off the remains of the old broken hinge.
20230806_103438.jpg
Close up of grinding.
20230807_094855.jpg
Drilling pilot hole for latch.
20230807_095050.jpg
Drilling final latch hole diameter.
20230807_095330.jpg
Testing rough fit.
Testing rough fit.
20230807_095856.jpg
Progress so far.
Progress so far.
20230807_100746.jpg
Cutting 45 degree ends to remove knee busting sharp corners.
20230807_101048.jpg
Progress so far.
Progress so far.
20230807_101432.jpg
The latch end needs to be flat foe easy cotter pin access.
The latch end needs to be flat for easy cotter pin access.
20230807_101623.jpg
Used a hack saw to cutt off the wings.
Used a hack saw to cut off the wings.
20230807_102350.jpg
After hack sawing off the wings.
20230807_102006.jpg
Ground the ends smooth.
20230807_103643.jpg
Weld the new hinge to the left door and frame.
20230807_111656.jpg
Weld the new hinge to the right door and frame.
20230807_111745.jpg
Testing the operation of the door.
20230807_112013.jpg
Paint it.
Paint it.
20230807_115238.jpg
Yep, it works with the ramps.
20230807_115317.jpg
All done.
All done.
Staff note (gir bot) :

Someone approved this submission.
Note: Certified for 4.5 points

 
Posts: 95
Location: Billings, MT
53
homeschooling kids trees food preservation fiber arts building
  • Likes 1
  • Mark post as helpful
  • send pies
    Number of slices to send:
    Optional 'thank-you' note:
  • Quote
  • Report post to moderator
Approved submission
Howdy, Permies!  I have been working on a termite eaten house that required a few floor joists to be replaced.  The plumber brought everything up to code and took up what real estate was necessary, but it left me to come up with a creative framing solution to get the floor joists around his pipe work.  I reinforced the joist (which was in two pieces) with channel steel and some flat bar.  I nailed it all to the wood and bolted all steel pieces together.  The joist behind the featured one also was reinforced with two pieces of flat bar.  All of it took this steel working noob about an hour with all the luck in the world.


Staff note (gir bot) :

Timothy Norton approved this submission.
Note: Certified for 1/2 Oddball point.

 
pollinator
Posts: 331
177
  • Mark post as helpful
  • send pies
    Number of slices to send:
    Optional 'thank-you' note:
  • Quote
  • Report post to moderator
Approved submission
I took a welding class and made a k-tube portable rocket stove. This was the conclusion of a 2x3h workshop, including instruction on safety and welding basics.

Keep in mind that the pieces were partially precut to fit an existing design. Work involved making final cuts (three openings to be exact), welding the entire assembly and grinding it smooth.

It took me a total of two hours of active time, including lots of back and forth between the welding and grinding station to get an esthetic weld (instructor was picky )

First time using a grinder! Hurray for firsts! Probably the hardest part too, since grinders are made for much larger hands than mine.
20241201_100249.jpg
Starting material
Starting material
20241201_105559.jpg
Cutting the openings
20241201_111646.jpg
First tacks
First tacks
20241201_114450.jpg
Stitch welded
Stitch welded
20241201_130715.jpg
Final result
Final result
Staff note (gir bot) :

Someone approved this submission.
Note: Certified for 1.5 metalworking oddball points

 
I did NOT cry! It was this tiny ad that cried. The tiny ad is a crier, not me.
permaculture and gardener gifts (stocking stuffers?)
https://permies.com/wiki/permaculture-gifts-stocking-stuffers
reply
    Bookmark Topic Watch Topic
  • New Topic