• Post Reply Bookmark Topic Watch Topic
  • New Topic
permaculture forums growies critters building homesteading energy monies kitchen purity ungarbage community wilderness fiber arts art permaculture artisans regional education skip experiences global resources cider press projects digital market permies.com pie forums private forums all forums
this forum made possible by our volunteer staff, including ...
master stewards:
  • Nancy Reading
  • Carla Burke
  • r ranson
  • John F Dean
  • paul wheaton
  • Pearl Sutton
stewards:
  • Jay Angler
  • Liv Smith
  • Leigh Tate
master gardeners:
  • Christopher Weeks
  • Timothy Norton
gardeners:
  • thomas rubino
  • Jeremy VanGelder
  • Maieshe Ljin

PEP Badge: Oddball

BB oddball - sand badge
 
pollinator
Posts: 72
54
  • Mark post as helpful
  • send pies
    Number of slices to send:
    Optional 'thank-you' note:
  • Quote
  • Report post to moderator
Approved submission
I decided To Make a carving for a relative for Christmas, so I thought I would post my progress on here.

I used poplar wood for this project.
turn4.JPG
[Thumbnail for turn4.JPG]
turn1.JPG
[Thumbnail for turn1.JPG]
turn2.JPG
[Thumbnail for turn2.JPG]
turn3.JPG
[Thumbnail for turn3.JPG]
turn5.JPG
[Thumbnail for turn5.JPG]
turn6.JPG
[Thumbnail for turn6.JPG]
turn7.JPG
[Thumbnail for turn7.JPG]
turn8.JPG
[Thumbnail for turn8.JPG]
turn9.JPG
[Thumbnail for turn9.JPG]
Staff note (gir bot) :

Someone approved this submission.
Note: Certified for 2 oddball points

 
  • Likes 3
  • Mark post as helpful
  • send pies
    Number of slices to send:
    Optional 'thank-you' note:
  • Quote
  • Report post to moderator
Approved submission
I am not sure which category this would fall under. This may fall under animal care but again I was unsure.  My son and I built this guinea pig tractor so we can put them outside on good days to both fertilize the ground and reduce feed cost.  We live in a new development and the building company just laid sod down a few months ago, so we are trying to build the soil as quickly as possible with our pets. The majority of the wood was taken from construction dumpsters nearby. I did buy the chicken wire but the round rod was a closet rod I had repurposed. This took my son and I about 6 hours to complete but would have taken a pro probably much less time.  But for a bonding project this was great and he still brags about it.  The back opens up to put the GPs in, there is also bedding in there with about 1/2 inch opening along the back wall so when I lift and pull the tractor it spreads the bedding out on the ground.  We have four males currently and they are pets but we have a friend up the road with 4 females and could start breeding for meat source in the future.

Thank you Mike for the help getting this where it belongs.

20220822_155523.jpg
[Thumbnail for 20220822_155523.jpg]
20220821_164442.jpg
[Thumbnail for 20220821_164442.jpg]
20220902_183811.jpg
[Thumbnail for 20220902_183811.jpg]
20220915_074812.jpg
[Thumbnail for 20220915_074812.jpg]
Staff note (gir bot) :

Mike Barkley approved this submission.
Note: Certified for 2 oddball points.

 
John Pachall
pollinator
Posts: 72
54
  • Likes 3
  • Mark post as helpful
  • send pies
    Number of slices to send:
    Optional 'thank-you' note:
  • Quote
  • Report post to moderator
Approved submission
I just finished making and wood burning a pair of knitting needles for a relative for Christmas. they ended out pretty smooth and symmetrical. I used a knife, some sand paper, and a wood burner for this project.
kneedles.JPG
[Thumbnail for kneedles.JPG]
kneedles1.JPG
[Thumbnail for kneedles1.JPG]
kneedles2.JPG
[Thumbnail for kneedles2.JPG]
kneedles3.JPG
[Thumbnail for kneedles3.JPG]
IMG_2687.JPG
[Thumbnail for IMG_2687.JPG]
IMG_2690.JPG
[Thumbnail for IMG_2690.JPG]
IMG_2692.JPG
[Thumbnail for IMG_2692.JPG]
kneedles9.JPG
[Thumbnail for kneedles9.JPG]
Staff note (gir bot) :

Someone approved this submission.
Note: Certified for 1/2 oddball point

 
Posts: 95
Location: Billings, MT
53
homeschooling kids trees food preservation fiber arts building
  • Likes 2
  • Mark post as helpful
  • send pies
    Number of slices to send:
    Optional 'thank-you' note:
  • Quote
  • Report post to moderator
Approved submission
This is my first attempt at an Oddball BB.  I apologize if it falls under another category, but I did not find anything similar on the lists.  I changed the spark plugs in my  '94 Chevy Blazer.  I had half of them done before I realized that it might qualify for BB's, and I ran out of daylight the first day to finish the maintenance (kids helped clean up so the first old spark plugs ended up in the garbage that day).  So, the photos were taken the following day from changing the last three, and that is also why I only have pictures of three old spark plugs.  Probably took me 3 hours total.  It runs much smoother and nicer now, starts better too.
Battery-disconnected.PNG
Always disconnect the battery first!
Parts.jpg
Here are the remaining parts I was working with once I realized the BB value of the maintenance.
Half-new-half-old-wires.jpg
Half dirty old wires, and half shiny new wires.
Removing-spark-plug.jpg
Blurry pic of removing an old spark plug.
Old-plugs.jpg
Nasty old plugs all replaced!
All-new-wires.jpg
All new wires installed.
Battery-reconnected.jpg
Battery reconnected and she started right up and purred like kitten!
Staff note (gir bot) :

Someone approved this submission.
Note: Certified

Staff note :

For 1/2 odd ball point.

 
John Pachall
pollinator
Posts: 72
54
  • Likes 5
  • Mark post as helpful
  • send pies
    Number of slices to send:
    Optional 'thank-you' note:
  • Quote
  • Report post to moderator
Approved submission
The fateful day of December the 25th was closing in quick. Thankfully I managed to get this gift done just in time!
It took a bit longer than I had originally thought but I enjoyed doing it and I think that the final product was worth it!
For those of you who don't know these characters are from a nice anime that my gift recipient really enjoys, called Spy x Family. (Would overall recommend.)

Anyway for this project I only used an average pencil and a wood burner. Glad I finished in time.
sxf-5.JPG
[Thumbnail for sxf-5.JPG]
sxf.JPG
[Thumbnail for sxf.JPG]
sxf-2.JPG
[Thumbnail for sxf-2.JPG]
sxf-3.JPG
[Thumbnail for sxf-3.JPG]
sxf-4.JPG
[Thumbnail for sxf-4.JPG]
Staff note (gir bot) :

Someone approved this submission.
Note: Certified for 3 oddball points.  Great job!

Staff note (gir bot) :

Someone approved this submission.
Note: Certified for 3 oddball points.  Great job!

 
steward
Posts: 15505
Location: Northern WI (zone 4)
4846
7
hunting trees books food preservation solar woodworking
  • Likes 3
  • Mark post as helpful
  • send pies
    Number of slices to send:
    Optional 'thank-you' note:
  • Quote
  • Report post to moderator
Approved submission
I made a mason jar carrying and emptying device from oak.  It holds three 1/2 gallon mason jars and there's a locking cross bar so you can empty all three at the same time without them falling out.

To make it a bit trickier, I did it without any metal or glue.  The joints are all box joints or, I guess, tenons.  They're pinned with oak pegs.  It's very sturdy and I learned a lot in the process.

If the square mortise the tenon fits into is wider than the tenon, when you pound in the pegs they have an easy time splitting the tenons.  So keep them snug!
Side-to-bottom-joint.jpg
Side to bottom joint
Test-fitting-the-pivoting-handle-and-clamp.jpg
Test fitting the pivoting handle and clamp
Upper-gap-will-turn-out-to-be-too-loose.jpg
Upper gap will turn out to be too loose
Same-for-this-lower-joint.jpg
Same for this lower joint
All-done.jpg
All done
All done
Pile-of-parts.jpg
Pile of parts
Pile of parts
Pegs-easier-to-see.jpg
Pegs easier to see
Pegs easier to see
Staff note (gir bot) :

Nicole Alderman approved this submission.
Note: Dude! I envy your woodworking skills. 7 BB points awarded! Well done!

 
Mike Haasl
steward
Posts: 15505
Location: Northern WI (zone 4)
4846
7
hunting trees books food preservation solar woodworking
  • Likes 3
  • Mark post as helpful
  • send pies
    Number of slices to send:
    Optional 'thank-you' note:
  • Quote
  • Report post to moderator
Approved submission
Last winter I did a big project.  The staircase down to the basement wasn't built to code, it was a head knocking annoyance.  I redid the rise/run of the steps to be as steep as allowable and just barely get the head knocker to go away (and meet code).

The oak treads for this came from a tree I had milled for lumber about a decade ago.  Routed the edges to a standard stair tread profile. The length had to be very precise and wasn't always exactly 90 degrees.  So I had to use a template to mark out each end of each tread.

The risers were plywood since I needed to save every 1/4" to hit the rise/run.  

To save a bit of money, for the skirt boards I glued together three boards and cut both skirts from the same board.  Otherwise I'd have to waste a bunch of triangles of wood.  It worked splendidly. The skirtboard is outside the treads so it had to be accurate to within 1/2" on top and damn near snug on the risers.  So laying it out correctly was a pain.

I could get at the bottom side of the stairs so I attached it all together with screws (not glue) so that I could fiddle with it if I didn't like how it turned out.  The mounting blocks for all the treads were to correct for uneven stair stringers and allow for mounting from below.  I made a jig to locate those before attaching them.

The bottom step wraps around the wall a few inches as well.
How-we-lived-for-three-years-(I-have-a-patient-wife).jpg
How we lived for three years (I have a patient wife)
Treads-taking-up-storage-(did-I-mention...-patient-wife).jpg
Treads taking up storage (did I mention... patient wife)
Side-skirt-boards-to-be-assembled.jpg
Side skirt boards to be assembled
Treads-removed-for-layout-and-adjustment.jpg
Treads removed for layout and adjustment
Skirt-board-glued-up.jpg
Skirt board glued up
Layout-(see-the-pencil-marks).jpg
Layout (see the pencil marks)
Jig-saw-for-the-win.jpg
Jig saw for the win
Jig saw for the win
Cutting-treads-to-finish-length-and-rounding-over.jpg
Cutting treads to finish length and rounding over
Adding-mounting-blocks.jpg
Adding mounting blocks
Screw-screw-screw.jpg
Screw, screw, screw
Screw, screw, screw
Getting-there....jpg
Getting there...
Getting there...
Wrap-around-step-and-mitered-riser.jpg
Wrap around step and mitered riser
Just-need-some-corner-trim.jpg
Just need some corner trim
All-done-on-right-side.jpg
All done on right side
Close-up-of-wrap.jpg
Close up of wrap
Close up of wrap
All-done-left-side.jpg
All done left side
All done left side
Staff note (gir bot) :

Someone approved this submission.
Note: Certified for 40 points!

 
Mike Haasl
steward
Posts: 15505
Location: Northern WI (zone 4)
4846
7
hunting trees books food preservation solar woodworking
  • Likes 2
  • Mark post as helpful
  • send pies
    Number of slices to send:
    Optional 'thank-you' note:
  • Quote
  • Report post to moderator
Approved submission
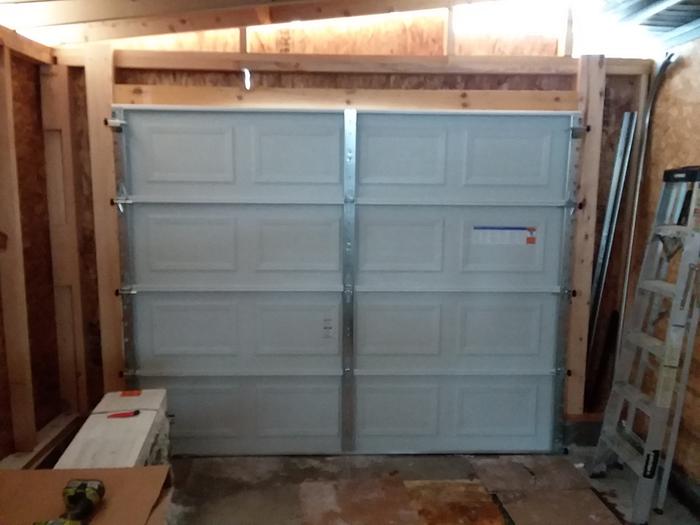
I've never installed a garage door.  Time to give that a shot...  It's not the hardest job, you just have to be able to read mediocre directions and figure out which hole (of 8 possible ones) the next bracket screws into.
Opening-in-need-of-a-door.jpg
Opening in need of a door
Box-o-parts.jpg
Box o' parts
Box o' parts
Assembling-each-panel-(hinges-on-the-top).jpg
Assembling each panel (hinges on the top)
Put-the-door-up-and-pin-in-place-with-nails.-THEN-add-the-rails.-Helps-to-have-a-service-door-to-escape-the-garage....jpg
Put the door up and pin in place with nails. THEN add the rails. Helps to have a service door to escape the garage...
All-done-.jpg
All done!
All done! Ice buildup caused the light to show on the right side
Spring-installed-(same-for-other-side).jpg
Spring installed (same for other side)
Staff note (gir bot) :

Mike Barkley approved this submission.
Note: Certified for 2 oddball points.

 
Mike Haasl
steward
Posts: 15505
Location: Northern WI (zone 4)
4846
7
hunting trees books food preservation solar woodworking
  • Likes 2
  • Mark post as helpful
  • send pies
    Number of slices to send:
    Optional 'thank-you' note:
  • Quote
  • Report post to moderator
Approved submission
The garage door on the two car garage stopped going up unless we helped it.  I figured one of the two springs was broken and that's what it turned out to be.  It's a Wayne Dalton so the springs are hidden inside a metal tube where you can't see them.  

I took it apart.  The challenging part is that you have to pull out the plastic sleeve to get the spring out.  I wasn't sure if that was supposed to be removed but youtube eased my worries.  Ordered two new springs and they came with new sleeves.  Popped them in and reinstalled the whole thing.  And it works!!
Broken-spring-(see-loose-cable-on-the-drum).jpg
Broken spring (see loose cable on the drum)
Some-of-the-removed-parts.jpg
Some of the removed parts
Pulling-the-spring-out.jpg
Pulling the spring out
Broken-one.jpg
Broken one
Broken one
Brand-spanking-new-springs.jpg
Brand spanking new springs
New-ones-installed-(funny-how-the-old-ones-were-plastic-and-the-new-ones-are-metal).jpg
New ones installed (funny how the old ones were plastic and the new ones are metal)
Back-together-.jpg
Back together!
Back together!
Staff note (gir bot) :

Mike Barkley approved this submission.
Note: Certified for 2 oddball points.

 
Mike Haasl
steward
Posts: 15505
Location: Northern WI (zone 4)
4846
7
hunting trees books food preservation solar woodworking
  • Likes 2
  • Mark post as helpful
  • send pies
    Number of slices to send:
    Optional 'thank-you' note:
  • Quote
  • Report post to moderator
Approved submission
Ok, last oddball submission for a little while....

I needed a person door to go from the main garage to the new 1 car garage.  So I picked a good spot in the wall and made it happen.

I went with a 32" rough opening so I could just remove two cinder blocks.  Luckily one edge of the blocks lined up with the studs.

I slid over the other stud 3" to be the king stud and added the jack stud next to it.  I cut out the OSB and the tops of the studs for (I think they're called cripple studs?) above the header.

Made up a header from some 2x8s laying around and attached it all.

Lastly I had to knock out those two cinder blocks without messing up the blocks on either side.  I hammer drilled out the mortar as much as I could and then tapped on them with a hammer to try to get them out.  It didn't work so I ended up demolishing one block and popping out the second one.
Before-starting.jpg
Before starting
Before starting
Hole-cut-studs-on-left-moved-over-studs-cut-for-header-cinder-blocks-still-there.jpg
Hole cut, studs on left moved over, studs cut for header, cinder blocks still there
Header-done-and-thickened-up-to-look-nice-with-a-spare-hunk-of-osb.jpg
Header done and thickened up to look nice with a spare hunk of osb
See-it-s-really-a-header.jpg
See, it's really a header
Cut-out-block-at-left-side.jpg
Cut out block at left side
Cut-out-bock-at-right-side.jpg
Cut out bock at right side
Whole-shebang-with-a-glass-storm-door-as-an-interim-door.-Liking-it-so-far....jpg
Whole shebang with a glass storm door as an interim door. Liking it so far...
Staff note (gir bot) :

Mike Barkley approved this submission.
Note: Certified for 4 oddball points.

 
Remember to always leap before you look. But always take the time to smell the tiny ads:
GAMCOD 2025: 200 square feet; Zero degrees F or colder; calories cheap and easy
https://permies.com/wiki/270034/GAMCOD-square-feet-degrees-colder
reply
    Bookmark Topic Watch Topic
  • New Topic