gift
Unofficial Companion Guide to the Rocket Oven DVD
will be released to subscribers in: soon!
  • Post Reply Bookmark Topic Watch Topic
  • New Topic
permaculture forums growies critters building homesteading energy monies kitchen purity ungarbage community wilderness fiber arts art permaculture artisans regional education skip experiences global resources cider press projects digital market permies.com pie forums private forums all forums
this forum made possible by our volunteer staff, including ...
master stewards:
  • Nancy Reading
  • Carla Burke
  • r ranson
  • John F Dean
  • paul wheaton
  • Pearl Sutton
stewards:
  • Jay Angler
  • Liv Smith
  • Leigh Tate
master gardeners:
  • Christopher Weeks
  • Timothy Norton
gardeners:
  • thomas rubino
  • Jeremy VanGelder
  • Maieshe Ljin

Kyle's Permie Bootcamp (BRK)

 
pollinator
Posts: 232
Location: Missoula, Montana, United States
452
fungi trees woodworking
  • Likes 8
  • Mark post as helpful
  • send pies
    Number of slices to send:
    Optional 'thank-you' note:
  • Quote
  • Report post to moderator
BRK Post 67

I was a quiet morning today. Just Josiah and I at breakfast and for most of the day at the greenhouse.

I fiddled with building the access cover for the door. I tried to make it so it doesn't need any fasteners to hold it in place. We'll see how it holds up.

All the paneling is on for the hinge side. Then I slid the door back into the door jamb frame and shimmed it to hold an even gap on all sides. I got up to drilling holes for the hinges but I need a longer 3/8" bit. I've got to go through 6" of wood. It was already 4 o'clock so not worth going to the basecamp shop to find one.

I finished the day with prepping one of the handles. Once those are ready I can reinstall the handle shaft when the door is hung.

Getting closer now. Tomorrow I'll get to bolt down the hinges and hang the door.
PanelingOn.jpg
Everything went smoothly, didn't have it redo anything. Nope no screwing up today, not once.**
Everything went smoothly, didn
ShinyHinges.jpg
Here is one hinge, 3in wide strap, 18in long
ShimsIn.jpg
Made shims on the table saw, there is an 1/8" gap on each side.
 
Kyle Noe
pollinator
Posts: 232
Location: Missoula, Montana, United States
452
fungi trees woodworking
  • Likes 10
  • Mark post as helpful
  • send pies
    Number of slices to send:
    Optional 'thank-you' note:
  • Quote
  • Report post to moderator
BRK Post 68

Had a good day of work on the greenhouse door. Bolted the straps of the hinges to the door first then anchored the hinge to the door jamb. These hinges have a wide plate where they bolt to the jamb so I had to put two in the jamb then double up with a second 2x8 to fit the other bolts.

Josiah helped me carry the door over and find out the rough opening had shrunk, probably... or I messed up a bit. Had to shave a half inch off each post. Then notch space for the top hinge block and for the bottom hinges to sit flush. I think in the future having the door opening be framed with square timbers would make this easier.

All that trimming took until lunch. Then I got started on hanging the thing.

First I set the hinge side of the jamb level, plumb, and flush to the rough opening. The door had to be open for this with a shim under to hold it off the floor. Once I had it shimmed, I used timber lock screws to tack it in, adjusting the shims so the screws didn't suck the frame too close and give it a bow. Then I checked the top of the jamb to be sure it was level.

Then closed the door and made sure the latch side was in line and not shifted forward or backward. Leveled and plumbed and shimmed again. Three more timber locks.

And now there's a working door. I have to adjust a few things then do the insulation and paneling on the outside tomorrow.
MadeSpace.jpg
What are the chances? Had to chisel around.
InPlace.jpg
It fits! After some chainsaw adjustments.
DoubleStudShimmed.jpg
I shimmed in two spots at the top hinge.
DoorStop.jpg
Tapped this one until the hinge post was plumb.
LagBoltsDone.jpg
Then the hinges get the right two bolts.
BottomHingeBolted.jpg
This one just needed a inch thick stud against a flat spot on the log.
SwingsFree.jpg
I have to round he latch face so it closes without sticking.
 
Kyle Noe
pollinator
Posts: 232
Location: Missoula, Montana, United States
452
fungi trees woodworking
  • Likes 12
  • Mark post as helpful
  • send pies
    Number of slices to send:
    Optional 'thank-you' note:
  • Quote
  • Report post to moderator
BRK Post 69

Gardening is getting exciting, I'm seeing new sprouts every time I tend the garden. Bit of a downer we are back to cold weather. It rained all night and there is a chance of snow for the next few nights.

But we took Judy to load up on more water and watered heavily since the soil was already damp. Had the brilliant idea to use the lawn sprinkler on the secondary berms once the primary gardens were soaked. Should have grabbed that on Monday, now I can cut down grass and water at the same time.

I seeded tomatoes, peppers, oregano, dill, and parsley on my plot where things looked empty. They should germinate and come up after the cold has passed.

Had a quick lunch then finished off closing up the greenhouse door. I put paper on each side of wool insulation to stop any drafts and stapled the wool in place.

The paneling is done too. It was nice to have the greenhouse roof keeping me dry while cutting the boards. Big plus not standing in the cold drizzle. Stayed an extra 20 minutes to finish up the job so I don't have to come back to it tomorrow.

I've got to trim the edges of the paneling a bit, maybe use a plane to give the edge a small bevel. Then drill a hole for the latch shaft tomorrow. And figure out how to seal around the shaft and insulate inside of the latch access.

Anyway that's tomorrow. Tonight feels like a good night for a fire.
FuzzyDoor.jpg
It's a door and it grows wool for us. Come one, come all! Experience the Fuzzy Door!
PaperBacking.jpg
Second layer of paper. Should help with any drafts.
PanelingDone.jpg
Looking good. Time to put a hole through it.
 
Kyle Noe
pollinator
Posts: 232
Location: Missoula, Montana, United States
452
fungi trees woodworking
  • Likes 13
  • Mark post as helpful
  • send pies
    Number of slices to send:
    Optional 'thank-you' note:
  • Quote
  • Report post to moderator
BRK Post 70

Getting closer and closer to finishing off the door project.

Drilled out a hole for the handle shaft, trimmed and rounded the edges of the door, and got one handle finished and one started.

The latch bolt wasn't allowing the door to close just by swinging it closed. I scraped the bolt face smooth, put an angle on the door jamb and burnished both until they were shiny. Now the two surfaces slide over each other.

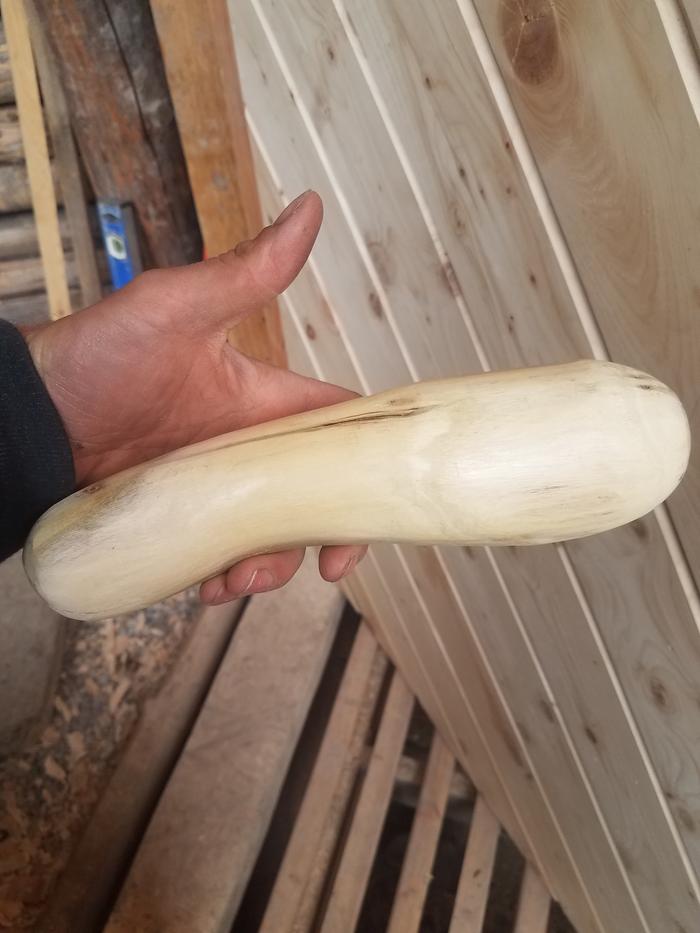
The first handle took hours to carve. This piece of locust was completely untouched by weathering or boring insects. It was extremely dense but gave a nice shine after burnishing.

The second handle is weathered and has many bore holes, it has  character. Much softer but also splinters more. I have to shave down to less weathered wood to give it a nice finish. I'm going to carve it into whatever shape works with the structure of the wood.

I might tinker a bit on the weekend to see what ideas come for solving the seal around the handles. That might consist of picking up pieces of wood and pondering until something strikes.
ShaftHole.jpg
Put a hole in a perfectly good door
JambAngle.jpg
Filed an angle and compressed the wood fibers with a steel rod
SmoothLatch.jpg
I scraped the sanding marks down with a sharp knife and burnished until smooth
RoughHandle.jpg
It's so heavy, wonder if this piece would sink in water.
It is so heavy, I wonder if it would sink in water.
SmoothHandle.jpg
Sanded, scraped, and burnished. The finish should keep down splinters and stay cleaner
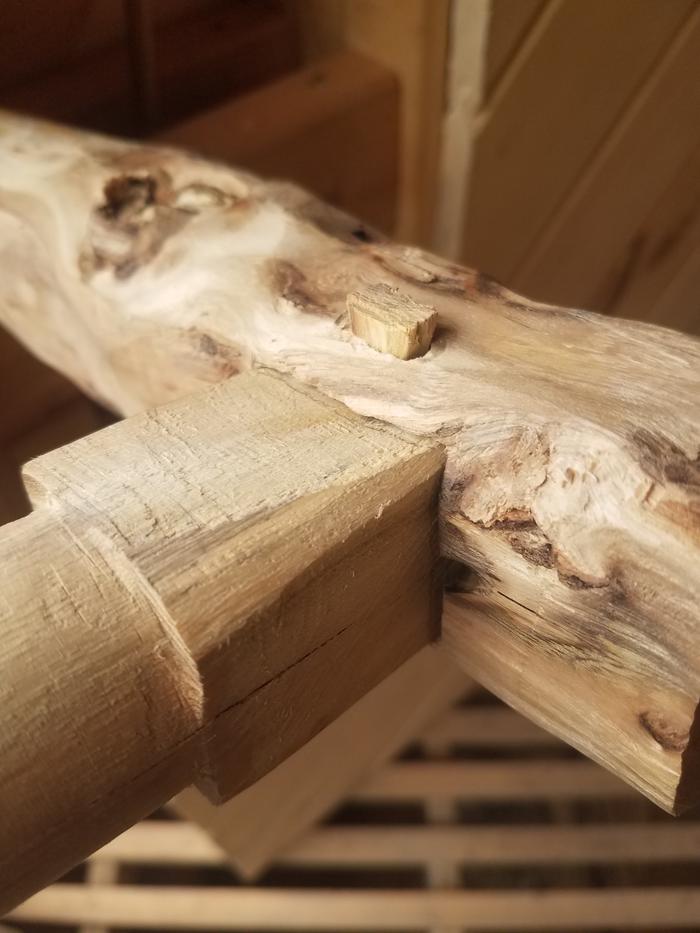
PinnedHandle.jpg
I'm going to pin both handles. They need to stay put with people pulling on them.
I am going to pin both handles, they need to stay solid with people pulling on them
NeedsShaping.jpg
Now what shape does this want to take?
SquarePegSquareHole.jpg
This handle needs to be removable but stay secure. I think I can pull off a removable peg.
 
gardener
Posts: 1236
360
7
trees wofati rocket stoves
  • Mark post as helpful
  • send pies
    Number of slices to send:
    Optional 'thank-you' note:
  • Quote
  • Report post to moderator
That first handle looks like a squash of some sort to me.  As far as a pin I would put it further back in the handle. Perhaps the picture angle throws me off but it looks like it only has half an inch of material to the peg hole, and as you said people will be pulling on it so that bit could crack off with use.
 
I have gone to look for myself. If I should return before I get back, keep me here with this tiny ad:
the permaculture bootcamp in winter (plus half-assed holidays)
https://permies.com/t/149839/permaculture-projects/permaculture-bootcamp-winter-assed-holidays
reply
    Bookmark Topic Watch Topic
  • New Topic