This is a timely revival for me. I have just gotten back to carving spoons after a long lapse, and took some pictures to share.
The top spoon is one I made 25ish years ago in a green woodworking class, with hand tools only. It was a freshly-cut sycamore sapling (so I couldn't make a wide bowl). I never quite finished it, though it has been used occasionally.
The middle and bottom ones are from a black walnut that blew down last summer on a friend's property. She let my best friend and me take the wood for carving and sculpture. He split the sapwood off some stove-length logs to expose the heartwood, and I gathered some of the splits that had heartwood showing. The small one was my first essay, roughed out on a table saw because that was what was to hand. The heartwood was very thin, which limited the depth possibilities. The big one (17" long) was also shaped on a table saw, and the bowl and fine surfaces finished with a gouge (Swiss Made 7/25 curve, which is excellent for all but the deepest spoon bowls). This piece was adjacent to a knot, which made nice curvature for the handle and bowl. Files and sandpaper took the surfaces to exact contours, though they are not quite finished yet.
I've been averaging maybe one spoon every two months, typically when I find a piece of wood that looks like it belongs as a spoon.
I really like the way mulberry comes out, and the good thing is I have 4 mulberry trees in my yard, 3 of which needed heavy pruning last winter.
For the salad tong, I split a piece of maple firewood and liked how crazy the grain was. I'm just waiting to find a counterpart for it with equally crazy grain and I'll have a set of salad tongs I made.
The birch spoons were surprisingly easy to work; they came from two pieces of firewood we got while camping in VT. The one with the hole in the bowl was caused when I went too deep carving the bowl. But it was really fun to do those, I roughed them out with just a hatchet, hook knife, and straight mora knife. Once they dried I finished them with the knife and sandpaper.
The bowl was my first and only so far, but was very fun. Roughed with the adze I bought from Bulgaria or some such place on ebay, and finished with a gouge. Finished that one with just Alfie Shine, which is a lovely product.
There are some beautiful utensils in this thread. Very inspiring. I got into spoon making this winter and have really enjoyed the process. Using only my hatchet, circle blade, and wanta forge pukko, along with some sand paper.
Hey Judith. I just started making ladles! I work in a stairbuilding shop so I have access to any tool I want. All the wood I use is just scrap pieces, so I am pretty lucky! What I do is start with a square piece, cut out the rough shapes on the band saw, then move over to the belt sander to round things out. Then I use a drill press to make the concave part. I start with a 2 inch drill saw, then move to 1.5 inch, 1, .5, etc. Then I smooth things out with my bosses round chisel, and then finish off with a die grinder with a circular sanding attachment. It's a lot of equipment and totally unnecessary, but that's how I figured out how to do it! I'll post a picture of one later.
For those who are inspired, here's a thread to show off that first spoon you make (or the 1000th). PEP BB for carving a spoon (Please note the requirements in the first post of the BB if you want to be certified)
kevin stewart wrote:Hi
Where is your welsh love spoon?
My husband is Welsh and was taught spoon carving by his uncle.
Is there any way to keep the wood from drying so quickly? On my first ladle, I ended up having to scrap it because I didn’t finish it before it dried too much to carve.
My solution to the drying problem is to start with really dry wood. I tend to pull pieces out of the firewood pile as I come across them and say "that's too pretty to burn." If the wood is already a year or more seasoned, and especially if it's been split, then it's probably done all the splitting it's going to do. That's the theory, anyway.
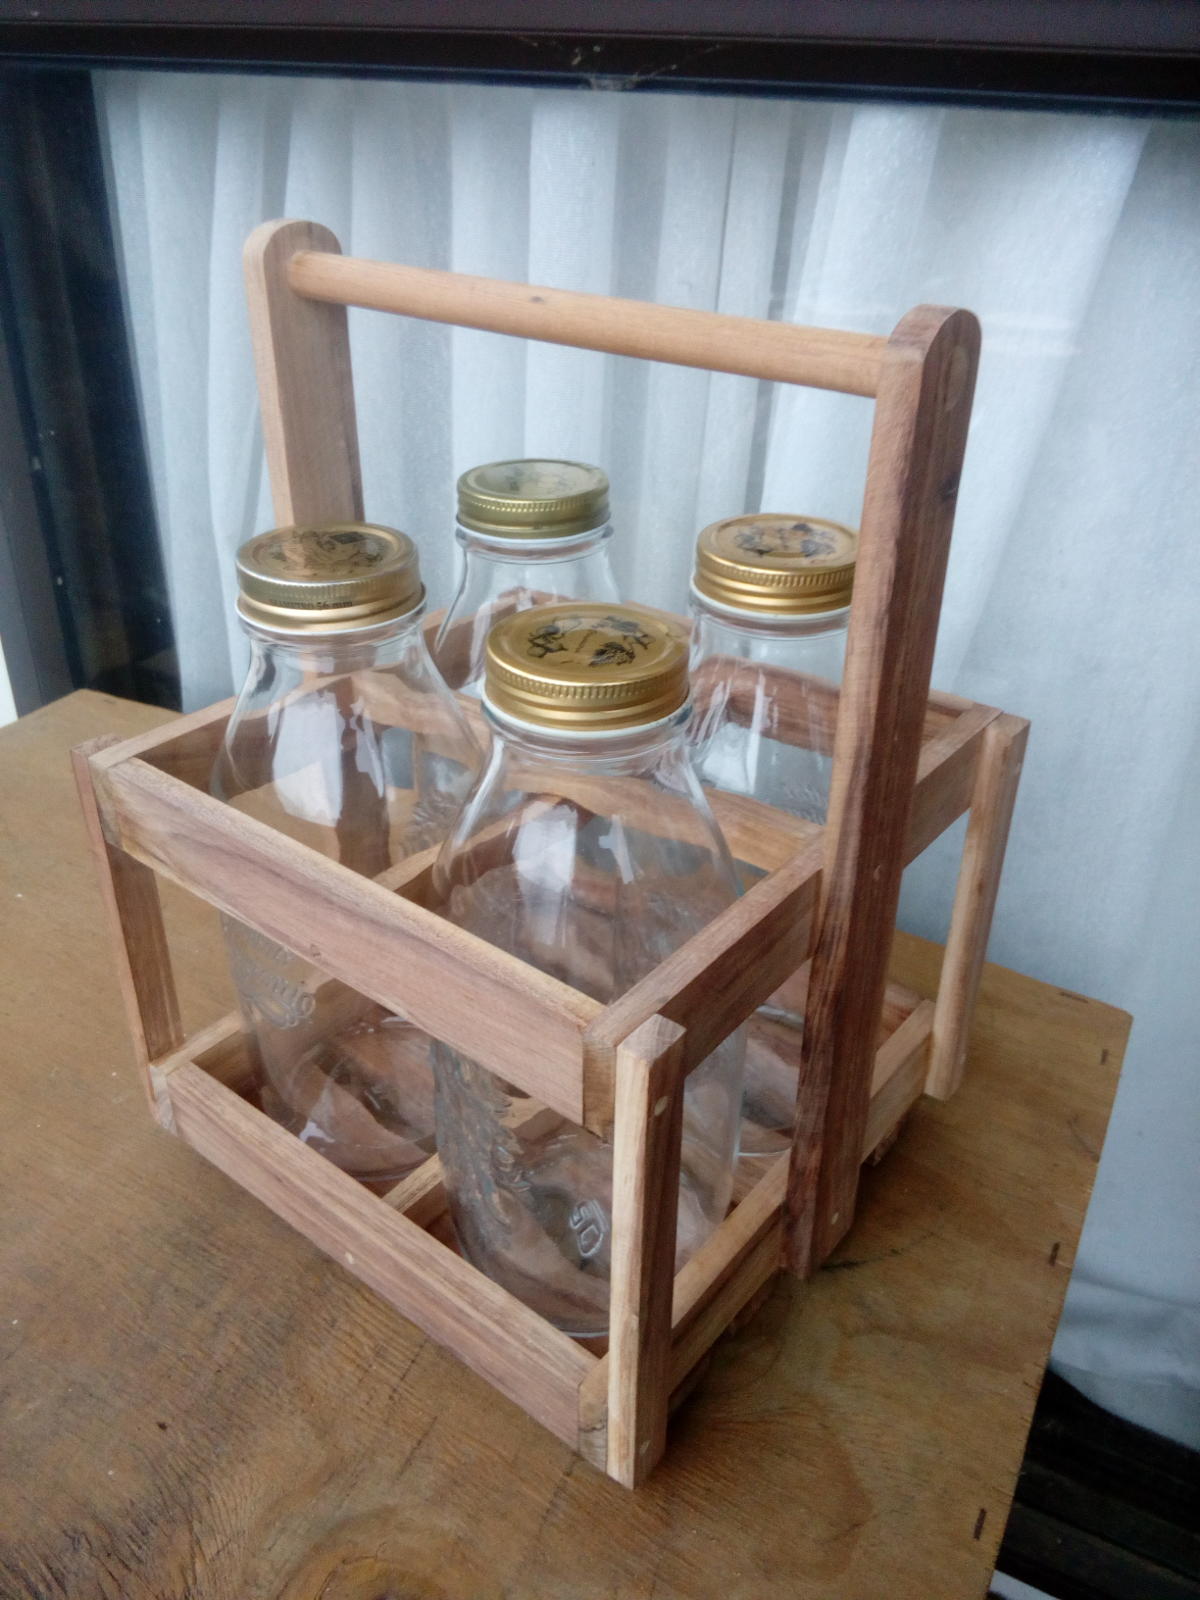
I know it's not a spoon, but this carrier for our milk bottles was a project that helped me while away a few hours during lockdown earlier in the year. It was two pieces of Tasmanian blackwood that got rescued from the firewood stack. This is an excellent carving wood and I'm making a spatula and a spoon from another piece.
kevin stewart wrote:Hi
Where is your welsh love spoon?
My husband is Welsh and was taught spoon carving by his uncle.
Is there any way to keep the wood from drying so quickly? On my first ladle, I ended up having to scrap it because I didn’t finish it before it dried too much to carve.
My humble but experienced opinion: 1. Spoons traditionally carved in green wood; carve the cheese, then turn it into concrete. 2. Traditionally, including Wales, is store the unfinished spoon under the bushel-size pile of shavings on the floor-- the wood you took off keeps the wood you want moist. 3. Substitutes include multiple cloth bags, cardboard boxes, etc. to slow drying, with plastic bags being last choice as too unbreathable (I've used plastic for very short periods, preferably with lots of small holes.) 4. Alternatively or additionally, oiling the unfinished spoon (or usually a larger object like a dough bowl), especially any areas suspected of a tendency to crack, then carving that off the next day. But any areas left oiled may make the final oil finish look uneven. 5. Traditionally, carve the whole spoon in one sitting (from the hewn blank), down to virtually tool-finished, then leave it to dry slowly (away from breezes) while you carve a dozen more. Traditionally, they were sold at this stage, "in the white", that is, dried but unfinished. Nowadays, do the boring but esthetically and commercially necessary sanding once they are fully air dried. (I've known spoon carvers to dry them, then wet-sand in front of a tub of water. This keeps the dust down nicely but takes expensive wet & dry sandpaper.) Traditional is in fact to scrape, with curved-edge metal scrapers, or for poor farmers. bits of broken glass. 5. avoid as much of the cracking as possible by attention to the grain. 6. Some species (notably hackberry and persimmon) are especially prone to staining if not carved completely in one sitting.
I ran across this French woodworker who carves wonderful spoons!
There are lots more examples of his work at this link.....
FERRÉOL BABIN SPOONS
Ferréol Babin dedicates half of his time collaborating with various furniture and lighting editors where he can incorporate his singular vision and approach of design. The other half is spent on making unique pieces, with an obvious brutalist yet delicate approach.
Dirty-hands, mix of mediums such as painting, sculpture, design and handcraft play their role in each of his creation.
His projects are always based on an awareness of function and rationality, combined with a poetic and emotional dimension.
I'm a complete novice. Never done any kind if woodcarving at all but I'd love to be able to. Where do you recommend I start learning? (Online only as i'm in Japan) and what tools will I need to carve a spoon? Thank you! :)
I've never hand carved a spoon, so these don't really count. I designed it in CAD and then milled them from a maple board. They went out with small jars of honey with chilis in them as Christmas gifts. Someday I'll try carving one from wood, I'd really like to try working with Osage (hedge apple).
N.Y. Anzai wrote:I'm a complete novice. Never done any kind if woodcarving at all but I'd love to be able to. Where do you recommend I start learning? (Online only as i'm in Japan) and what tools will I need to carve a spoon? Thank you! :)
I myself always advised against rushing out and buying a lot of expensive tools. Traditional is carve with what you've got. Also. traditional is mostly carve with one sharp knife, though unless its a bent knife (the Canadian preference), you'll also need some sort of gouge to dig out the bowls. And stones to keep them sharp. But mostly, start carving some, which will let you know what you need. I carved green wood whenever I could, which is also traditional, and way easier for hard woods, but takes experience working green wood, learning how to work it so it will dry without cracking. I say traditional, but I only know of Western-- the peaks of traditional woodworking on this planet were Scandinavia and Japan, so you're better set than me for the latter. I ended up using broad hatchet, drawknife, spokeshave, gouge, a 1" chisel (as a push knife), a carving knife, occasionally scrapers (but usually used the knife as a scraper), and sandpaper-- but these were all things I had.
There are some great websites on spoons, but I mostly found them highly inspirational, more than how-to, and I don't have any list of them. Just search for wooden spoons, etc. But the two books I started with long ago would certainly be Swedish Carving Techniques by Wille Sundquist (1990) and Country Woodcraft by Drew Langsner (1978), which has a chapter on spoon carving that was the result of a visit from... Wille Sundquist.
N.Y. Anzai wrote:I'm a complete novice. Never done any kind if woodcarving at all but I'd love to be able to. Where do you recommend I start learning? (Online only as i'm in Japan) and what tools will I need to carve a spoon? Thank you! :)
YouTube has loads of information. Jorge Sondquist has a series of videos demonstrating the various knife grips and cutting techniques, highly recommended. Jorge also addresses tools.
Barn the Spoon has a series of "Silent Carving" videos that are inspirational and educational. You see exactly how Barn does every bit of each of the different spoons that he demonstrates.
N.Y. Anzai wrote:I'm a complete novice. Never done any kind if woodcarving at all but I'd love to be able to. Where do you recommend I start learning? (Online only as i'm in Japan) and what tools will I need to carve a spoon? Thank you! :)
YouTube has loads of information. Jorge Sondquist has a series of videos demonstrating the various knife grips and cutting techniques, highly recommended. Jorge also addresses tools.
Barn the Spoon has a series of "Silent Carving" videos that are inspirational and educational. You see exactly how Barn does every bit of each of the different spoons that he demonstrates.
Thank you! I'll check them out!!
And for the poster above I'll definitely not be rushing to buy expensive tools. I'll look at secondhand ones if I need any :) Thank you for your book recommendations too! :)
Wow so much talent! Beautiful!
When we trimmed our mulberry last winter that was exactly what I did was start to carve me some spoons. Even using the freshly cut wood my hands were so sore (arthritis) I couldn’t use them for anything else for the following week.
I hate wasting good wood so one of my hobbies is Love spoon carving!
I love the skill, as my great great Grandfather was from the boarder of Wales and has some Welsh heritage,
He was a bit of a hero he went down a collapse mine filled with gas several times a day for several days trying to rescue his mates and retrieve bodies, whilst The Pompous desk Jockey kept leading people to die!
Later he carved a welsh Love spoon over a yard long and eloped with the mine owner Daughter!
Her uncle Was a minister and led the ceremony in secrete!
I am Glad others love this hobby as well!
I think it is an important skill!
It takes a lot of patients and planning,
One learns much about the ways of wood by doing so,
As well as the important of sharp tools,
One learns great strength and dexterity in the hands,
One learns to understand trees more!
I do however need to master Sharpening gouges!
Particularly, very small gouges!
Last year I made my first firewood spoon and it was pretty fun. It's firewood time again, and I saw a small, flat slab of maple that glowed in the light, so I thought it was time to try again. I had just forged a new adze I needed to try out, so this was its first test. After a little work, it looked like it had promise. It had one little knot, but I believed I could work around it. I thought I would try something a little fancier this time. I think it turned out ok.
Lots of information and inspiration in this thread!
I got some carving tools for Christmas, sharpened up an old side hatchet i found and have been pruning trees lately. I saved some apple limbs and white birch limbs and crooks for spoons and ladles.
I have a feeling I wont be carving anything in the near future as I’m still waiting for a hook/spoon knife and have other projects going on at the moment. How should I store the branches?
I know carving green (especially apple wood) is preferred, but that’s probably not an option right now. Some ideas that have mentioned to me are:
1. Store green wood in a freezer until ready to carve
2. Keep green wood in a bucket of water until ready to carve
3. Paint or seal the ends of wood to help it to dry slowly and prevent splitting
Has anyone tried any of these methods or have any input about them? Im also wondering if I should peel the bark or leave it on for these methods.
Judith Browning wrote:Spoons at various stages along the way. Some still have the 'nose' attached...a helpful extension for holding at the shaving horse while working on the spoon. The one he is working on at the shaving horse has had the 'nose' cut off in order to do some shaping on the back of the bowl.
These are so awesome. Thanks for showing all the pictures at the different stages. The spoons are gorgeous.
![[Logo]](/templates/default/mobile/images/mobile-permies-2015.png)

![[IMG_1430-w600.jpg]](/t/38366/a/46646/IMG_1430-w600.jpg "Filename: IMG_1430-w600.jpg
Description: 15\", 9\", 17\" long")
![[IMG_1431-w600.jpg]](/t/38366/a/46647/IMG_1431-w600.jpg "Filename: IMG_1431-w600.jpg
Description:")
![[IMG_1433-w600.jpg]](/t/38366/a/46648/IMG_1433-w600.jpg "Filename: IMG_1433-w600.jpg
Description: this one balances very nicely")
![[Thumbnail for IMG_5208.JPG]](/t/38366/a/55849/IMG_5208.JPG "Filename: IMG_5208.JPG
Description: mulberry ladle")
![[Thumbnail for IMG_5209.JPG]](/t/38366/a/55850/IMG_5209.JPG "Filename: IMG_5209.JPG
Description: mulberry ladle side")
![[Thumbnail for IMG_4401-(1).JPG]](/t/38366/a/55851/IMG_4401-(1).JPG "Filename: IMG_4401-(1).JPG
Description: salad tong? (maple)")
![[Thumbnail for IMG_5169.JPG]](/t/38366/a/55852/IMG_5169.JPG "Filename: IMG_5169.JPG
Description: my first bowl (maple)")
![[Thumbnail for IMG_5684.JPG]](/t/38366/a/55853/IMG_5684.JPG "Filename: IMG_5684.JPG
Description: birch spoons")
![[Thumbnail for IMG_6292.JPG]](/t/38366/a/55854/IMG_6292.JPG "Filename: IMG_6292.JPG
Description: mulberry spatula")
![[Thumbnail for 2E6188CB-072F-4D05-A28D-73B60949502B.jpeg]](/t/38366/a/55860/2E6188CB-072F-4D05-A28D-73B60949502B.jpeg "Filename: 2E6188CB-072F-4D05-A28D-73B60949502B.jpeg
Description:")
![[Thumbnail for 8C07DF6A-AF72-407C-950D-B2E3D4704552.jpeg]](/t/38366/a/55861/8C07DF6A-AF72-407C-950D-B2E3D4704552.jpeg "Filename: 8C07DF6A-AF72-407C-950D-B2E3D4704552.jpeg
Description:")
![[Thumbnail for C9443F5A-E7E2-4CEE-8F56-B181FBFD0BDC.jpeg]](/t/38366/a/55862/C9443F5A-E7E2-4CEE-8F56-B181FBFD0BDC.jpeg "Filename: C9443F5A-E7E2-4CEE-8F56-B181FBFD0BDC.jpeg
Description:")
![[Thumbnail for 355BB852-1FE6-4668-B381-2AB60C22D349.jpeg]](/t/38366/a/55863/355BB852-1FE6-4668-B381-2AB60C22D349.jpeg "Filename: 355BB852-1FE6-4668-B381-2AB60C22D349.jpeg
Description:")
![[Thumbnail for 3823A7B4-A00F-43A0-BD65-5E591CE25F90.jpeg]](/t/38366/a/55864/3823A7B4-A00F-43A0-BD65-5E591CE25F90.jpeg "Filename: 3823A7B4-A00F-43A0-BD65-5E591CE25F90.jpeg
Description:")


![[Thumbnail for IMG_5283.JPG]](/t/38366/a/58281/IMG_5283.JPG "Filename: IMG_5283.JPG
Description:")
![[Thumbnail for IMG_4469.JPG]](/t/38366/a/58282/IMG_4469.JPG "Filename: IMG_4469.JPG
Description:")
![[Thumbnail for IMG_8502.jpg]](/t/38366/a/69097/IMG_8502.jpg "Filename: IMG_8502.jpg
Description:")
![[Thumbnail for IMG_8503.jpg]](/t/38366/a/69098/IMG_8503.jpg "Filename: IMG_8503.jpg
Description:")
![[spoons.jpg]](/t/38366/a/71815/spoons.jpg "Filename: spoons.jpg
Description:")


![[sked.jpg]](/t/38366/a/111590/sked.jpg "Filename: sked.jpg
Description: My first carved spoon- from apple wood.")
![[kvinsked.jpg]](/t/38366/a/111591/kvinsked.jpg "Filename: kvinsked.jpg
Description: A cubist inspired carved spoon from apple wood.")
![[SPOON-4vw.jpg]](/t/38366/a/111592/SPOON-4vw.jpg "Filename: SPOON-4vw.jpg
Description: A gift for a wonderful friend. Carved from pear wood.")




![[Thumbnail for 20171206_205102.jpg]](/t/38366/a/122962/20171206_205102.jpg "Filename: 20171206_205102.jpg
Description:")


![[Thumbnail for 06533C2A-EF47-4817-AD36-D261450A9694.jpeg]](/t/38366/a/123056/06533C2A-EF47-4817-AD36-D261450A9694.jpeg "Filename: 06533C2A-EF47-4817-AD36-D261450A9694.jpeg
Description:")
![[Thumbnail for FE8613F6-7C87-414B-8C2B-75071F21C61B.jpeg]](/t/38366/a/123057/FE8613F6-7C87-414B-8C2B-75071F21C61B.jpeg "Filename: FE8613F6-7C87-414B-8C2B-75071F21C61B.jpeg
Description:")
![[Thumbnail for IMG_20210819_151910.jpg]](/t/38366/a/153402/IMG_20210819_151910.jpg "Filename: IMG_20210819_151910.jpg
Description:")
![[Thumbnail for IMG_20210819_105240.jpg]](/t/38366/a/153403/IMG_20210819_105240.jpg "Filename: IMG_20210819_105240.jpg
Description:")
![[Thumbnail for IMG_20210806_154352.jpg]](/t/38366/a/153404/IMG_20210806_154352.jpg "Filename: IMG_20210806_154352.jpg
Description:")


![[Thumbnail for 20211126_211704.jpg]](/t/38366/a/164023/20211126_211704.jpg "Filename: 20211126_211704.jpg
Description: Looks promising")
![[Thumbnail for 20211127_112504.jpg]](/t/38366/a/164024/20211127_112504.jpg "Filename: 20211127_112504.jpg
Description: Imagination becomes concrete")
![[Thumbnail for 20211127_114446.jpg]](/t/38366/a/164025/20211127_114446.jpg "Filename: 20211127_114446.jpg
Description: Holey moley!")
![[Thumbnail for 20211127_120603.jpg]](/t/38366/a/164026/20211127_120603.jpg "Filename: 20211127_120603.jpg
Description: All sawed")
![[Thumbnail for 20211129_195040.jpg]](/t/38366/a/164027/20211129_195040.jpg "Filename: 20211129_195040.jpg
Description: Whitlin'")
![[Thumbnail for 20211130_190606.jpg]](/t/38366/a/164028/20211130_190606.jpg "Filename: 20211130_190606.jpg
Description: Center's out")
![[Thumbnail for 20211206_194739.jpg]](/t/38366/a/164029/20211206_194739.jpg "Filename: 20211206_194739.jpg
Description: LOTS more whitlin'")
![[Thumbnail for 20211210_210437.jpg]](/t/38366/a/164030/20211210_210437.jpg "Filename: 20211210_210437.jpg
Description: Sanded to final shape")
![[Thumbnail for 20211215_222457.jpg]](/t/38366/a/164031/20211215_222457.jpg "Filename: 20211215_222457.jpg
Description: Shellacked1")
![[Thumbnail for 20211215_223027.jpg]](/t/38366/a/164032/20211215_223027.jpg "Filename: 20211215_223027.jpg
Description: Shellacked2")
