• Post Reply Bookmark Topic Watch Topic
  • New Topic
permaculture forums growies critters building homesteading energy monies kitchen purity ungarbage community wilderness fiber arts art permaculture artisans regional education skip experiences global resources cider press projects digital market permies.com pie forums private forums all forums
this forum made possible by our volunteer staff, including ...
master stewards:
  • Nancy Reading
  • Carla Burke
  • r ranson
  • John F Dean
  • paul wheaton
  • Pearl Sutton
stewards:
  • Jay Angler
  • Liv Smith
  • Leigh Tate
master gardeners:
  • Christopher Weeks
  • Timothy Norton
gardeners:
  • thomas rubino
  • Jeremy VanGelder
  • Maieshe Ljin

Half log staircase by shower shack

 
steward
Posts: 15505
Location: Northern WI (zone 4)
4846
7
hunting trees books food preservation solar woodworking
  • Likes 7
  • Mark post as helpful
  • send pies
    Number of slices to send:
    Optional 'thank-you' note:
  • Quote
  • Report post to moderator
I'm pondering the smartness of thinking about maybe attempting to build a half log staircase from the shower shack to the road above.  There's a rickety staircase there now that this would replace.

I'm imagining something very similar to the staircase to the couch balcony.  I'd include a pic but I can't find one of it.  The sides would be a big log that is sawn in half.  Flat sides facing the inside.  Kinda like this:


The steps would be more logs sawn in half.  Perhaps 3-4 feet long (that is 3-4' wide as you climb the stairs).

The bottom would need to have some sort of rock landing that the staircase sits on.  Maybe the top as well, depends on how the terrain is laid out.

Contemplations:
- If the hillside is lumpy, the stairs would have to clear the high spots
- It would be nice to have it steep enough that the treads are completely natural.  Maybe so that as viewed from space, there is continuous tread surface everywhere.
- A railing would be nice.  It would double the amount of time needed but it could be done.

Joinery:
A)  The sexiest way to connect the treads to the sides would be some sort of massive rectangular tenons that are pegged snug from below.  Bonus points if the holes are drilled offset so the pegs draw the treads tight to the sides.  

B)  An easier way would be to make the treads with no tenons.  Butt them up against the sides and drill a pair of big peg holes (2"?) through the sides and into the treads.  Peg them with hardwood pegs.  The pegs could even have wedges inside the tread holes (Japanese style) and be wedged as well where they exit the sides.  Like the "Dowel joint" in this pic only the dowels would go through the side logs:

C)  I'd love to avoid metal fasteners...

Alternative options:
1.  Do nothing and stick with the existing staircase
2.  Do a dry stack rampart up the hillside instead
3.  Build this log staircase nearby so that if it fails miserably the current staircase is still usable

Risks:
a.  I run out of time (or don't have any help) and it doesn't get done
b.  The stairs suck and everyone hates them
c.  Don't have logs available and there isn't enough time to get them and build the staircase
d.  Earthworks in the area have changed the terrain so much that this isn't needed or appropriate
Staff note (Mike Haasl) :

If you wanna get in on this nice project this summer, here's where to get your ticket: PTJ Event Ticket

 
steward and tree herder
Posts: 8380
Location: Isle of Skye, Scotland. Nearly 70 inches rain a year
3973
4
transportation dog forest garden foraging trees books food preservation woodworking wood heat rocket stoves ungarbage
  • Likes 3
  • Mark post as helpful
  • send pies
    Number of slices to send:
    Optional 'thank-you' note:
  • Quote
  • Report post to moderator
I think this is the current steps From Matthew Stone's thread about a year ago?
 
Nancy Reading
steward and tree herder
Posts: 8380
Location: Isle of Skye, Scotland. Nearly 70 inches rain a year
3973
4
transportation dog forest garden foraging trees books food preservation woodworking wood heat rocket stoves ungarbage
  • Likes 7
  • Mark post as helpful
  • send pies
    Number of slices to send:
    Optional 'thank-you' note:
  • Quote
  • Report post to moderator
Perhaps you could incorporate a slide?


source
 
steward
Posts: 12422
Location: Pacific Wet Coast
6991
duck books chicken cooking food preservation ungarbage
  • Likes 12
  • Mark post as helpful
  • send pies
    Number of slices to send:
    Optional 'thank-you' note:
  • Quote
  • Report post to moderator
If Nancy's picture is the current one, I totally approve of an upgrade!

I will mention that there are "standards" for outside staircases. Generally there is less rise per tread, and the treads are wider. I can't remember where I think I saved info on it, but it's out there on the web, and there are sound reasons for it. My front steps are built like indoor steps (not by us) and they're very unnerving for many people. The steps you're talking about sound like steps that may be taken in the dark and in wet weather - maybe icy even? So following the standard (within reason) and having a sturdy railing seems like a good idea to me.
 
Mike Haasl
steward
Posts: 15505
Location: Northern WI (zone 4)
4846
7
hunting trees books food preservation solar woodworking
  • Likes 3
  • Mark post as helpful
  • send pies
    Number of slices to send:
    Optional 'thank-you' note:
  • Quote
  • Report post to moderator
Yup, that's the current one!  Thanks for the pic Nancy, that helps me imagine it much better.
 
pollinator
Posts: 287
55
  • Mark post as helpful
  • send pies
    Number of slices to send:
    Optional 'thank-you' note:
  • Quote
  • Report post to moderator
Gorgeous!
 
Posts: 708
149
  • Likes 7
  • Mark post as helpful
  • send pies
    Number of slices to send:
    Optional 'thank-you' note:
  • Quote
  • Report post to moderator
Yeah, I agree, that current wooden ships ladder is just a broken leg waiting to happen.

I would not take stair building lightly though, its one of those things where the little details really make a difference on safety. I think because we just take so many staircases (I average 21 per day according to fit bit) that one tiny detail off, and we are set up to be completely thrown off.

I like your stair concept so far. My only thoughts are to anchor it both above and below with a gabion. Really build on something solid, and then form a set of steps between the two points.

But for other ideas I might check out the US Forest Service. They inevitably have a lot of forested trails and will have various ideas on how to make safe access using materials at hand whether rock or wood, and built by summer interns with little experience in building.
 
author and steward
Posts: 52410
Location: missoula, montana (zone 4)
hugelkultur trees chicken wofati bee woodworking
  • Likes 3
  • Mark post as helpful
  • send pies
    Number of slices to send:
    Optional 'thank-you' note:
  • Quote
  • Report post to moderator
An idea.

Two big green logs.  Peeled.  Parallel.

Take a thick 5 foot long green log and cut two saddles in it so it can sit on the two logs a bit steppish.  When the log is snug and positioned well, put an inch and a half hole through it.  Pound in some 1.5 inch dry pegs.  Carve out a flat step from the top third of the log.

Repeat the last step until you have all the steps you want.

 
Posts: 12
  • Likes 1
  • Mark post as helpful
  • send pies
    Number of slices to send:
    Optional 'thank-you' note:
  • Quote
  • Report post to moderator
Looks like you need good balance to go up those stairs.😵
 
Posts: 24
Location: Garner, NC, USA
4
  • Mark post as helpful
  • send pies
    Number of slices to send:
    Optional 'thank-you' note:
  • Quote
  • Report post to moderator
I would suggest following a much shallower slope than the typical 7” rise 11” run for indoor steps. With that in mind, you are probably looking at at least two landings with switch backs.

Also to get the longer run per step you may need two or even three half logs per step.
 
pollinator
Posts: 1165
Location: Boston, Massachusetts
506
6
urban books building solar rocket stoves ungarbage
  • Likes 3
  • Mark post as helpful
  • send pies
    Number of slices to send:
    Optional 'thank-you' note:
  • Quote
  • Report post to moderator
I bet you could get away with three of the treads mortised with drawn-bored pegs, and the others just simple, shallow mortises. You might even get tricky and make those three mortises as through mortises with wedges that also incorporate the railing posts somehow. Maybe at the inside end of the tread, so the post would be drawn tight to the stringer as well?
One alternate mounting might be build a rip-rap stone covering over the embankment to lay the whole staircase on. This might help with erosion, and eliminate soil contact.

Stairs indoors can usually have shallower treads 10" and higher risers 7"-8" than outdoor stairs, where 11+" treads and 6" risers are common.
Maintaining an even riser height is important for safety, whether you tweak the landings to suit so you can use "round numbers", or divide the total rise by the # stairs and end up using weird fractions,
 
Kenneth Elwell
pollinator
Posts: 1165
Location: Boston, Massachusetts
506
6
urban books building solar rocket stoves ungarbage
  • Likes 4
  • Mark post as helpful
  • send pies
    Number of slices to send:
    Optional 'thank-you' note:
  • Quote
  • Report post to moderator

paul wheaton wrote:An idea.

Two big green logs.  Peeled.  Parallel.

Take a thick 5 foot long green log and cut two saddles in it so it can sit on the two logs a bit steppish.  When the log is snug and positioned well, put an inch and a half hole through it.  Pound in some 1.5 inch dry pegs.  Carve out a flat step from the top third of the log.

Repeat the last step until you have all the steps you want.


Cross-posted and just saw this... I like this idea a lot. (like alot, a lot.) The likelihood of long-term survival seems much better than the mortise and tenon method, which is relying on much less wood to make it work. It is also simpler to build, piece by piece, in place. It doesn't suffer the all-or-nothing, of the mortise design... needing the whole kit to assemble all at once at the end.

I'll restate my integrated railing idea in this context... Maybe the pegs could be larger? 2" (how big a drill have you got?) and, on one side at least, be tall enough to be balusters for a railing! Possibly the top and bottom "step logs" could be longer (7 feet?) to allow a diagonal brace for extra support for the railing posts.
 
Mike Haasl
steward
Posts: 15505
Location: Northern WI (zone 4)
4846
7
hunting trees books food preservation solar woodworking
  • Likes 2
  • Mark post as helpful
  • send pies
    Number of slices to send:
    Optional 'thank-you' note:
  • Quote
  • Report post to moderator
I'm in full agreement on keeping the rise/run consistent.  If I'm doing it, it has to get done in a week or less.

It would take half as many logs to do it the way I am proposing.  And the construction could be done without tenons, saddles or any tricky joints.  Just cut a bunch of logs in half lengthwise and put them together with pegs as shown below.  Then again, where's the fun in that.

I like the beefy awesomeness of Paul's idea but I'm a bit worried about the time it would take to fit each saddle and then cut out the tread area.  And the number of logs that would have to be prepped would be double.  

Here's a pic of both designs (as I understand them).  Sorry for the crappy modeling program...
Log-stairs.png
[Thumbnail for Log-stairs.png]
 
Nancy Reading
steward and tree herder
Posts: 8380
Location: Isle of Skye, Scotland. Nearly 70 inches rain a year
3973
4
transportation dog forest garden foraging trees books food preservation woodworking wood heat rocket stoves ungarbage
  • Likes 3
  • Mark post as helpful
  • send pies
    Number of slices to send:
    Optional 'thank-you' note:
  • Quote
  • Report post to moderator

Mike Haasl wrote:
It would take half as many logs to do it the way I am proposing.  And the construction could be done without tenons, saddles or any tricky joints.  Just cut a bunch of logs in half lengthwise and put them together with pegs as shown below.  Then again, where's the fun in that.

I like the beefy awesomeness of Paul's idea but I'm a bit worried about the time it would take to fit each saddle and then cut out the tread area.  And the number of logs that would have to be prepped would be double.  

Here's a pic of both designs (as I understand them).  Sorry for the crappy modeling program...


Can you combine both designs, and use half logs on Paul's design? I would have put the pegs vertically into the bearers.

I like Kenneth's idea too to make every fourth or fifth peg a post to support a banister. Round wood poles can be pretty strong, and that stacks functions a bit...and some nice rustic panels for a climbing vine....

source

That could be a future project perhaps, getting the treads may be enough working by hand.

 
Steve Zoma
Posts: 708
149
  • Likes 2
  • Mark post as helpful
  • send pies
    Number of slices to send:
    Optional 'thank-you' note:
  • Quote
  • Report post to moderator
What about just making stone stairs, either out of rearranged rocks, or gabions? You have an excavator on site so minds we’ll use it.

It might be a bit longer to build but would last forever.

If you wanted handrails some 3/4 black iron pipe and slam anchors would net you that and last decades before it rusted through.

With logs, you might get a decade out of them before it starts to be compromised by rot.
 
paul wheaton
author and steward
Posts: 52410
Location: missoula, montana (zone 4)
hugelkultur trees chicken wofati bee woodworking
  • Likes 2
  • Mark post as helpful
  • send pies
    Number of slices to send:
    Optional 'thank-you' note:
  • Quote
  • Report post to moderator
Mike,

I think an important thing is that the bigger the log pieces, the longer it will all last.

Also, for each step, I am proposing that only the inside gets carved out - so you are right:  what you are proposing would go much faster - provided that your chainsaw cuts are all perfectly square.  And THAT is a really big accomplishment.  

My design kinda rolls with the idea that the builder (you) isn't gonna make perfectly square cuts.  And it adds a lot of extra wood to the whole thing to get sheer volume of wood to act as "longevity".   It also takes water away from the joints - which are most prone to rot.


And I also like my idea of fat pegs turning into freaky beefy handrails.
 
paul wheaton
author and steward
Posts: 52410
Location: missoula, montana (zone 4)
hugelkultur trees chicken wofati bee woodworking
  • Mark post as helpful
  • send pies
    Number of slices to send:
    Optional 'thank-you' note:
  • Quote
  • Report post to moderator
In the end, Mike, it your decision.
 
pollinator
Posts: 3844
Location: Kent, UK - Zone 8
701
books composting toilet bee rocket stoves wood heat homestead
  • Likes 3
  • Mark post as helpful
  • send pies
    Number of slices to send:
    Optional 'thank-you' note:
  • Quote
  • Report post to moderator
Is a wooden set of stairs even the right approach?

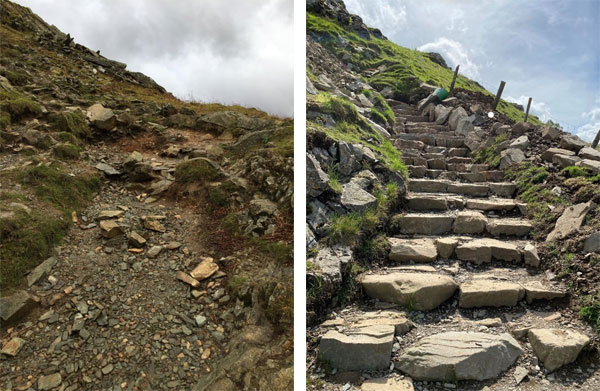
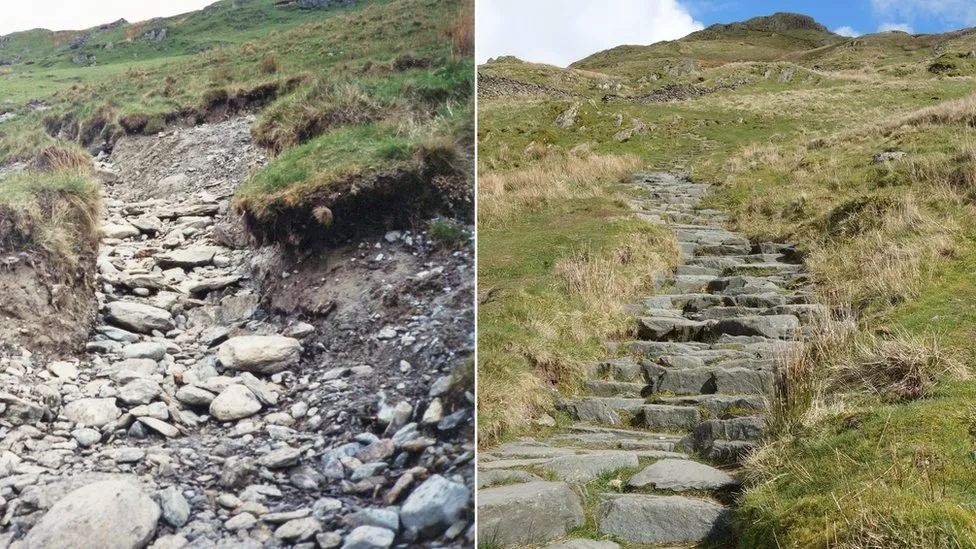
I believe you have some heavy machinery on site for moving rock around, and no shortage of large rocks, just looking at the picture of rocks falling out of the hillside. Might a stone pathway be just as quick to construct, and more durable in the long term?


Paths in national parks in the UK are restored as per the image above—heavy stones, set to make permanent stairs. There is a bit of an art to making them so that water flow doesn't cause erosion, and the stone must be set deeply to ensure durability. Paths constructed using the same techniques as the modern one in the picture above are still used hundreds of years later.

 
Kenneth Elwell
pollinator
Posts: 1165
Location: Boston, Massachusetts
506
6
urban books building solar rocket stoves ungarbage
  • Likes 5
  • Mark post as helpful
  • send pies
    Number of slices to send:
    Optional 'thank-you' note:
  • Quote
  • Report post to moderator
Here's a model of the idea so far, assume 12 inch logs for all, 3 inch posts tapered to 2 inch at ends.
5 inch deep cuts for the stair treads, 4 inch deep saddle cuts
6" rise/10-3/8" run, 11-7/8" treads

Screenshot-(7).png
Saddle log staircase
 
Jay Angler
steward
Posts: 12422
Location: Pacific Wet Coast
6991
duck books chicken cooking food preservation ungarbage
  • Likes 1
  • Mark post as helpful
  • send pies
    Number of slices to send:
    Optional 'thank-you' note:
  • Quote
  • Report post to moderator
Seems to me that we need someone at the lab to get us: 1) a height of the bank
2) whether there are constraints such as how far out at the bottom the stairs can sit from the edge of the slope
3) whether the bank can be changed in any way.

Mike's been there, so he likely has a mental picture, but I can remember someone trying to build a staircase to the front door of their cottage, and finding that the slope was too great for a staircase to be even remotely practical!
 
Mike Haasl
steward
Posts: 15505
Location: Northern WI (zone 4)
4846
7
hunting trees books food preservation solar woodworking
  • Likes 2
  • Mark post as helpful
  • send pies
    Number of slices to send:
    Optional 'thank-you' note:
  • Quote
  • Report post to moderator
Steve and Michael, I agree that rock stairs would last much longer and be fairly rot resistant.  The problems are that they don't have great rock there to build with.  And that hillside is currently fragmented rock with a thin layer of crappy soil on it.  So I think the underpinnings would be suspect.  The excavator usually lives on the lab, not at basecamp where this project would be.  And they've used every big rock they've found for other projects so it would require a lot of distant searching to find bigger rocks.  Lastly, I'm not that great at stone laying :)
 
Mike Haasl
steward
Posts: 15505
Location: Northern WI (zone 4)
4846
7
hunting trees books food preservation solar woodworking
  • Likes 1
  • Mark post as helpful
  • send pies
    Number of slices to send:
    Optional 'thank-you' note:
  • Quote
  • Report post to moderator
Thanks Kenneth, that's very helpful!

I'm not sure if I like having the spindles double as the pins.  It might be easier to separate those functions and use 1-1.5" hardwood pins (perpendicular to the main logs) and spindles made with the tenon cutting tool.  That way the pins can be harder wood and the spindles something more readily available.

If the logs aren't exactly 12" in diameter, how would that affect the treads?  If they're bigger, could we saddle them deeper to keep the same tread width or would we have to hew them down closer to 12"?  Same question for if they're 10"?
 
Kenneth Elwell
pollinator
Posts: 1165
Location: Boston, Massachusetts
506
6
urban books building solar rocket stoves ungarbage
  • Likes 4
  • Mark post as helpful
  • send pies
    Number of slices to send:
    Optional 'thank-you' note:
  • Quote
  • Report post to moderator
Mike, yeah, after seeing it modelled, it does seem to make for a very long peg on the base of the post to be able to do both jobs. The biggest trouble might be a bit to drill it, where ship augers for smaller size pegs are common and less expensive. Next would be getting the peg shaved down straight for 16". I think there's plenty of meat there to do both separately.

The "stringer logs" could probably be as small as 8" diameter and be plenty strong. It would reduce the work required for the saddle cuts.

The "tread logs" at 12" makes 11-12" possible for tread width, if you go any smaller than 10" and you're just making a fancier ladder. Wider like 14-16" might be fine? A wide variation over/under might cause more hassle than just a few oversized logs... which you'll probably be cutting deeper saddles, and/or possibly hewing them down some? Now wider logs like that might make good top and bottom treads, where the extra width runs out into space at the top (to be backfilled with earth/stone) and at the bottom without worry about a stair below, but possibly making a plumb cut at the nose of the tread to keep that distance the same as all the steps. It's when a wide log like that is in the middle of the flight, that it's awkward... I bet you could cut the saddle deeper to leave the same "meat" above the stringer, and get it to work with the step below pretty easy, but then you might need to hew the "shoulders?" a bit to allow the step above to get close enough to fall in line.

My model has the stringers at a 7/12 pitch, and the tread logs touching each other resulting in the 6" riser height. If a 7" riser height were used instead, there would then be some gap between the tread logs which would allow for some variation in the diameters. It might also be possible to work away the variation by placing a wider log adjacent to a narrower log? or just hew any oversized logs to measure 12" at saddle cut. The critical thing is that the noses of the treads are regularly spaced.
 
Steve Zoma
Posts: 708
149
  • Likes 2
  • Mark post as helpful
  • send pies
    Number of slices to send:
    Optional 'thank-you' note:
  • Quote
  • Report post to moderator
How about a solar powered cable tram?

I am just being silly but a guy in Maine had a camp on a lake with 120 steps to the water so he made a cable tram to go from camp to water.

People are pretty creative.
 
Mike Haasl
steward
Posts: 15505
Location: Northern WI (zone 4)
4846
7
hunting trees books food preservation solar woodworking
  • Likes 1
  • Mark post as helpful
  • send pies
    Number of slices to send:
    Optional 'thank-you' note:
  • Quote
  • Report post to moderator
Thanks Kenneth, that's kinda what I figured.  We'll have to see what the slope of the site actually is.  I wonder if some of the variables could be eliminated if some aspect of the treads was kept consistent (diameter would be great but is unlikely).  

Maybe the amount of meat left above the saddle?  Or cut an 11" tread in the steps and then align the center of the tread with some spot on the stringers.  Keep saddling deeper till it lines up?  Or some other way of generating consistency...
 
Jay Angler
steward
Posts: 12422
Location: Pacific Wet Coast
6991
duck books chicken cooking food preservation ungarbage
  • Likes 2
  • Mark post as helpful
  • send pies
    Number of slices to send:
    Optional 'thank-you' note:
  • Quote
  • Report post to moderator

Steve Zoma wrote:How about a solar powered cable tram?
I am just being silly but a guy in Maine had a camp on a lake with 120 steps to the water so he made a cable tram to go from camp to water.


Not all that silly:


I don't think we can justify it for this location, but it's cool to see that it's being done in an effort to make a city functional without urban sprawl!
 
Kenneth Elwell
pollinator
Posts: 1165
Location: Boston, Massachusetts
506
6
urban books building solar rocket stoves ungarbage
  • Likes 2
  • Mark post as helpful
  • send pies
    Number of slices to send:
    Optional 'thank-you' note:
  • Quote
  • Report post to moderator
Mike, just got to thinking about how to model the variable log diameters, and about your last post, and think I know the answer.
"Square Rule Framing" or maybe it's round wood equivalent? Measure the depths relative to some reference point or plane. Let's say the center of the log, since it is easy to find, and won't cause the depths to vary as widely.
So the tread cut and the saddle cuts will be at some angle apart from each other (TBD) and each to the same distance from the centers of the logs. Then assuming straight, consistent diameter stringer logs, they should all line up without much trouble. (especially using the layout with intentional gaps between tread logs)

Another idea that might work to speed things up is to hew the stringers to have an inverted "V" top surface (eliminating the need to cope the treads to match the curve/sizes of the stringers) all the saddle cuts could then be V notches that could simply be sawn either by hand or chainsaw. The V would still shed water well, although would be a cut surface rather than just peeled. Maybe plane it smooth? especially if there's a power plane option... Might also be easy to do this on the sawmill, and get good, straight, 90 degree cuts. You probably don't even need/want to make a sharp corner on the stringers, if the saddles have sharp corners, it would be more forgiving for fitting up.
 
Mike Haasl
steward
Posts: 15505
Location: Northern WI (zone 4)
4846
7
hunting trees books food preservation solar woodworking
  • Mark post as helpful
  • send pies
    Number of slices to send:
    Optional 'thank-you' note:
  • Quote
  • Report post to moderator
Great idea Kenneth!  I think if we made the copes shy of the centerline by 2? inches and then also made the tread surface 2? inches away as well, we'd lock in several variables.  If a given stair log is bigger, we can cut the face away.  For consistency we might want to cut the riser face away on all of the steps...

I'm already imagining how to speed up the process of marking and cranking out the treads.  I'm pretty sure the stringer logs won't be perfect cylinders...

I like the V notch idea but I've gotta think about it a bit more.  It would make the whole project a lot easier.  The cut stringers might rot faster.  But maybe 20 years instead of 25.  But it wouldn't have the same "roundwood" appeal...  Then again, the cut treads will probably rot the most since they're flat....
 
Kenneth Elwell
pollinator
Posts: 1165
Location: Boston, Massachusetts
506
6
urban books building solar rocket stoves ungarbage
  • Likes 1
  • Mark post as helpful
  • send pies
    Number of slices to send:
    Optional 'thank-you' note:
  • Quote
  • Report post to moderator
The sawn stringers will mostly be covered up by the treads, just as if all round wood. I might be over-optimistic on the time savings cutting V-notches in the treads when cutting the stringers factored in, or over-pessimistic about the coping of all the saddles... It seems like you could make a "miter box" for the V-notches that would set the spacing apart, and angles, and have a way to adjust the depth. Another jig could be made to reference the notches (or the saddles) to mark the tread cuts.

 
Posts: 2
Location: Tennessee
2
  • Likes 9
  • Mark post as helpful
  • send pies
    Number of slices to send:
    Optional 'thank-you' note:
  • Quote
  • Report post to moderator
This staircase is a work of art...  located at Wharton Escherick home in Valley Forge, PA.

 
Rocket Scientist
Posts: 4526
Location: Upstate NY, zone 5
574
5
  • Likes 6
  • Mark post as helpful
  • send pies
    Number of slices to send:
    Optional 'thank-you' note:
  • Quote
  • Report post to moderator
I have seen that in person - it's amazing. One of the handrails is a mammoth tusk that has the perfect compound curve. Anybody who appreciates hand-sculpted wood should visit the house (a museum with guided tours).

As far as bigger logs lasting longer, there is something to it, but whole round logs in the weather in my experience tend to rot faster than half-logs - water that gets in (as it will) can't get out as fast. That may not be as big a factor in the drier Montana climate...
 
pollinator
Posts: 1237
Location: Wheaton Labs, Montana, USA
2292
9
home care trees books wofati food preservation bike bee building writing seed
  • Likes 1
  • Mark post as helpful
  • send pies
    Number of slices to send:
    Optional 'thank-you' note:
  • Quote
  • Report post to moderator
Just dropping a note here to let Mike and others know that the Boot team can have steps peeled and ready for this project. There are currently 10 in the staircase now. We'll also mark a tree that can be felled for the side supports, then can [help] fell it once construction begins so the required log stays green as long as possible.

Mike, if anything changes about this, feel free to drop me a line however you like.
 
Mike Haasl
steward
Posts: 15505
Location: Northern WI (zone 4)
4846
7
hunting trees books food preservation solar woodworking
  • Likes 1
  • Mark post as helpful
  • send pies
    Number of slices to send:
    Optional 'thank-you' note:
  • Quote
  • Report post to moderator
Thanks Stephen!  I think the steps on the current ladder are a bit far apart so if there are 10 on that one, I think we may need more like 16 for the new one.  

Thanks to the Boot Team, you guys are awesome!!!
 
Mike Haasl
steward
Posts: 15505
Location: Northern WI (zone 4)
4846
7
hunting trees books food preservation solar woodworking
  • Likes 1
  • Mark post as helpful
  • send pies
    Number of slices to send:
    Optional 'thank-you' note:
  • Quote
  • Report post to moderator
General construction question...  Do the experts here think that the side logs need to be green?  Since we're saddle joining the steps to them, if they shrink noticeably, the joint may get a bit worse.  Not that they'll be perfect to begin with...  

Maybe it would help hold the pins?  But if it shrinks in diameter, and the pins are dry, and the steps are dry (or green for that matter), might the stringer logs shrink away from the steps and create a gap?  The steps could then be entirely supported by the pins?

Maybe dry stringers would be better?
 
Glenn Herbert
Rocket Scientist
Posts: 4526
Location: Upstate NY, zone 5
574
5
  • Likes 1
  • Mark post as helpful
  • send pies
    Number of slices to send:
    Optional 'thank-you' note:
  • Quote
  • Report post to moderator
Not an expert, but my opinion is that the stringers in the proposed design are not going to be worked to speak of and would not especially benefit from being green. The shrinkage is a factor to consider. It seems like the treads are what would be worked most and benefit most from being green, though I don't know just how much difference it would make for your wood.
 
Mike Haasl
steward
Posts: 15505
Location: Northern WI (zone 4)
4846
7
hunting trees books food preservation solar woodworking
  • Mark post as helpful
  • send pies
    Number of slices to send:
    Optional 'thank-you' note:
  • Quote
  • Report post to moderator
From what I've seen, green vs dry large conifer timbers at WL both seem to be easy to work.  So I wouldn't base a decision on that.  I'd much rather have dry logs that are ready to go vs green ones that need to be cut and peeled...

Unless there's a joinery reason of course...
 
Mike Haasl
steward
Posts: 15505
Location: Northern WI (zone 4)
4846
7
hunting trees books food preservation solar woodworking
  • Mark post as helpful
  • send pies
    Number of slices to send:
    Optional 'thank-you' note:
  • Quote
  • Report post to moderator
Thinking about this a bit more...  I think if the steps are milled off flat the whole way (not just in the tread area), it would be easier to make.  

One approach:
1. Get the stringer logs in place on the hillside.  Need to be parallel and in the same plane with the fewest knots on the top side as possible.  Screw scrap wood to them so they don't shift while building the staircase.
2. Measure slope of the stringers and distance between.  
3. Cut a bunch of stair treads to length and make a visual guide to screw to both ends of the tread to make saddle cutting consistent.  Saddles should all go the same distance from the center of the tread log.  Let's say 3".
4. Cut down to the max depth of the saddle (3" from center) with a chainsaw at the center-to-center spacing of the risers.  Don't go deeper than this "reference" cut when making saddles.  Carve saddles.  It would be nice to have a fast way of marking out saddles that is halfway accurate...
5. Test fit and adjust.  Biggest tread logs go at the top and bottom of the staircase.
6. Once they fit, use a jig to mark out the tread cuts.  Similar to saddles they are a set distance from the center of the log.  Say 3".  Cut the top off of the whole tread with a chainsaw.
7.  Set in place and temporarily screw to the stringer.  Set them with a consistent rise between steps.  
8.  Determine if cutting the fronts off the treads is needed (red line in picture).  It most likely will be needed.  Cut that either in place or by removing the treads and doing it on sawhorses.
9.  Drill 1.5" holes with auger.  One or two per tread end depending on how it looks.
10. Make 8" pegs from dry wood.  Preferably from hardwood.  Use tenon cutter to make the first 6" cylindrical and to the right size.  Shave the remaining 2" to be slightly fatter than 1.5" dia.  Cut slot in opposite end for a wedge (down in the stringer) that is driven tight by pounding the peg in.
11.  Cross our fingers and start pegging the stairs together
12.  Get junkpole wood and make spindles for the handrail (one or both sides)
13.  Get a small tree with a root ball for the handrail.
14.  Auger holes for spindles, orient them so they are roughly lined up at the top and install spindles
15.  Mark hole locations on the handrail, auger them and then try to get them all to line up.  Pound together.  Holes in handrail don't go all the way through.
16.  Use small pins (1/2") into side of handrail to secure it to the spindles.  
17.  Sand handrail smooth

Alternate plan:
Temporarily put stringers in place on hillside to measure slope.  Temporarily attach them together (very securely) and cart them down to the shop.  Do steps 3-11 at the shop in the shade and with better access to power.  Carry the stairs up and put in place.  Do handrail on site.

The alternate seems much more comfortable (shade) but moving the stringers down to the shop without things shifting could be perilous.

Questions:
Should the tread surface be sloped a couple degrees off of flat (into the hillside) so they feel better underfoot?  Seems like that might be a nice touch so you don't feel like you'll slide down them...
Is there an easy way to mark/measure saddles?  Since this will be on a hillside, cutting, fitting, cutting, fitting, cutting, fitting will be annoying.
Does anyone who's coming to help out with this have some oak or other good hardwood we could cut the pegs from?
Log-stair-layout.png
[Thumbnail for Log-stair-layout.png]
 
Jay Angler
steward
Posts: 12422
Location: Pacific Wet Coast
6991
duck books chicken cooking food preservation ungarbage
  • Likes 2
  • Mark post as helpful
  • send pies
    Number of slices to send:
    Optional 'thank-you' note:
  • Quote
  • Report post to moderator
Mike Haasl wrote:

Temporarily put stringers in place on hillside to measure slope.  Temporarily attach them together (very securely) and cart them down to the shop.  Do steps 3-11 at the shop in the shade and with better access to power.  Carry the stairs up and put in place.  

I'm betting these stairs are going to be pretty heavy. Isn't there a BB for putting up temporary shade? Maybe find someone who wants to earn that badge? That doesn't help the power bit...

and wrote:

Should the tread surface be sloped a couple degrees off of flat (into the hillside) so they feel better underfoot?  Seems like that might be a nice touch so you don't feel like you'll slide down them...

In my climate that would be a good approach so that water doesn't sit/pool on the surface and rot the wood. Would ice be an issue?
The exact number of degrees off level might be something to research?
 
Jay Angler
steward
Posts: 12422
Location: Pacific Wet Coast
6991
duck books chicken cooking food preservation ungarbage
  • Likes 3
  • Mark post as helpful
  • send pies
    Number of slices to send:
    Optional 'thank-you' note:
  • Quote
  • Report post to moderator
I saw a picture on Dez's thread of work in progress and it looks awesome - particularly when compared to the old set that showed in the picture.

I'm really glad people built such a solid "landing" at the bottom. A friend has an outdoor wooden stair arrangement, and the earth at the bottom keeps eroding, so the first step up keeps getting higher and higher relative to the dirt level!
 
gardener
Posts: 966
571
4
rabbit building solar rocket stoves
  • Likes 6
  • Mark post as helpful
  • send pies
    Number of slices to send:
    Optional 'thank-you' note:
  • Quote
  • Report post to moderator
 
This tiny ad is suggesting that maybe she should go play in traffic.
the permaculture bootcamp in winter (plus half-assed holidays)
https://permies.com/t/149839/permaculture-projects/permaculture-bootcamp-winter-assed-holidays
reply
    Bookmark Topic Watch Topic
  • New Topic