• Post Reply Bookmark Topic Watch Topic
  • New Topic
permaculture forums growies critters building homesteading energy monies kitchen purity ungarbage community wilderness fiber arts art permaculture artisans regional education skip experiences global resources cider press projects digital market permies.com pie forums private forums all forums
this forum made possible by our volunteer staff, including ...
master stewards:
  • Nancy Reading
  • Carla Burke
  • r ranson
  • John F Dean
  • paul wheaton
  • Pearl Sutton
stewards:
  • Jay Angler
  • Liv Smith
  • Leigh Tate
master gardeners:
  • Christopher Weeks
  • Timothy Norton
gardeners:
  • thomas rubino
  • Jeremy VanGelder
  • Maieshe Ljin

PEP Badge: Oddball

BB oddball - sand badge
 
steward
Posts: 1897
Location: Coastal Salish Sea area, British Columbia
1057
2
books chicken food preservation pig bike solar wood heat rocket stoves homestead ungarbage
  • Likes 1
  • Mark post as helpful
  • send pies
    Number of slices to send:
    Optional 'thank-you' note:
  • Quote
  • Report post to moderator
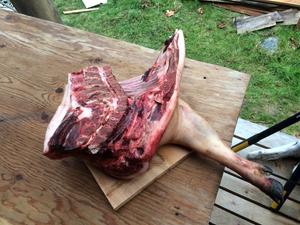
Here is what i started with. About 125 pounds of pork, one half and another half minus the front shoulder


Here is the front shoulder on the table before it was processed.


Here is the stomach section before it gets processed into bacon/ rib chops mmmm


Here is the back leg portion, also shown is the belly bacon, some bones for stock, some fat pieces for sausage, and some skin/fat pieces for beans.


Here is some of the meat labelled and packaged up. That is a banana box the meat is in.


So this process took me about 5 hours, this does include cutting up the hams and turning it into loose sausage. The sausage weighted about 17 pounds. All of this except the head and the belly/loin went into the freezer. The tools i use were;
Boning knife
long knife for larger cuts
cleaver
hand saw for cutting bones
many cutting boards and containers for moving the meat inside for packaging.

Here is the video i used!


I would have taken more photos however having pork lard hands makes it difficult.

 
steward
Posts: 15505
Location: Northern WI (zone 4)
4846
7
hunting trees books food preservation solar woodworking
  • Likes 1
  • Mark post as helpful
  • send pies
    Number of slices to send:
    Optional 'thank-you' note:
  • Quote
  • Report post to moderator
Let me preface this by saying I'm not Paul so this is just my thinking...

If you started with a living pig, I think this fits under Slaughter/butcher a pig in the Animal Care badge.  If you started with the halved pigs, I think it's just part of the Wood badge for Food Prep and Preservation - Preserve a million calories.

Oddball tends to be for tasks that aren't a fit for other badges and this seems to be right in line with some of the other badge principles.  I believe...
 
gardener
Posts: 461
Location: Northern Ontario, Canada
317
goat dog gear books bike building
  • Likes 10
  • Mark post as helpful
  • send pies
    Number of slices to send:
    Optional 'thank-you' note:
  • Quote
  • Report post to moderator
Got sent over here from another thread (https://permies.com/wiki/145589/pep-metalworking/Bicycle-Frame-metalworking-wood-bike). One of my first welding projects was a long tail cargo bike. I got the bike free through a volunteer repair program I do in the summer. I got the rebar and the tubing from the local scrapyard. And the welding was all done with a little inverter stick welder using 1/8" 6011 rods. It isn't pretty but it can carry a LOT. I've carried my dad on the back rack with no signs of stress on the rack. It's also been to the scrapyard with me a few times, and with a milk crate strapped to it I've brought it to a paint job too. I'm brand new to Permies and to PEP but I think this is a great program for me to focus my energy with. I'll let whoever sees this decide how many points it is worth and what not. Thanks!
IMG_20200921_173158_433.jpg
[Thumbnail for IMG_20200921_173158_433.jpg]
IMG_20200925_182403_599.jpg
[Thumbnail for IMG_20200925_182403_599.jpg]
IMG_20201020_125632_870.jpg
[Thumbnail for IMG_20201020_125632_870.jpg]
Staff note :

Certified for 1 oddball point and an oddball air badge

 
Cam Haslehurst
gardener
Posts: 461
Location: Northern Ontario, Canada
317
goat dog gear books bike building
  • Likes 1
  • Mark post as helpful
  • send pies
    Number of slices to send:
    Optional 'thank-you' note:
  • Quote
  • Report post to moderator
Here's another oddball: a quilt. It was done with a machine at a free sewing class back when I was in university. Overall it took me 10-12 hours to complete from fabric selection to completion. Work involved cutting strips from the fabric, cutting those strips into squares, and sewing them together to form a pattern. Following that we cut some stuffing to size, and sewed it in my putting another sheet on the other side to sandwich it inside. I suspect a pro would do this in a few hours, because most of my time used was fixing screw-ups. The pro version would obviously be much more visually appealing as well. The colours are quite bright. I asked the lady to pick colours for me as I don't have an eye for that stuff but she insisted I pick my own. I'm better at working with my hands than colour selection that's for sure. Anyways I think this fits best as an oddball because skill-wise it's very basic but none of the basic PEPs seemed to fit it. If anyone knows a better place for it let me know. I don't have my initials on it but the last pic is me on the floor with it. It is now serving at the cottage as a very warm comforter.

Edit: just realized 4th photo is before the borders were put on, not the final product. 5th photo is it all done.
IMG_20190227_184911.jpg
Piles of strips in pattern before sewing together
IMG_20190227_195426.jpg
Strips sewed together
IMG_20190321_195531.jpg
After cutting and sewing back together
IMG_20190327_190354.jpg
Final product with yours truly
Before putting borders on
IMG_20190403_180230-(1).jpg
Final product!
Final product!
 
Mike Haasl
steward
Posts: 15505
Location: Northern WI (zone 4)
4846
7
hunting trees books food preservation solar woodworking
  • Mark post as helpful
  • send pies
    Number of slices to send:
    Optional 'thank-you' note:
  • Quote
  • Report post to moderator
Hey Cam, there's a BB in the Wood badge of Textiles for making a quilt.  I'm not sure if you meet or exceed the requirements for that BB but I hope so.  The BB hasn't been written yet so you can't submit to it just yet.  But check it out in the meantime.   Textiles badge   (It's about the second BB down in the Wood level)
 
Cam Haslehurst
gardener
Posts: 461
Location: Northern Ontario, Canada
317
goat dog gear books bike building
  • Likes 1
  • Mark post as helpful
  • send pies
    Number of slices to send:
    Optional 'thank-you' note:
  • Quote
  • Report post to moderator
Mike,

Looks like it's pretty close. It exceeds the 7x5 grid as it's 8x8 I think. Not sure what topstitching is, not sure if I did it or not. I used cotton batting I think. Either way I'm in no rush. When it is ready I will find out for sure if it qualifies, even for partial credit. Thanks for your input!
 
Posts: 119
Location: Montréal, QC
77
2
foraging tiny house fiber arts building rocket stoves homestead
  • Likes 3
  • Mark post as helpful
  • send pies
    Number of slices to send:
    Optional 'thank-you' note:
  • Quote
  • Report post to moderator
Picked up an old chair that someone was tossing on a walk a few months ago. It had a few paint drips on it, so I decided to sand those off and refinish it. Unfortunately I left it outside and forgot about it for a while, tipping it against the wall to ward against puddles thinking that would be enough. It was not! It ended up requiring a lot more sanding and treatment with bleach to deal with water damage and old stains. All I had was some leftover spray-on water-based finish (technically for outdoor use, but my logic is that it should stand up to indoor use as well), so I put 4 coats of that on. I waited a bit too long to do this, so it was technically too cold for me to be doing this. As a result, the finish is a bit rough, so I'll wait until the spring to go over again with high-grit sandpaper and another final coat. Maybe I'll stain it back to that warm golden colour and fix that broken spindle at some point, too.

Probably about 4-5 hours of active work time, but I am by no means an expert.
Oddball-chair-1.jpg
Before. I think it looks better here than when I finished with it :\
Oddball-chair-2.jpg
Sanding has begun!
Sanding has begun!
Oddball-chair-3.jpg
More sanding
More sanding
Oddball-chair-4.jpg
After bleach and moving up to the next grit
Oddball-chair-5.jpg
Applying the finish
Applying the finish
Oddball-chair-6.jpg
Dry and inside
Dry and inside
Staff note :

Certified for 1/2 oddball point.  Plus points for Otis Factor, minus points for PEP Factor

 
Cam Lee
Posts: 119
Location: Montréal, QC
77
2
foraging tiny house fiber arts building rocket stoves homestead
  • Likes 4
  • Mark post as helpful
  • send pies
    Number of slices to send:
    Optional 'thank-you' note:
  • Quote
  • Report post to moderator
This didn't really seem to fit any of the textile BBs, so I'll submit it here instead. A friend of mine asked me to recreate some curtains for his boat. He dropped off the old faded, grimy ones and I washed and took measurements from those to base these ones off of. There is a wire across the top and bottom that the curtains are fed onto, and I opted to make those channels a bit wider to make them easier to take off and put back on. Otherwise, this is pretty straight forward. Lots of straight lines, pinning, pressing, realizing my measurements were slightly off and sewing the smallest possible seam allowances to compensate. They turned out great and the friend is happy! Took me about 3 hours total, including measuring and cutting.
img_20201113_103250.jpg
[Thumbnail for img_20201113_103250.jpg]
img_20201113_103513.jpg
[Thumbnail for img_20201113_103513.jpg]
img_20201113_104859.jpg
[Thumbnail for img_20201113_104859.jpg]
img_20201113_110845.jpg
[Thumbnail for img_20201113_110845.jpg]
img_20201113_124141.jpg
[Thumbnail for img_20201113_124141.jpg]
img_20201113_133022.jpg
[Thumbnail for img_20201113_133022.jpg]
Staff note :

Certified for 1 oddball point

 
steward
Posts: 21553
Location: Pacific Northwest
12040
11
hugelkultur kids cat duck forest garden foraging fiber arts sheep wood heat homestead
  • Mark post as helpful
  • send pies
    Number of slices to send:
    Optional 'thank-you' note:
  • Quote
  • Report post to moderator
My daughter wanted a Princess Belle dress for her doll. I rummaged through my scraps of fabric and cut up an old pair of pants for lining. Pretty sure neither of the textiles were natural fibre (maaaybe the cotton is), so I'm submitting this here!

(Note, the time spent on the button and button hole don't count for this submission, as I'll be submitting those for Textile BBs)

This is the doll dress pattern I used.

It took me at least 3 hours to do...but I also taught my son to sew and had to stop impaling their toys with pins and needles. It was entirely hand sewn (my sewing machine is broken). A lot of the time was just in all the pinning and cutting, and tight corners, so I can't imagine this would have been much faster on a machine.
20201129_134245.jpg
Yellow cloth already cut out, now cutting up old pants to make the lining
20201129_142359.jpg
Lining and the yellow fabric pinned together and ready to sew
20201129_153701.jpg
Now pinning the finished shirt-portion to the skirt fabric
20201129_155915.jpg
Dress finished, and it fits the doll perfectly!
20201201_200601.jpg
Added in gold ribbon I had lying around for a nice sash
20201201_200539.jpg
Finished back of the dress, with the sash tying nicely!
Staff note :

Certified for 1 oddball point

 
steward
Posts: 12425
Location: Pacific Wet Coast
6992
duck books chicken cooking food preservation ungarbage
  • Likes 3
  • Mark post as helpful
  • send pies
    Number of slices to send:
    Optional 'thank-you' note:
  • Quote
  • Report post to moderator
I'm not sure this fits anywhere else!  My favorite farm hat was getting thin on top. I tried replacing it, but didn't find one as comfy, so I decided to fix it. It's been fixed and worn daily for over a week and I'm really glad I did this before it got any worse.
Hat-top-thin-and-edges-worn.JPG
[Thumbnail for Hat-top-thin-and-edges-worn.JPG]
Hat-pattern-on-scrap-cotton.JPG
[Thumbnail for Hat-pattern-on-scrap-cotton.JPG]
Hat-pressed-fabric.JPG
[Thumbnail for Hat-pressed-fabric.JPG]
Hat-new-top-pinned.JPG
hat new top pinned
hat new top pinned
Hat-top-finished-brim-pinned.JPG
I hand stitched the new top using a blind stitch.
Hat-ready-to-wear.JPG
Actually, I treated the top with a linseed oil/beeswax mix to waterproof it a little.
Staff note (Nicole Alderman) :

I hereby certify this for 1.5 oddball points!

 
The meaning of life is to give life meaning. - Ken Hudgins / tiny ad
Freaky Cheap Heat - 2 hour movie - HD streaming
https://permies.com/wiki/238453/Freaky-Cheap-Heat-hour-movie
reply
    Bookmark Topic Watch Topic
  • New Topic