• Post Reply Bookmark Topic Watch Topic
  • New Topic
permaculture forums growies critters building homesteading energy monies kitchen purity ungarbage community wilderness fiber arts art permaculture artisans regional education skip experiences global resources cider press projects digital market permies.com pie forums private forums all forums
this forum made possible by our volunteer staff, including ...
master stewards:
  • Nancy Reading
  • Carla Burke
  • r ranson
  • John F Dean
  • paul wheaton
  • Pearl Sutton
stewards:
  • Jay Angler
  • Liv Smith
  • Leigh Tate
master gardeners:
  • Christopher Weeks
  • Timothy Norton
gardeners:
  • thomas rubino
  • Jeremy VanGelder
  • Maieshe Ljin

PEP Badge: Oddball

BB oddball - sand badge
 
gardener
Posts: 1569
Location: Washington State
985
6
forest garden trees rabbit earthworks composting toilet fiber arts sheep wood heat woodworking rocket stoves homestead
  • Likes 2
  • Mark post as helpful
  • send pies
    Number of slices to send:
    Optional 'thank-you' note:
  • Quote
  • Report post to moderator
Approved submission
Here is my submission for Oddball Points.

Recently, my sister and I were doing housecleaning with my sister.  She was vacuuming and I was picking up and putting things away (including laundry.  I walked back into the room she was vacuuming and noticed the smell of the vacuum belt so I decided to inspect and clean.  Initially, the beater looked pretty clean but the belt was under the cover so I got out some tools and my camera and cleared out the mess.  I'll narrate the photos below for more information.

This took me about an hour and I had to learn as I went
1.JPG
vacuum - upside down and getting the screws out
2.JPG
here you can see the hair, wool, and debris on the beater and near the belt
3.JPG
started removing excess material - decided to remove beater from housing
4.JPG
beater removed - easier to remove debris from the beater
5.1.JPG
clearing the way
clearing the way
5.2.JPG
tiny shop vac - vacuuming out the insides of the vacuum
6.JPG
reinstalling the beater and belt
7.JPG
finished with tools and debris removed
Staff note (gir bot) :

Someone approved this submission.
Note: Certified for 1/2 oddball point!

 
Posts: 31
Location: Fernie, British Columbia
34
chicken building ungarbage
  • Likes 3
  • Mark post as helpful
  • send pies
    Number of slices to send:
    Optional 'thank-you' note:
  • Quote
  • Report post to moderator
Approved submission
I consider our vehicles to be extremely important to our operation and I do most of the maintenance myself. Luckily we have two minivans so when one breaks there is a backup and we just need to be a bit better at carpooling for a while. This was kinda a fun and interesting little fix so I thought I would post it up here. It's pretty much electrical but doesn't really fit in the electrical BB so....

Anyways, last week our orange van (Bert) wouldn't start when it was cold outside. I did some reading online and found that the fuel pump relay is often faulty in these vehicles. So I did some testing and used a jumper wire in the fuse box to get power to the fuel pump temporarily. The fix worked okay but it didn't work when it was cold out because the auxiliary power gets cut when the vehicle is cranking over. This meant no fuel pump and no fuel to the engine while the starter circuit was running. Residual fuel pressure would sometimes get enough gas to the injectors until the pump kicked on again, but I needed a better fix.

The fuel pump relay in these vehicles is integrated into the power module (the fuse box there) and is about $1000 to replace. Not a great option for me.

Enter the racing switch!
IMG_20220316_151656_resize_83.jpg
Final install!
Final install!
IMG_20220316_152335_resize_35.jpg
Had to run wires through the firewall so I poked a coathanger through and pulled the wires through one at a time
IMG_20220316_145741_resize_69.jpg
Wires coming through into cab; black cable is for the hood release
IMG_20220316_145715_resize_8.jpg
Wires coming through into the engine bay
IMG_20220316_152000_resize_6.jpg
Magical connector that I will put in the spot where the fuel pump fuse goes
IMG_20220316_150146_resize_85.jpg
Crimped to the blue. I thought the connector was heat shrinkable. It wasn't, hence the slight burn marks.
IMG_20220316_150551_resize_26.jpg
Taped and installed
Taped and installed
IMG_20220316_145229_resize_73.jpg
Cut notch in plastic where it leaves the fuse box
IMG_20220316_150229_resize_6.jpg
Red crimped, will be wired right to the positive connection. Power all the time!
IMG_20220316_150400_resize_67.jpg
Taped, secured and routed.
IMG_20220316_152720_resize_65.jpg
Wires out of the way, headed to the cab switch
IMG_20220316_151049_resize_84.jpg
Dash moved and hole drilled!
IMG_20220316_151150_resize_59.jpg
Quick connects crimped.
IMG_20220316_151326_resize_67.jpg
Taped and switch connected
IMG_20220316_151437_resize_14.jpg
Switch installed. Just need to put the dash back together!
IMG_20220316_153030_resize_10.jpg
Battery back in and reconnected, works like a dream!
Staff note (gir bot) :

Someone approved this submission.
Note: Certified for 2 oddball points.

 
pollinator
Posts: 3089
Location: Meppel (Drenthe, the Netherlands)
1018
dog forest garden urban cooking bike fiber arts
  • Likes 2
  • Mark post as helpful
  • send pies
    Number of slices to send:
    Optional 'thank-you' note:
  • Quote
  • Report post to moderator
Approved submission
I think I can get a few (or 1/2) oddball point(s) for what I did. I first carefully read all Textile Straw BBs, but this was not there. There are BBs for making a garment bigger or smaller, but not for shortening it (at least: I think by 'smaller' you mean 'less wide'). And this was a knitted garment, that's different from something store-bought made out of woven fabric.
But if you think this fits in the PEP Textiles, that's OK, I can move it there.

A year ago I knitted this 'garden jacket'. I wear it when I work at the allotment garden (under my coat when it's cold, otherwise instead of the coat). It has stretched, became longer and longer ... I think this lengthwise stretching was because of the heavy pockets and because I knitted it sideways. Yesterday I found it really was too long and decided to make it shorter!
Alas the pockets needed to go then ...

Photos and explanation

It was this long! Because of the sideways knitting I couldn't just 'frog' the underside. I decided to 'steek' it.


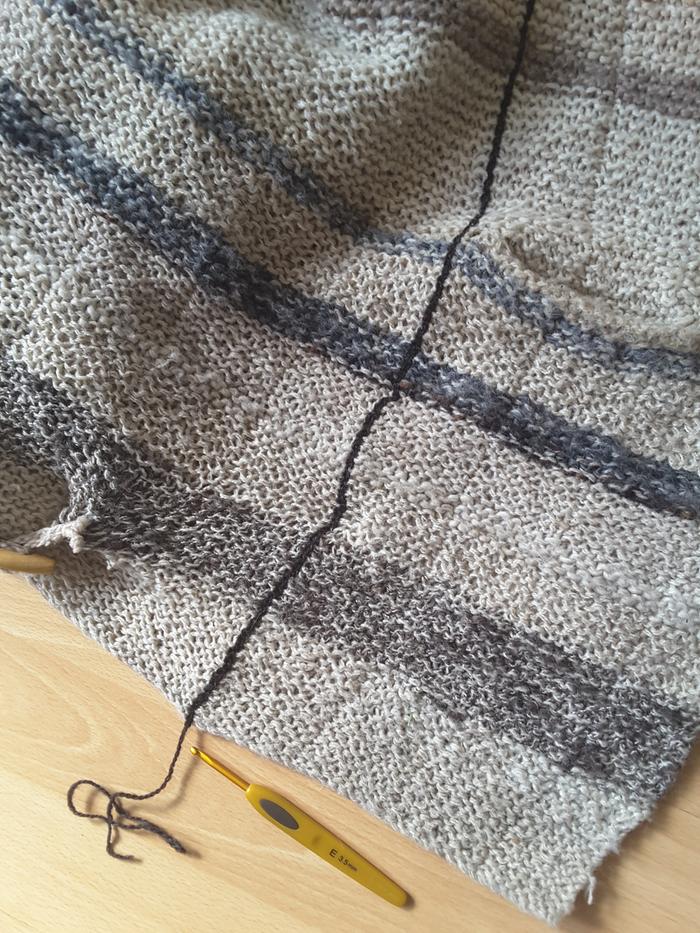
First step of steeking without a sewing machine: crochet a line (thanks to 'the Knitting Man' I know now how to do this).


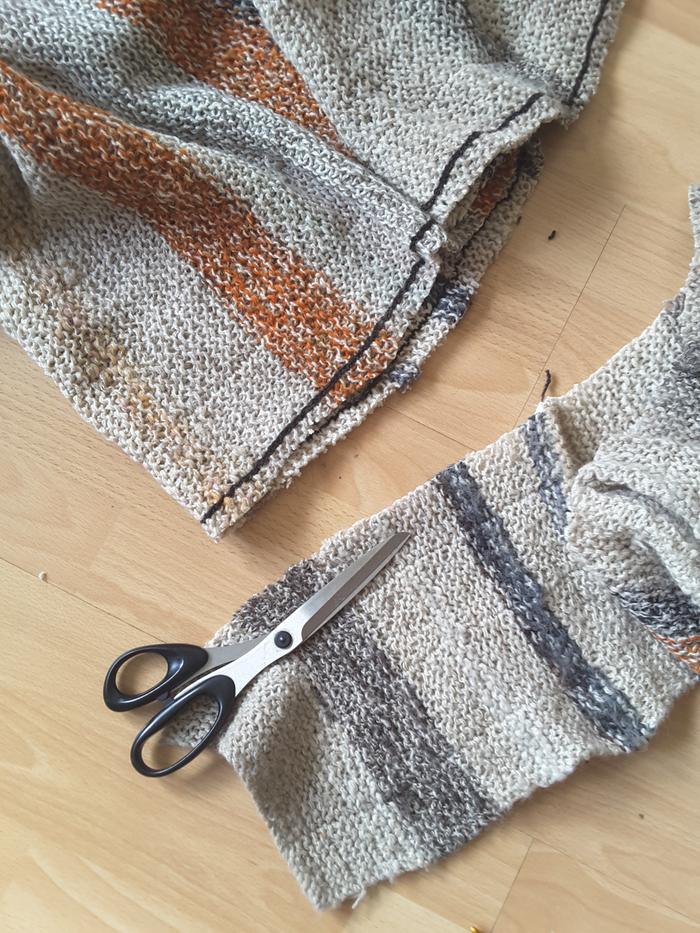
Second step: cut a few stitches from the crochet line.


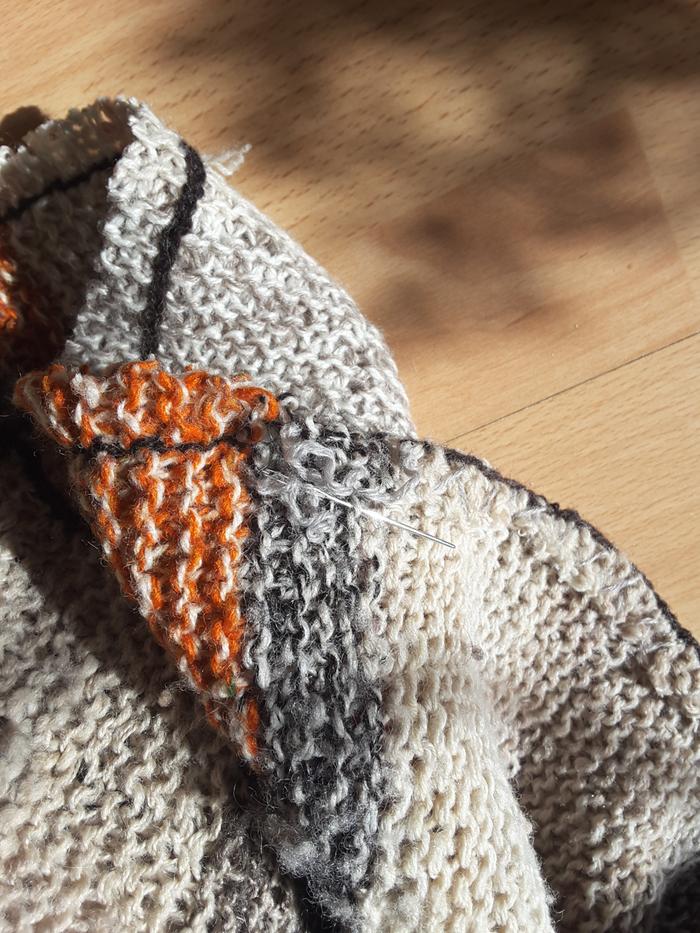
Third step: fold it and hem with a flanel stitch (I'm not sure you call it like that in English).


Finished. Now it won't hang over my knees anymore!  
Staff note (gir bot) :

Someone approved this submission.
Note: I certify this badge bit complete and award 1.5 points.

 
pollinator
Posts: 111
Location: Seattle, WA
61
kids personal care foraging urban food preservation fiber arts medical herbs ungarbage
  • Likes 3
  • Mark post as helpful
  • send pies
    Number of slices to send:
    Optional 'thank-you' note:
  • Quote
  • Report post to moderator
Approved submission
Does a compost bin count? It's more a building project than a garden project. In my climate I can't put undecomposed material on the surface of the garden without attracting a ton of slugs, so composting stuff first is important for the vegetable garden. I trench composted for many years, but after trying a no dig approach and getting much better harvests, I decided to invest time into a compost bin.

I built this 3- stall bin in 5 weekends, spread over the course of a year, as I was able to gather supplies and time. It was built using all free wood, either scraps we already had on hand or free pallets. Reusing materials that are otherwise going to waste is important to me. The front panels are mostly plywood, but the rest is solid wood.
20210424_141213-1.jpg
Cleaning up the area and assembling the back wall
Assembling the back wall
20210521_221155.jpg
One stall usable!
One stall usable!
received_3170961226474089.jpeg
Complete and in use!
received_636718967422200.jpeg
With decorations :)
With decorations :)
Staff note (gir bot) :

Mike Barkley approved this submission.
Note: Certified for 2 oddball points.

 
C Lundquist
pollinator
Posts: 111
Location: Seattle, WA
61
kids personal care foraging urban food preservation fiber arts medical herbs ungarbage
  • Likes 3
  • Mark post as helpful
  • send pies
    Number of slices to send:
    Optional 'thank-you' note:
  • Quote
  • Report post to moderator
Approved submission
Here's a submission for animal care of my snails.

I'm trying to raise apple snails. If I get good enough, I could raise them for food! I noticed the snails I had were getting thinning shells. So I looked up solutions and made "snail jello" for them, which includes calcium for their shells. They also seem to really love it.

20220219_174212.jpg
Ingredients
Ingredients
20220219_171722.jpg
After setting, I sliced them up
20220219_172119.jpg
Storing in the fridge
20220219_175311.jpg
Nom nom
Nom nom
Staff note (gir bot) :

Mike Barkley approved this submission.
Note: Certified for 1/2 oddball point.

 
Posts: 68
Location: Northeast Indiana (zone 6a)
73
home care urban food preservation fiber arts medical herbs homestead
  • Mark post as helpful
  • send pies
    Number of slices to send:
    Optional 'thank-you' note:
  • Quote
  • Report post to moderator
Edge case submission
Submitting about 15 minutes of work (so I think 0.25 Oddball points?) crocheting a scrubby for washing dishes.

The yarn I used is unfortunately a cotton/polyester blend, but I couldn't find a natural fiber yarn that had enough texture to scrub dried-on melted cheese off dishes (a common problem in my house). This yarn is specifically called scrubby yarn, and it has extra fiber twists coming off of it for extra scrubbing. I basically made a circle with split single crochet and chained a small loop for hanging. I'm a pretty accomplished crochet-er and it took me about 15 minutes start to finish.
supplies.jpg
[Thumbnail for supplies.jpg]
crochet1.jpg
[Thumbnail for crochet1.jpg]
crochet2.jpg
[Thumbnail for crochet2.jpg]
finished.jpg
[Thumbnail for finished.jpg]
Staff note (gir bot) :

Someone flagged this submission as an edge case BB.
BBV price: 0
Note: Please resubmit the BB using appropriate materials to crochet a dishcloth as part of Textiles: permies.com/wiki/113969. This submission too closely matches a textiles BB to be scored for Oddball. 

 
Inge Leonora-den Ouden
pollinator
Posts: 3089
Location: Meppel (Drenthe, the Netherlands)
1018
dog forest garden urban cooking bike fiber arts
  • Likes 1
  • Mark post as helpful
  • send pies
    Number of slices to send:
    Optional 'thank-you' note:
  • Quote
  • Report post to moderator

Jay Girardot wrote:...
The yarn I used is unfortunately a cotton/polyester blend, but I couldn't find a natural fiber yarn that had enough texture to scrub dried-on melted cheese off dishes (a common problem in my house). ...


Jay, I used sisal (that's sold as twine or rope) for crocheting such scrubbies. Did you try that (with the melted cheese)? It's a plant fiber, made of a tropical plant, some kind of Agave.
 
Yuri Cottonwood
Posts: 31
Location: Fernie, British Columbia
34
chicken building ungarbage
  • Mark post as helpful
  • send pies
    Number of slices to send:
    Optional 'thank-you' note:
  • Quote
  • Report post to moderator
Approved submission
Yuri here with another odd job... Well it's already getting too hot in the new greenhouse that I finished in the fall. I got these automatic window openers last year to install in the roof to dump heat. I've used them before with great success on wall windows, but this is the first time I have installed them in a roof mount. They typically start to crack the window open around 15 degrees (49 F) and reach full expansion around 35 degrees (95 F)

The roof panels are corrugated plastic but they are not very flexible, so it was a bit challenging to figure a way that would not leak if it's raining but still allow the window to open properly. Here are some pictures:
IMG_20220330_110853_resize_18.jpg
Original roof. i moved to the right a couple of spaces so that it would be more in the center
IMG_20220330_113139_resize_46.jpg
First need a window frame, here is some cut wood ready for assembly
IMG_20220330_113646_resize_47.jpg
Window frame done
Window frame done
IMG_20220330_125633_resize_17.jpg
Hole cut and frame installed with some leftover piano hinge from the shop
IMG_20220401_125331_resize_95.jpg
Panel cut, notched, and mounted to the frame from the top.
IMG_20220401_125333_resize_46.jpg
This should keep most of the rain out but still allow the window to open fully
IMG_20220401_130910_resize_45.jpg
Hardware installed and doing it's job already!
Staff note (gir bot) :

Someone approved this submission.
Note: Certified for 2 oddball points!

 
pollinator
Posts: 258
Location: Pacific Northwest
111
8
forest garden fungi wofati cooking solar homestead
  • Likes 4
  • Mark post as helpful
  • send pies
    Number of slices to send:
    Optional 'thank-you' note:
  • Quote
  • Report post to moderator
Approved submission
I fixed the timber tool at wheaton labs.  I cut out the bent section then butt welded it back together.  I followed it up with some pieces of angle for overkill.  Took me about 4 hours.
20220425_090105.jpg
all bent outta shape
20220425_092502.jpg
choppin
choppin
20220425_103316.jpg
grinding edges and paint
20220425_110227.jpg
butt weld hehe
butt weld hehe
20220425_122553.jpg
finished
finished
Staff note (gir bot) :

Mike Barkley approved this submission.
Note: Certified for 3 oddball points.

 
Opalyn Rose
gardener
Posts: 1569
Location: Washington State
985
6
forest garden trees rabbit earthworks composting toilet fiber arts sheep wood heat woodworking rocket stoves homestead
  • Mark post as helpful
  • send pies
    Number of slices to send:
    Optional 'thank-you' note:
  • Quote
  • Report post to moderator
Approved submission
Here is my submission for Oddball Points.

I'm staying in the Solarium while attending the BB20 Event and am enjoying the rocket mass heater.  Unfortunately, the vertical exhaust components did not get screwed together and one of the crimped ends was cut off so there was barely 1/4" of the crimped section left.  This was not enough to screw that joint together so I predrilled and screwed two of the lower joints together and fit the upper joint back together.  Unfortunately due to the short overlap, it still wiggles so I added a piece of aluminum tape to seal the joint.

To document the completion of the BB, I have provided the following:
 -  photos before, during, and after
1.JPG
disconnected vertical exhaust
2.JPG
predrilling holes for screws at chest height
5.JPG
multiple screws at chest and ankle height
4.JPG
joint still loose
joint still loose
6.JPG
alluminum tape
alluminum tape
7.JPG
finished
finished
Staff note (gir bot) :

Someone approved this submission.
Note: half point

 
Run away! Run away! Here, take this tiny ad with you:
the permaculture bootcamp in winter (plus half-assed holidays)
https://permies.com/t/149839/permaculture-projects/permaculture-bootcamp-winter-assed-holidays
reply
    Bookmark Topic Watch Topic
  • New Topic