• Post Reply Bookmark Topic Watch Topic
  • New Topic
permaculture forums growies critters building homesteading energy monies kitchen purity ungarbage community wilderness fiber arts art permaculture artisans regional education skip experiences global resources cider press projects digital market permies.com pie forums private forums all forums
this forum made possible by our volunteer staff, including ...
master stewards:
  • Nancy Reading
  • Carla Burke
  • r ranson
  • John F Dean
  • paul wheaton
  • Pearl Sutton
stewards:
  • Jay Angler
  • Liv Smith
  • Leigh Tate
master gardeners:
  • Christopher Weeks
  • Timothy Norton
gardeners:
  • thomas rubino
  • Jeremy VanGelder
  • Maieshe Ljin
  • Likes 7
  • Mark post as helpful
  • send pies
    Number of slices to send:
    Optional 'thank-you' note:
  • Quote
  • Report post to moderator
This is a badge bit (BB) that is part of the PEP curriculum.  Completing this BB is part of getting the Straw Badge in Textiles.

For this BB, you will repair a hole in a shirt or sleeve.

To complete this BB, the minimum requirements are:
- repair to a hole in the fabric of a shirt
- use natural materials like cotton or wool

To document your completion of the BB, provide proof of the following as pictures or a video (less than two minutes):
- show the shirt with the hole to be repaired
- show the tools and materials
- show the repair in progress
- show your shirt with the hole repaired
- describe how you will mend the hole (optional)

Holes in shirts can be mended in various ways. They can be darned, patched, or hidden with embroidery. The following articles and videos will give you some creative ideas for your repair.

Related Articles:
Two best methods to repair holes in a shirt
Cover a Hole in a Shirt Sleeve with Faux Cuffs

Related Videos:
How to darn a hole in clothes


Mend a hole in a shirt with embroidery

COMMENTS:
 
steward
Posts: 12433
Location: Pacific Wet Coast
6996
duck books chicken cooking food preservation ungarbage
  • Likes 1
  • Mark post as helpful
  • send pies
    Number of slices to send:
    Optional 'thank-you' note:
  • Quote
  • Report post to moderator
Approved submission

Hubby ripped his shirt. The edges were frayed and uneven, which limited my options, but it didn't seem old enough to be rags, so I unpicked the "breast pocket flap" as material for repairs. There are several "invisible mend" techniques I'd have liked to try, but the pocket flap fabric didn't "match the plaid", so I went with the patch on the inside, and did invisible stitches first to hold the patches in place, and then to close the gap.


The only tools I used were a stitch ripper to salvage the flap, scissors, and a needle and thread and I didn't think to include those in the picture.

This is not *as invisible* as I would like, but considering the damage to the shirt and the material available and the location of the tear where the fabric will be mostly under his arm, I'm pleased with the result.
This is a good reminder how much easier things like this are when you sew the shirt yourself and have scrap fabric to do repairs like this!
Staff note (gir bot) :

Leigh Tate approved this submission.

 
Posts: 33
Location: South Eastern Virginia
34
4
cat trees chicken
  • Likes 1
  • Mark post as helpful
  • send pies
    Number of slices to send:
    Optional 'thank-you' note:
  • Quote
  • Report post to moderator
Approved submission
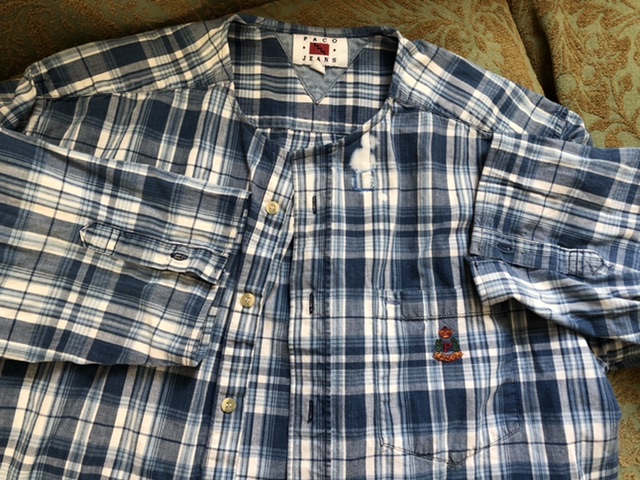
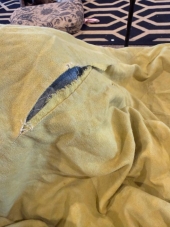
I have a shirt I like to wear for yard work.  It had a bleach accident and a hole appeared among the damaged threads.  This is how I fixed the hole while modifying the shirt. I used regular sewing thread and a donor fabric backing. Other tools used were binder clips for holding and the sewing machine for final hemming of neckline and sleeve ends.

(The shirt before)

The collar looked like a good place to find donor fabric to go behind the hole. I wasted an afternoon trying to pick the seam at the collar only to discover the makers had assembled the collar pieces then attached them to the neckline.  Unless I wanted to spend all week picking away one stitch at a time, it was time to break out my good fabric scissors. I carefully snipped away the collar, then decided to remove the sleeve cuffs as well.

(The colors)

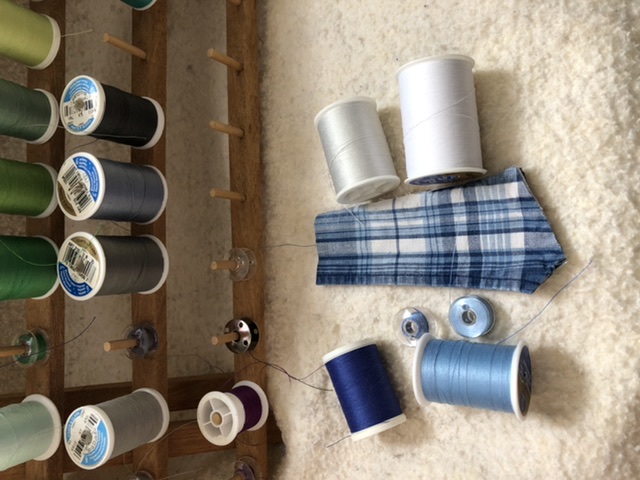
I picked out thread colors that would blend with the shirt. For some reason I do not have navy blue.

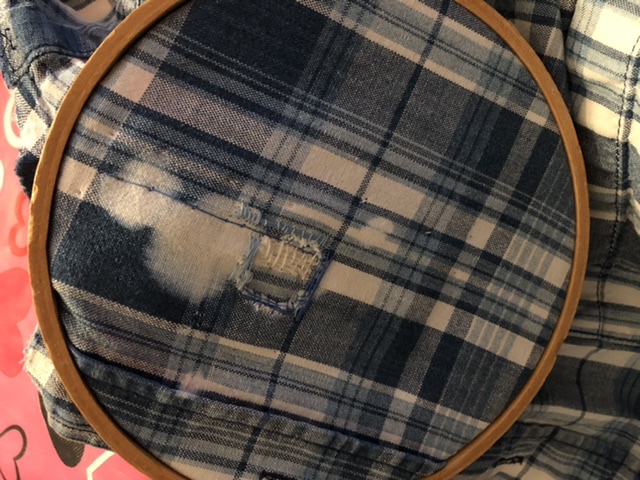
I used indigo blue, light blue, and white threads to tack down the edges of the hole. I pinned the donor fabric behind the hole and decided the five inch embroidery hoop was the best size for my project.

(Hooping it)

I ironed the section of the shirt to help it lay flat so maybe it would turn out better. I started with one sewing needle and decided quickly it was too fat and was destroying the fabric rather than passing through.  I switched to a thinner needle.  I maintain a variety of needles in my pin cushion for "fashion emergencies".

Then I experimented with tiny stitches, some satin stitching, and some attempts at weaving on the fabric surface. I attempted something that I will call "couching", but I used the previous satin stitches rather than a thread laid on top.

After a couple of hours, I had to put down the project and walk away.  The next day I examined my progress and decided upon my strategy. Another few rounds of changing colors of threads on my needle and turning the work to attack from all angles, I finally was much happier.  The edges of the hole are now captured.

(In process)

I turned the hems for the sleeves and neckline.  When the fabric becomes too thick for even quilting pins, I switch to binder clips. I started with the sleeves because they will annoy me less.  I decided that black thread was NOT an acceptable substitute for navy blue and switched to the indigo blue I had used before.  After a few stalls on areas that likely had five or more layers, the rest was easy.  I trimmed the threads and examined my work.

(Machining it)

Unfortunately the bleached area is still very visible. I may attempt blending with blue Sharpie markers to make it less noticeable.  I will have to color on the scraps and see how it turns out.  At any rate, the hole is now secured and I should be able to launder, hang up, and wear this shirt for many years without threat of imminent destruction.

(The end)
6CAC0B0E-9C19-4413-BF88-0E1FBAA9F5EF.jpeg
The shirt before
The shirt before
F253FE87-69CC-4AA8-8D98-368339E1269A.jpeg
The colors
The colors
038C1875-E11A-4A3B-8BD8-6ED84A7BCD9F.jpeg
Hooping it
Hooping it
B77E8864-6E95-4874-A8E1-969D5253D57C.jpeg
In process
In process
56CBA426-AAD0-487C-8886-A443BCF9A8A6.jpeg
Machining it
Machining it
66E35897-A483-437B-8B4D-C18B3092AA8B.jpeg
The end
The end
Staff note (gir bot) :

Leigh Tate approved this submission.
Note: Congratulations on your first Badge Bit!

 
Janie Brackett
Posts: 33
Location: South Eastern Virginia
34
4
cat trees chicken
  • Mark post as helpful
  • send pies
    Number of slices to send:
    Optional 'thank-you' note:
  • Quote
  • Report post to moderator
If we happen to have a “how to stick the photos where you want them to appear” type of wiki, instruction, or such, please direct me to it! I have another BB to submit and want to do better next time. Thank you all. That stuff I learned BM (Before Motherhood) is actually used here.
 
author & steward
Posts: 5297
Location: Southeastern U.S. - Zone 7b
3080
5
goat cat forest garden foraging food preservation fiber arts medical herbs writing solar wood heat homestead
  • Likes 2
  • Mark post as helpful
  • send pies
    Number of slices to send:
    Optional 'thank-you' note:
  • Quote
  • Report post to moderator

Janie Brackett wrote:If we happen to have a “how to stick the photos where you want them to appear” type of wiki, instruction, or such, please direct me to it! I have another BB to submit and want to do better next time.


Janie, it's a learning curve, isn't it? :)

Try this thread for photo how-tos -> How to post an image on Permies.com.
 
pollinator
Posts: 259
Location: New Zealand
307
chicken food preservation fiber arts woodworking homestead
  • Mark post as helpful
  • send pies
    Number of slices to send:
    Optional 'thank-you' note:
  • Quote
  • Report post to moderator
Approved submission
Another one of my shirts got a hole in the sleeve. As it is a nice woolen shirt and it's currently winter here, I want to keep wearing it! I used patches made from an old pair of moth-eaten men's woolen trousers I'd picked up at at op shop for the purpose some time back. Works great! Made the patch rather large as my elbow is pointy and wanders a bit in the sleeve, and previous elbow patches have failed when my elbow is resting on the fabric around the periphery.
mb-bb-textiles-straw-repair-shirt-1.JPG
Woolen shirt with hole in elbow; cutting patches; pinning patch in place
mb-bb-textiles-straw-repair-shirt-2.JPG
Sewing patch; completed job
Staff note (gir bot) :

Stacie Kim approved this submission.

 
Posts: 76
48
  • Likes 2
  • Mark post as helpful
  • send pies
    Number of slices to send:
    Optional 'thank-you' note:
  • Quote
  • Report post to moderator
Edge case submission
Tiny wear hole in my boy’s old onesie. I wanted to get this hole mended before putting it away for another future child, and decided a handmade embroidered patch was the way to go. Traced the snail line art from an old children’s book, and stitched it with back stitch and satin stitch. Once I finished the patch, I backed it and the onesie with iron on stabilizer (a necessity when working with knits). Then I used a (lazy) whip stitch to fix the patch in place.
DBB6C893-C58A-45C8-9247-A678D15CCBBF.jpeg
Embroidering the patch
0AFE8815-B1C5-4CEB-95A3-6552CC055ADC.jpeg
The hole
The hole
3B09C532-9AD6-4B63-BABC-15646094FA32.jpeg
Whip stitching the patch onto the hooped shirt
95015429-2FC8-44BD-849D-C7A07EE4A4CC.jpeg
Finished!
Finished!
3C2DCFBD-A9A9-48CF-8444-B72E81AD1CD6.jpeg
From the inside. Nice and smooth
Staff note (gir bot) :

Opalyn Rose flagged this submission as an edge case BB.
BBV price: 0
Note: Beautiful embroidery! Unfortunately this BB requires natural materials.

Staff note (Jay Angler) :

Your work is lovely Melody. If you don't want to replace the iron on stuff with a simple, fine cotton scrap, I suggest you submit this for "Oddball" points under that badge bit. Getting into the "all natural" mindset when people have grown up without being aware of the difference is a skill in itself.

 
Melody Goretti
Posts: 76
48
  • Likes 2
  • Mark post as helpful
  • send pies
    Number of slices to send:
    Optional 'thank-you' note:
  • Quote
  • Report post to moderator
Thanks, y’all! I completely forgot this bit needed to use natural materials. I have more mending in the future, so I’ll just resubmit when I do another mending spree.
 
Posts: 72
Location: London, UK
43
urban books cooking writing
  • Likes 1
  • Mark post as helpful
  • send pies
    Number of slices to send:
    Optional 'thank-you' note:
  • Quote
  • Report post to moderator
Approved submission
I've owned this hoodie since I was 15 so it has accumulated a lot of little holes and one bigger one has appeared over the last few days. I bought some light purple cotton thread to blend in with the original colour as best as possible. I sewed up the holes without a patch to match the weave as best as I could. I only know the basics of sewing so hopefully this is alright.
Holes-1.jpg
A couple of small holes right on the cuff and a bigger one further down
Fixing-1st-hole.jpg
A simple stitch going over it a number of times to reinforce it for my first hole
Fixing-big-hole.jpg
I used pins for the bigger hole to make it easier for me to sew up the two edges neater and tighter
Fixed-big-hole.jpg
A close up of the finished mend on the big hole
Finished-product.jpg
All the other holes sewed up
Staff note (gir bot) :

Someone approved this submission.

 
pollinator
Posts: 773
Location: Western MA, zone 6b
479
cat dog forest garden foraging urban food preservation
  • Mark post as helpful
  • send pies
    Number of slices to send:
    Optional 'thank-you' note:
  • Quote
  • Report post to moderator
Approved submission
To document your completion of the BB, provide proof of the following as pictures or a video (less than two minutes):
- show the shirt with the hole to be repaired
- show the tools and materials
- show the repair in progress
- show your shirt with the hole repaired
- describe how you will mend the hole (optional)

One of my favorite sweaters has been getting some holes under the arm,  so good chance to get one sewn and do this BB.

Cotton thread,  overcast stitch along the seam,  thread doubled for strength:  

IMG_3254.JPG
[Thumbnail for IMG_3254.JPG]
IMG_3256.JPG
[Thumbnail for IMG_3256.JPG]
IMG_3258.JPG
[Thumbnail for IMG_3258.JPG]
IMG_3259.JPG
[Thumbnail for IMG_3259.JPG]
IMG_3260.JPG
[Thumbnail for IMG_3260.JPG]
IMG_3261.JPG
[Thumbnail for IMG_3261.JPG]
Staff note (gir bot) :

Cam Haslehurst approved this submission.

 
Posts: 123
64
  • Mark post as helpful
  • send pies
    Number of slices to send:
    Optional 'thank-you' note:
  • Quote
  • Report post to moderator
Approved submission
I really like this shirt. So I spent almost a forever procrastinating fixing these hole, but they actually look pretty good.
I'm sorry it didn't dawn on me, the full shirt pic. posted previously and just didn't think about it.
20230106_214202.jpg
Hole and materials.
Hole and materials.
20230106_230340(0).jpg
After the white thread.
20230106_232654.jpg
Midway through blue thread.
20230106_232716.jpg
Done back.
Done back.
shirt.jpg
Before sewing.
Before sewing.
Staff note (gir bot) :

r ranson flagged this submission as an edge case.
BBV price: 0
Note: almost there.  Can you add a photo showing this is a shirt?

Staff note (gir bot) :

Luke Mitchell approved this submission.
Note: Nice job!

 
steward & author
Posts: 38404
Location: Left Coast Canada
13657
8
books chicken cooking fiber arts sheep writing
  • Likes 1
  • Mark post as helpful
  • send pies
    Number of slices to send:
    Optional 'thank-you' note:
  • Quote
  • Report post to moderator
Just a reminder the very first requirement is to:

To document your completion of the BB, provide proof of the following as pictures or a video (less than two minutes):
- show the shirt with the hole to be repaired


Some of these are difficult to see they are shirts.  

Anyone already approved above is grandfathered in, but future submissions will likely be more strict about this.  
 
steward
Posts: 21553
Location: Pacific Northwest
12040
11
hugelkultur kids cat duck forest garden foraging fiber arts sheep wood heat homestead
  • Mark post as helpful
  • send pies
    Number of slices to send:
    Optional 'thank-you' note:
  • Quote
  • Report post to moderator
Approved submission
I just realized I'd never taken pictures of a shirt mending for this BB!

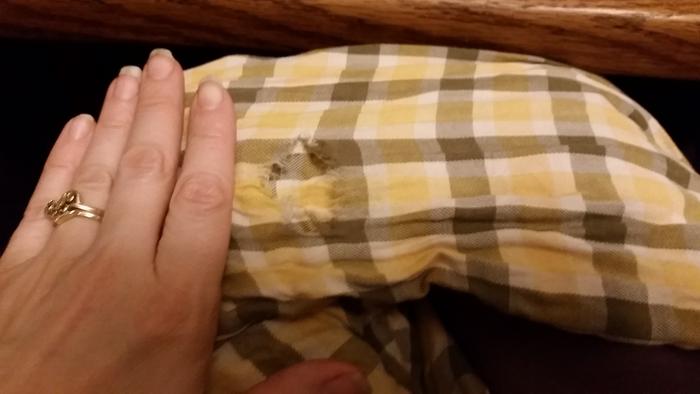
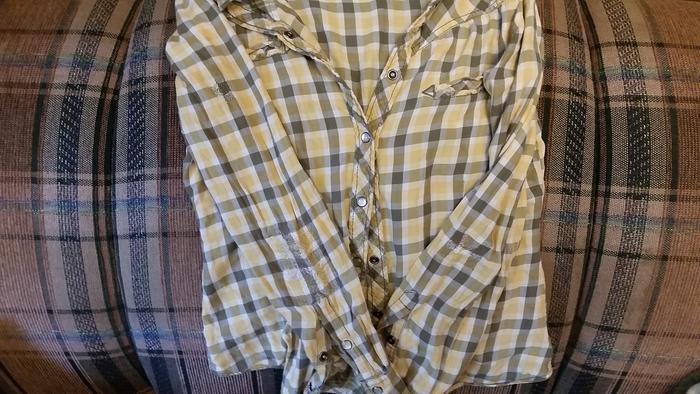
I'm pretty sure I've had this shirt for at least 8 years. It's one of the few yellow colors that look good on me, and I really like this shirt. This is the 4th time I've mended it over the years, and I love seeing how my mending has changed and improved over the years!

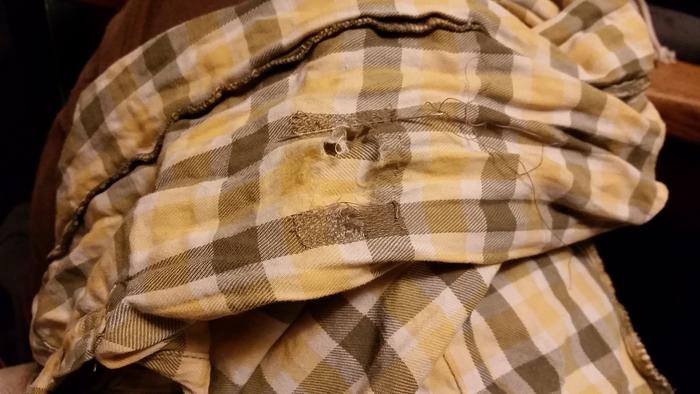
Here's the big elbow hole:

hole in the elbow of my yellow/brown/white plaid shirt


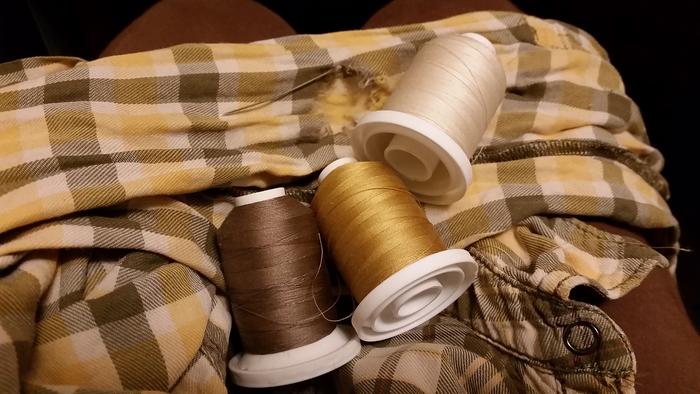
I have cotton thread in gold, dusty brown, and off-white that almost perfectly match the shirt.

The matching threads and long sewing needle I used to mend the hole


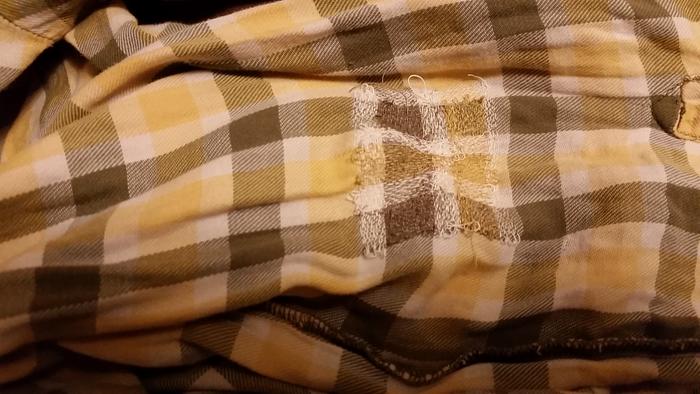
For this mending, I reweaved the the pattern of the plaid. I start on the outside stripes. These two brown stripes took 30 minutes.

30 minutes into the mend


Considering the amount of youtube videos I watched while mending, I ended up spending 2.5-3 hours on fixing this shirt, but I really love how it turned out! There's a slight puckering in the middle, but I think it's barely noticeable.

The finished mend, viewed from the inside


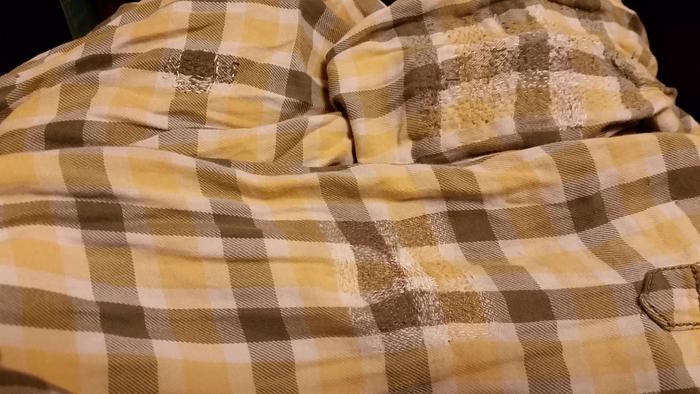
Most recent mend it pictured at the bottom. The other sleeve contains my older mends. The right mend was done with a piece of khaki pants fabric backing, and I've had to remend it twice


20230117_141244.jpg
The mended shirt from afar. The mending is pretty hard to discern at this distance--yay!
Staff note (gir bot) :

Someone approved this submission.
Note: Lovely job - wear it with pride!

 
Apprentice Rocket Scientist
Posts: 853
Location: 4a, high mountain dessert
410
3
kids foraging rabbit fiber arts medical herbs bee
  • Mark post as helpful
  • send pies
    Number of slices to send:
    Optional 'thank-you' note:
  • Quote
  • Report post to moderator
Approved submission
I do not know how my daughter split open her shoulder seam! It's a new shirt! And she still needs it for cheerleading. ug. Good thing I can sew.
20230131_073600.jpg
seams at shoulder, open
20230131_075950.jpg
tools used: thread, needle, scissors
20230131_074916.jpg
repair in progress
repair in progress
20230131_080038.jpg
ta da!
ta da!
Staff note (gir bot) :

D. Logan approved this submission.

 
pollinator
Posts: 122
Location: Gloucestershire, UK
89
5
foraging urban cooking fiber arts ungarbage
  • Mark post as helpful
  • send pies
    Number of slices to send:
    Optional 'thank-you' note:
  • Quote
  • Report post to moderator
Approved submission
My husband wears through the elbow on his shirts. The last one I mended looked a bit scruffy so this time I did two patches. The first with a piece of old t-shirt to stabilise the hole (what I did last time), and the second to cover that up (linen patch). It looks much better with the second patch on as well.
IMG_20230221_115708.jpg
The hole to be mended
IMG_20230221_120902.jpg
Inner patch
Inner patch
IMG_20230221_122309.jpg
First patch done
First patch done
IMG_20230221_123240.jpg
Outer patch in progress
IMG_20230221_123525.jpg
All finished
All finished
Staff note (gir bot) :

Someone approved this submission.
Note: nice neat job!

 
gardener
Posts: 1491
569
12
homeschooling hugelkultur trees medical herbs sheep horse homestead
  • Mark post as helpful
  • send pies
    Number of slices to send:
    Optional 'thank-you' note:
  • Quote
  • Report post to moderator
Approved submission
This is an old lace shirt that my grandma had.  


My materials: cotton thread, needle and scissors.


Half way done


All fixed

Staff note (gir bot) :

David Huang approved this submission.
Note: I hearby certify this complete.

 
pioneer
Posts: 78
Location: Königs Wusterhausen, Germany
27
bike solar homestead
  • Mark post as helpful
  • send pies
    Number of slices to send:
    Optional 'thank-you' note:
  • Quote
  • Report post to moderator
Submission flagged incomplete
Had this whole in the sleeve of one of my favorite pullovers. First time hand sewing.
20230419_171548.jpg
Hole (left side)
Hole (left side)
20230419_171608.jpg
Tools
Tools
20230419_172307.jpg
In progress
In progress
20230419_173433.jpg
Finished
Finished
20230419_173647.jpg
From the right side
From the right side
Staff note (gir bot) :

Someone flagged this submission as not complete.
BBV price: 1
Note: repair to a hole in the fabric of a shirt - not a seam

 
Today you are you, that is truer than true. There is no one alive who is youer than you! - Seuss. Tiny ad:
GAMCOD 2025: 200 square feet; Zero degrees F or colder; calories cheap and easy
https://permies.com/wiki/270034/GAMCOD-square-feet-degrees-colder
reply
    Bookmark Topic Watch Topic
  • New Topic