• Post Reply Bookmark Topic Watch Topic
  • New Topic
permaculture forums growies critters building homesteading energy monies kitchen purity ungarbage community wilderness fiber arts art permaculture artisans regional education skip experiences global resources cider press projects digital market permies.com pie forums private forums all forums
this forum made possible by our volunteer staff, including ...
master stewards:
  • Nancy Reading
  • Carla Burke
  • r ranson
  • John F Dean
  • paul wheaton
  • Pearl Sutton
stewards:
  • Jay Angler
  • Liv Smith
  • Leigh Tate
master gardeners:
  • Christopher Weeks
  • Timothy Norton
gardeners:
  • thomas rubino
  • Jeremy VanGelder
  • Maieshe Ljin
  • Likes 3
  • Mark post as helpful
  • send pies
    Number of slices to send:
    Optional 'thank-you' note:
  • Quote
  • Report post to moderator
This is a badge bit (BB) that is part of the PEP curriculum.  Completing this BB is part of getting the sand badge in Dimensional Lumber Woodworking.

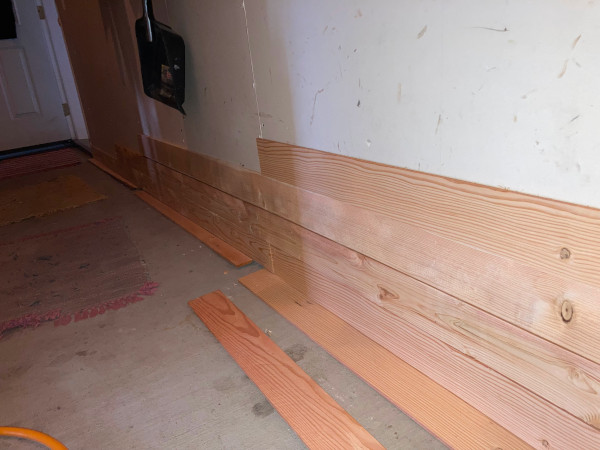
Walls work better when you can't see through them.  Unless it's a window in which case it's ok.  But generally you want your walls to be solid.  Let's put some wood on a wall!

Here's a board and batten style where as the wood shrinks it still provides coverage (lower part of photo).


Here's a simpler arrangement where rain/snow/bug/sunlight intrusion isn't as critical (upper part of photo).


To complete this BB, the minimum requirements are:
- cover at least 40 square feet of wall with wood
- ends of boards are attached to studs for stability
- no treated wood (or woods with glues)
- no paint, stain or oil

Provide:
  - pictures or video (no longer than 2 minutes)
       o the wood you're starting with
       o the construction partially underway
       o the finished wall
  - description of why you installed the boards the way you did
COMMENTS:
 
gardener
Posts: 3073
Location: Central Texas zone 8a
818
2
cattle chicken bee sheep
  • Likes 1
  • Mark post as helpful
  • send pies
    Number of slices to send:
    Optional 'thank-you' note:
  • Quote
  • Report post to moderator
Approved submission
I just finished the siding on my entry closet and hot water heater.

Why i did it- the open door of closet hit my entry door. The 2 doors went away to an.open area that may or may not get a sliding door later. Also got extra height by removing the wall. The 12" shelving will be replaced with 18" shelves.  This will help to not double stack home canned goods.

Why the way i did i- i used shiplap, installed backwards because i wanted a flat surface without gaps showing the painted wall behind it if it shrinks.

I missed the starting lumber pic but took pics of some scraps. Walls are 2ft x 8ft, 3ft x 8ft, and 4 walls 18" x 8ft

20191026_130702-756x1008.jpg
[Thumbnail for 20191026_130702-756x1008.jpg]
PhotoPictureResizer_191028_151030311_crop_1602x3562.jpg
[Thumbnail for PhotoPictureResizer_191028_151030311_crop_1602x3562.jpg]
20191028_150110-756x1008.jpg
[Thumbnail for 20191028_150110-756x1008.jpg]
20191028_150915-756x1008.jpg
[Thumbnail for 20191028_150915-756x1008.jpg]
Staff note (Mike Haasl) :

I certify this BB complete!

 
pollinator
Posts: 3757
Location: 4b
1358
dog forest garden trees bee building
  • Mark post as helpful
  • send pies
    Number of slices to send:
    Optional 'thank-you' note:
  • Quote
  • Report post to moderator

wayne fajkus wrote:I just finished the siding on my entry closet and hot water heater.

Why i did it- the open door of closet hit my entry door. The 2 doors went away to an.open area that may or may not get a sliding door later. Also got extra height by removing the wall. The 12" shelving will be replaced with 18" shelves.  This will help to not double stack home canned goods.

Why the way i did i- i used shiplap, installed backwards because i wanted a flat surface without gaps showing the painted wall behind it if it shrinks.

I missed the starting lumber pic but took pics of some scraps. Walls are 2ft x 8ft, 3ft x 8ft, and 4 walls 18" x 8ft


That's quite an improvement.  It looks great.
 
steward
Posts: 10760
Location: South Central Kansas
2989
9
kids purity fungi foraging trees tiny house medical herbs building woodworking wood heat homestead
  • Likes 4
  • Mark post as helpful
  • send pies
    Number of slices to send:
    Optional 'thank-you' note:
  • Quote
  • Report post to moderator
Approved submission
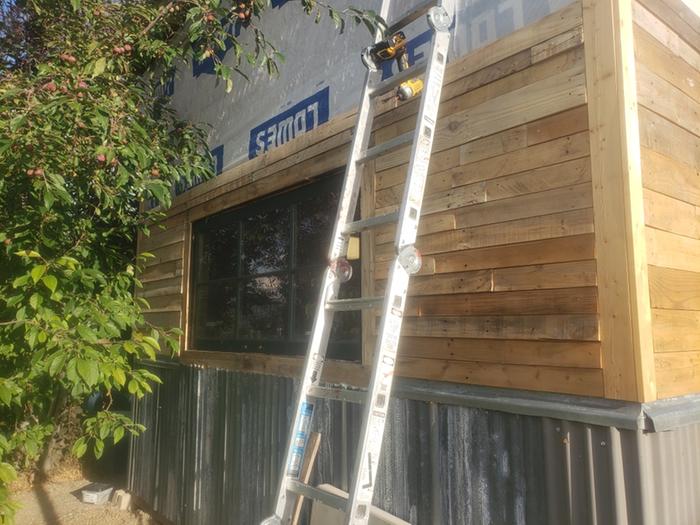
Part of making a micro home work for a family of four. This used to be a 280 sq ft detached garage. My dad turned it into a one room cabin years ago. Now there are four of us living in it for the time being, granted we are doing most of our cooking at the main house 100 yards away.

So, why I did this - I am enclosing what was formerly the 6x14 front porch, essentially a cement slab to add to our living space and get some of our boots and jackets out of the primary area. The South and West walls are of reclaimed polymer panels, like those used in many greenhouses and pergola roof designs. It will have some solar benefit in the winter. The North wall, behind what will be our rocket mass heater and oven, I wanted to give a different look, and I obviously didn’t need the solar utility. And I’ve had my eye on a small stack of early 1900’s toungue-in-groove siding that I can only imagine was the original siding for the original farmhouse. I will probably insulate with last year’s sheeps wool seconds, and clad the exterior with tin or whatever exterior panel I have available at the time. Up for suggestions. There are 2-foot eves on the roof, so it ought to be well protected from the elements.

I hung it groove-down, thinking it would help shed any incidental moisture, inside and out.
Starting-wood..jpeg
Starting wood.
Starting wood.
Halfway-done..jpeg
Halfway done.
Halfway done.
Finished-wall..jpeg
Finished wall.
Finished wall.
Staff note (Dave Burton) :

I hereby certify this BB as complete!

 
pollinator
Posts: 232
Location: Missoula, Montana, United States
452
fungi trees woodworking
  • Likes 1
  • Mark post as helpful
  • send pies
    Number of slices to send:
    Optional 'thank-you' note:
  • Quote
  • Report post to moderator
Submission flagged incomplete
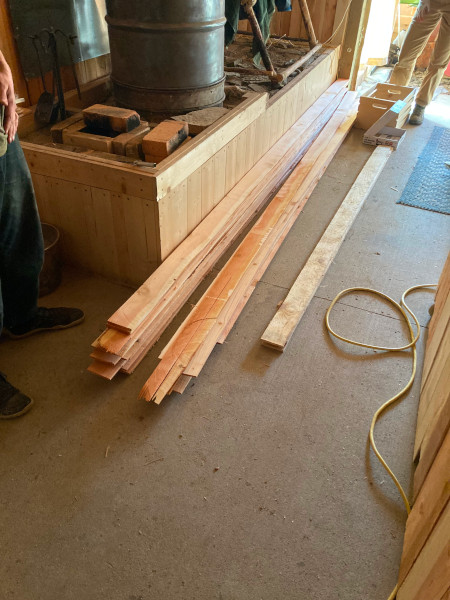
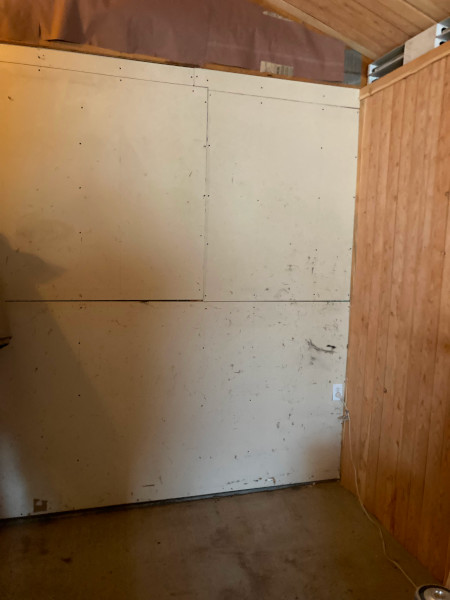
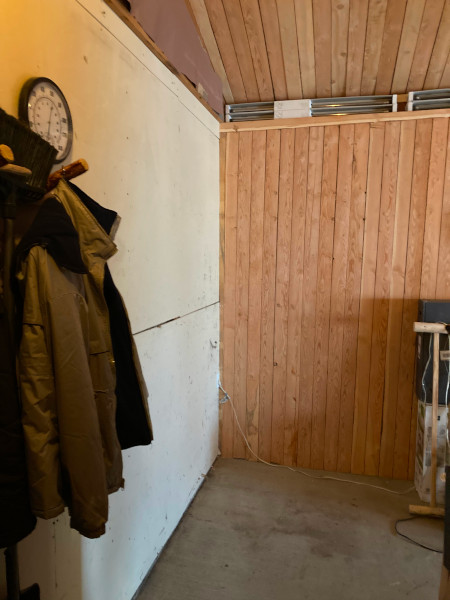
I paneled the inside of the rocket sauna. This is probably an edge case. I didn't get a picture of all of  the wood beforehand and I did work with one or two guys during the build. But the space is clearly larger than 40 ft^2 and many of the boards needed an extra hand to put in.

I think each of us did enough paneling on our own to qualify each of us on our own.

We set the boards at a 45 degree angle to give the structure better resistance from any twisting forces.
GreysonTractor.jpg
Here is some of the tongue and groove boards.
SaunaWalls.jpg
Here is the inside at the start.
PanelingComingAlong.jpg
[Thumbnail for PanelingComingAlong.jpg]
InsidePaneling.jpg
[Thumbnail for InsidePaneling.jpg]
Vestibule.jpg
[Thumbnail for Vestibule.jpg]
Staff note (gir bot) :

Someone flagged this submission as not complete.
BBV price: 1
Note: If all three workers "maybe" would qualify for three BBs, it sounds like we don't have enough proof to determine you did enough yourself.  Sorry

 
Kyle Noe
pollinator
Posts: 232
Location: Missoula, Montana, United States
452
fungi trees woodworking
  • Likes 1
  • Mark post as helpful
  • send pies
    Number of slices to send:
    Optional 'thank-you' note:
  • Quote
  • Report post to moderator
Is there evidence you would except as proof?

I have a few pictures of us starting and finishing the build. I measured the total square footage of the paneling we did, it came to around 500 sq/ft.

I didn't mean to say "maybe" each of us did enough for a BB. I am sure each of us exceeded 40 sq/ft.

I just didn't want to claim the whole job as my own work.
 
steward
Posts: 15505
Location: Northern WI (zone 4)
4846
7
hunting trees books food preservation solar woodworking
  • Likes 1
  • Mark post as helpful
  • send pies
    Number of slices to send:
    Optional 'thank-you' note:
  • Quote
  • Report post to moderator
Hey Kyle, knowing it's 500 sq/ft will help the certifiers a lot.  Maybe also saying which walls you worked on and what % of the wall you did would make them happy.  For instance, wall B is 100 sq ft and you did half of it.  Or something like that.  Thanks!
 
Posts: 20
14
3
  • Likes 2
  • Mark post as helpful
  • send pies
    Number of slices to send:
    Optional 'thank-you' note:
  • Quote
  • Report post to moderator
Approved submission
Added ~200 sq ft of 3/4" x 6" x 6' locally milled cedar fence boards to the inside of the unfinished workshop using finish nails. Installed horizontally to attach to wall studs. Cuts made for doors, lights, plugs, vents.

Some of the wood used stacked up against the wall (from an after pic):


Before


During (safety first)


After


Staff note (gir bot) :

Someone flagged this submission as an edge case BB.
BBV price: 0
Note: Nice job!  Looks like you're just missing one pic - The wood you're starting with

Staff note (gir bot) :

Paul Fookes approved this submission.
Note: I certify this BB complete.  It is important to read the BBs before you start. Otherwise well done

 
steward
Posts: 1897
Location: Coastal Salish Sea area, British Columbia
1057
2
books chicken food preservation pig bike solar wood heat rocket stoves homestead ungarbage
  • Likes 2
  • Mark post as helpful
  • send pies
    Number of slices to send:
    Optional 'thank-you' note:
  • Quote
  • Report post to moderator
Approved submission
Not really sure what to say about why i installed them this way. They are easy to put on when they are horizontal as the bottom board support them.
The wood we used was Grand Fir we cut and processed the whole way, planing, routering. Finish work is so time consuming.
IMG_0288-2.JPG
showing before the wood went up
IMG_0289.JPG
wood we started with
IMG_1097-2.JPG
partially installed
partially installed
IMG_1099-2.JPG
All of the paneling up on the wall
IMG_1100-2.JPG
Another angle.
Another angle.
Staff note (gir bot) :

Mike Haasl approved this submission.

 
pollinator
Posts: 258
Location: Pacific Northwest
111
8
forest garden fungi wofati cooking solar homestead
  • Mark post as helpful
  • send pies
    Number of slices to send:
    Optional 'thank-you' note:
  • Quote
  • Report post to moderator
Approved submission
I made a little shed to house my washing machine.  I did the sides and roof in cedar boards.  I installed them overlapping to better shed water.  behold!
20220520_114849.jpg
frame
frame
20220520_135631.jpg
one side done
one side done
20220520_144122.jpg
all done
all done
20220520_144404.jpg
each side is 3 feet wide
20220520_144433.jpg
and 7 feet tall
and 7 feet tall
Staff note (gir bot) :

Someone flagged this submission as not complete.
BBV price: 1
Note: The instructions say to include a description of why you installed the boards the way you did. Please add that.

Staff note (gir bot) :

Someone approved this submission.

 
pollinator
Posts: 273
Location: Gaspesie, Quebec, Canada, zone3a at the bottom of a valley
170
3
forest garden rabbit books chicken composting toilet food preservation bike building wood heat homestead composting
  • Mark post as helpful
  • send pies
    Number of slices to send:
    Optional 'thank-you' note:
  • Quote
  • Report post to moderator
Approved submission
In winter, snow enter in my firewood shed sometimes, this will help to block it and further conserv the shed for the future. Did it with spruce wood board from a neigboors forest. The shed measure 8 feet high and 10 feet wide, so 80 square feet!
20220806_093345.jpg
Board load haul by bike
20220806_093348.jpg
Starting the project
20220806_100730.jpg
Mi-project
Mi-project
20220806_111644.jpg
Finished!
Finished!
20220806_120558.jpg
[Thumbnail for 20220806_120558.jpg]
20220806_120434.jpg
[Thumbnail for 20220806_120434.jpg]
Staff note (gir bot) :

Mike Haasl approved this submission.

 
Apprentice Rocket Scientist
Posts: 853
Location: 4a, high mountain dessert
410
3
kids foraging rabbit fiber arts medical herbs bee
  • Mark post as helpful
  • send pies
    Number of slices to send:
    Optional 'thank-you' note:
  • Quote
  • Report post to moderator
Approved submission
I've only got siding left on my she shed! It's taken me over a year to finish, since I've learned to do everything myself.  For the siding, I'm using pallet planks because if I used new wood planks for the siding, I would literally double the cost of the entire building! So I began with pallets, pulled them or cut them apart with hammers, crowbars, and a saws-all for the stubborn nails. The wood-working people in my life all felt like I need the boards to over-lap somehow to help the walls repel water. So I used a table saw to cut the opposite corners off of each plank. In this way, they fit inside each other about 1 cm. top and bottom. It feels like its taking half my life! But when I'm finished, the she-shed will be as long-lasting as I can make it... from 2nd-hand wood (and with the limited skills I have now)

The north wall is 14 feet wide by 10 feet tall, not including the metal wainscoat. It's about 115 square feet of siding, WAY more than the required 40. I also had to finish the wall, as per BB guidelines, before turning it in. :)
20220709_105750.jpg
The grooves cut, on opposite corners, so the planks inter-fit
Resized_20220813_185506.jpeg
as far as I made it up one wall while still pregnant. People didn't want me on a ladder. weird.
20220903_190919.jpg
north wall done ta da!
Staff note (gir bot) :

Mike Haasl approved this submission.

 
gardener
Posts: 1569
Location: Washington State
985
6
forest garden trees rabbit earthworks composting toilet fiber arts sheep wood heat woodworking rocket stoves homestead
  • Likes 1
  • Mark post as helpful
  • send pies
    Number of slices to send:
    Optional 'thank-you' note:
  • Quote
  • Report post to moderator
Approved submission
Here is my submission for the Dimensional Lumber - Swanson List - Sand - Animal Care BB.

I'm at Wheaton Labs for BB20 2023.  Every time I visit, there are various improvements to The Solarium and the current project is siding.  The Boots left the North Wall (previously covered by drywall) for the BB20 attendees to cover with homegrown and cut lumber.  I used the exposed screws and marks on the drywall to identify the location of the studs.

Since there are four of us, I decided to cover just over the required amount instead of the whole wall.  

To complete this BB, I provide the following information to verify that I've met the minimum requirements:
- cover at least 40 square feet of wall with wood: 2'-6" x 16'-4" = 40.8 sq ft
- ends of boards are attached to studs for stability - see photos
- no treated wood (or woods with glues)
- no paint, stain, or oil
- description of why you installed the boards the way you did: I installed these boards horizontally because the studs are vertical.  This allows the siding to be attached to the wall every two feet.

To document the completion of the BB, I have provided the following pictures:
       o the wood you're starting with
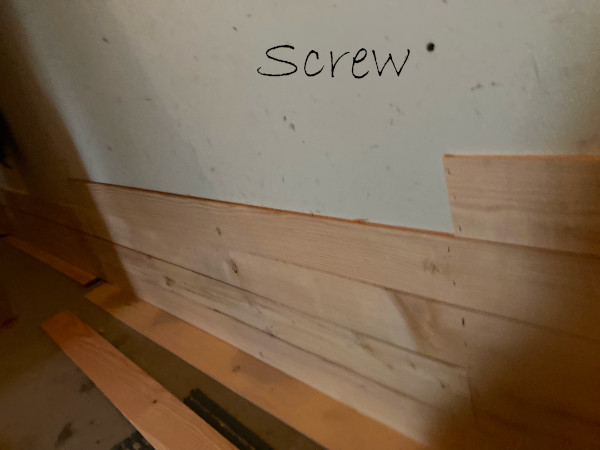
       o the construction partially underway (one photo shows screws to verify that boards are attached properly)
       o the finished wall (including measurements)
1-wood.jpg
the wood I started with
2-part-of-wall-before.jpg
drywalled north wall of Solarium
2-part-of-wall.jpg
a second angle of north wall
3-part-way-2.jpg
partially completed project
4-studs.jpg
partially completed showing location of screws (studs)
5-finished.JPG
finished project
finished project
6-heigt.JPG
height 30.5"
height 30.5"
6-width.JPG
width 16'-4"
width 16'-4"
Staff note (gir bot) :

Raphaël Blais approved this submission.

 
Posts: 36
Location: Florida Panhandle
12
fungi tiny house homestead
  • Likes 1
  • Mark post as helpful
  • send pies
    Number of slices to send:
    Optional 'thank-you' note:
  • Quote
  • Report post to moderator
Approved submission
The boots left the north wall open for the BB20 event. I did the middle part of the wall.
I followed the pattern that Opalyn created and that's why it's like that!

To complete this BB, the minimum requirements are:
- cover at least 40 square feet of wall with wood
- ends of boards are attached to studs for stability
- no treated wood (or woods with glues)
- no paint, stain or oil

Provide:
 - pictures or video (no longer than 2 minutes)
      o the wood you're starting with
      o the construction partially underway
      o the finished wall
 - description of why you installed the boards the way you did
PXL_20230424_201246023.jpg
[Thumbnail for PXL_20230424_201246023.jpg]
PXL_20230424_201259477.jpg
[Thumbnail for PXL_20230424_201259477.jpg]
PXL_20230424_201331159.jpg
[Thumbnail for PXL_20230424_201331159.jpg]
PXL_20230424_201612844.jpg
[Thumbnail for PXL_20230424_201612844.jpg]
PXL_20230424_201804083.jpg
[Thumbnail for PXL_20230424_201804083.jpg]
PXL_20230424_204042091.jpg
[Thumbnail for PXL_20230424_204042091.jpg]
PXL_20230424_204925381.jpg
[Thumbnail for PXL_20230424_204925381.jpg]
PXL_20230424_204935911.jpg
[Thumbnail for PXL_20230424_204935911.jpg]
PXL_20230424_213950011.jpg
[Thumbnail for PXL_20230424_213950011.jpg]
PXL_20230424_213953442.jpg
[Thumbnail for PXL_20230424_213953442.jpg]
PXL_20230424_224834356.jpg
[Thumbnail for PXL_20230424_224834356.jpg]
PXL_20230424_224838294.jpg
[Thumbnail for PXL_20230424_224838294.jpg]
PXL_20230424_231238180.jpg
[Thumbnail for PXL_20230424_231238180.jpg]
PXL_20230424_231257408.jpg
[Thumbnail for PXL_20230424_231257408.jpg]
PXL_20230424_231304892.jpg
[Thumbnail for PXL_20230424_231304892.jpg]
Staff note (gir bot) :

Mike Haasl approved this submission.

 
Posts: 56
Location: Florida Panhandle
30
4
  • Likes 1
  • Mark post as helpful
  • send pies
    Number of slices to send:
    Optional 'thank-you' note:
  • Quote
  • Report post to moderator
Approved submission
Installed about 45 sqft of paneling in the solarium at Wheaton Labs today. What I did on the big part of the wall was 30sf and beside the door was 15sf.  

They milled this beautiful pine on site.

I installed it this way because I was continuing the work of others, and working with the material that I had which was definitely getting scarce towards the end.  
95E61496-4E62-4DEA-A554-3BE41D732D1B.jpeg
Wood that I’m using milled on site at Wheaton Labs
CA078EEB-FE35-42A5-9DCA-6A84641A8825.jpeg
Progress picture showing nailing into studs
06150434-611D-476F-95FD-A8D6852D0216.jpeg
Progress picture of after I topped the door
F251E462-ECBB-48F4-8D60-AB9884D12CFF.jpeg
Completed-blue tape shows where I started
B8CA1520-5552-404A-A83D-F0CD564B4859.jpeg
Completed-showing area beside door
Staff note (gir bot) :

Someone approved this submission.

 
gardener
Posts: 325
Location: NW Washington - Zone 8b (15 to 20 °F / -9.4 to -6.7 °C)
270
2
cattle goat foraging trees earthworks cooking building solar sheep wood heat
  • Likes 1
  • Mark post as helpful
  • send pies
    Number of slices to send:
    Optional 'thank-you' note:
  • Quote
  • Report post to moderator
Approved submission
This morning I installed 3/8" x 4" pine lap siding previously cut on the sawmill to the back exterior wall of the sauna at Wheaton Labs to cover the slip straw insulation and provide exterior siding.  It got up to 105 F today so I was thankful to get this done in the AM.  I had time to do more than 40 sq ft but ran out of boards and had to use the available time to saw more boards for next time.
20230815_085839.jpg
The materials, 3/8x4 pine.
20230815_085846.jpg
The wall before I started.
20230815_085900.jpg
The tools.
The tools.
20230815_090503.jpg
Partially underway action shot.
20230815_101449.jpg
40 sq ft completed.
40 sq ft completed.
20230815_101354.jpg
Amount I added measured vertically.
20230815_101434.jpg
Width of wall.
Width of wall.
Staff note (gir bot) :

Someone approved this submission.

 
pollinator
Posts: 298
Location: Boise, ID
155
5
hugelkultur trees chicken wofati food preservation cooking building medical herbs rocket stoves homestead
  • Likes 1
  • Mark post as helpful
  • send pies
    Number of slices to send:
    Optional 'thank-you' note:
  • Quote
  • Report post to moderator
Approved submission
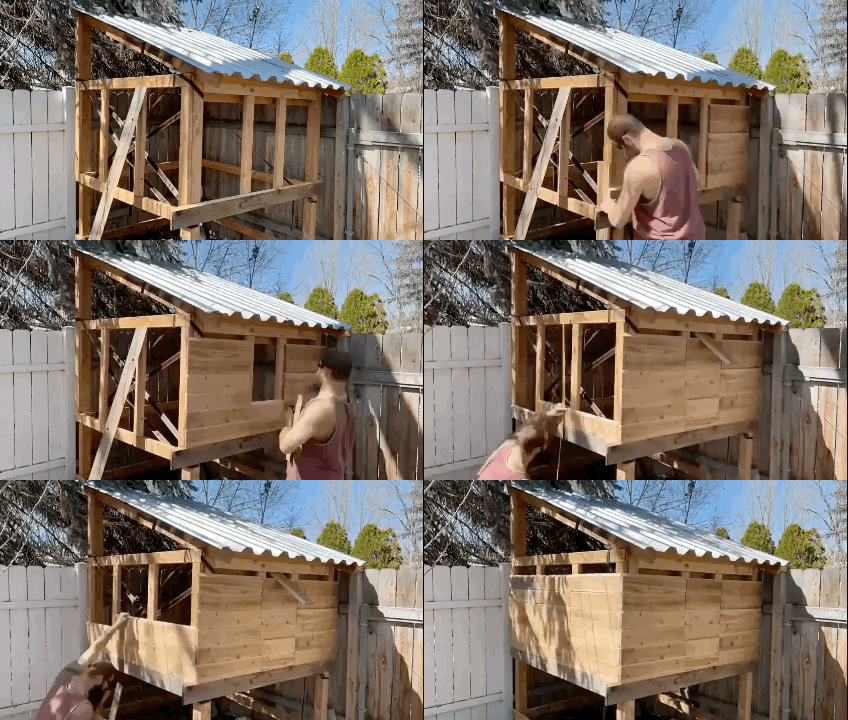
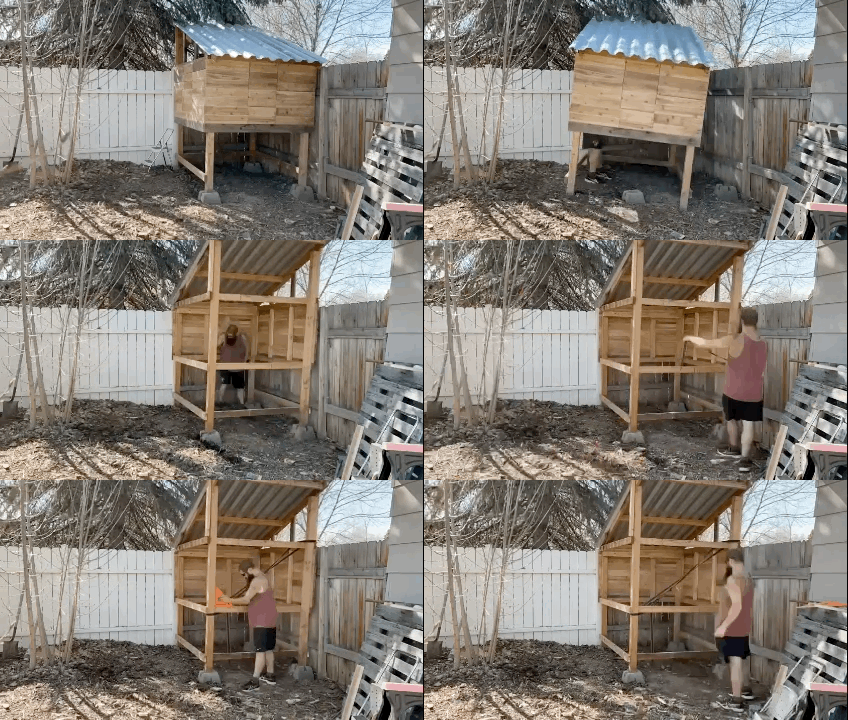
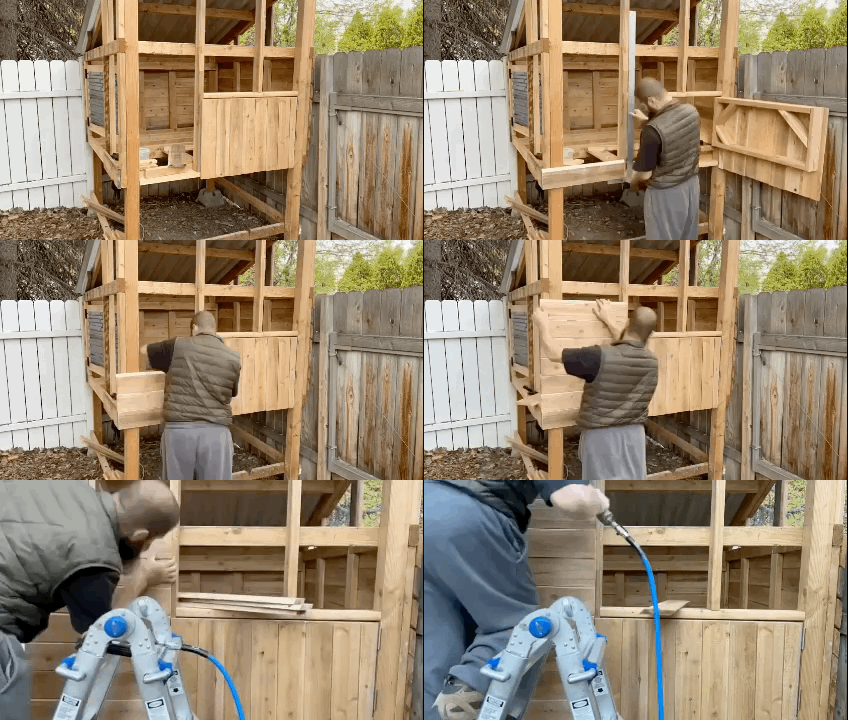
After moving the skeleton of my old coop, https://permies.com/wiki/147045/pep-homesteading/Move-Outbuilding-Site-Simple-Move#2352355 , I needed to redesign and add siding to make it ready for chickens again!

I tried to make shiplap, but my fence boards were neither the same thickness, nor straight, nor true. The cups, bows, and twists refused to play nicely with my table saw. Yet I refused to be stymied.  

Instead, I took an easier path and cut 45° angles off the edge of the boards, making a poor man’s version.

I then installed them with a little (sometimes a not-so-little) gap between to allow for expansion, slight airflow, and to correct for milling errors.

Thankfully this is for chooks who couldn’t care less about aesthetics as long as it’s functional. I fall into a similar camp, though I do find rough cedar attractive.

The front wall alone is >25 square feet. Rounding down to the the nearest foot (and ignoring the triangle sections) the dimensions are:

Front wall 5’x5’ =25
Back wall: 3’tall x 5’wide =15
Full side: 3’tall x 6’wide =18
Door side: 5’tall x 2’wide =10

For a total of more than 68 square feet.

Thank you, reviewers, for all your hard work!! Let me know if you need more measuring tape pictures :)
CB86BBA9-142B-4722-A412-48A28DE6DBC2.gif
Siding the back walls
0101F14C-D00B-43E2-9989-6EBED26D2154.gif
Rotating to continue
35BACDBD-F5B3-4EAE-A048-4AF6FB93093C.gif
Nest box door and front wall
IMG_8810.jpeg
Last board!
Last board!
IMG_8817.jpeg
Inside
Inside
IMG_8818.jpeg
Door side
Door side
IMG_8823.jpeg
All siding on!
All siding on!
IMG_8945.jpeg
Front width
Front width
IMG_8946.jpeg
Front height
Front height
Staff note (gir bot) :

Rebekah Harmon approved this submission.
Note: looks awesome to me, Clay!

 
Yes, my master! Here is the tiny ad you asked for:
permaculture and gardener gifts (stocking stuffers?)
https://permies.com/wiki/permaculture-gifts-stocking-stuffers
reply
    Bookmark Topic Watch Topic
  • New Topic